
How to Put Stucco on a Metal Building

Stucco can be used internally or externally on any surface. It can be molded into patterns to add texture or painted to add color. Some surfaces such as brick or concrete do not require much preparation before the stucco is applied.

Other surfaces like wood and metal require the addition of steel mesh or another substance that will allow the stucco to adhere more effectively. Stucco panels can also be purchased from a variety of sources that can be attached directly to a metal building.
Things You Will Need
- 15-pound roofing felt
- 17-gauge metal netting
- Roofing nails
- Tin snips
- Brush
- Ready-mix stucco
- Plasterer’s rake
- Plastering trowel
- Finishing trowel
- Plasterer’s Hawk
-
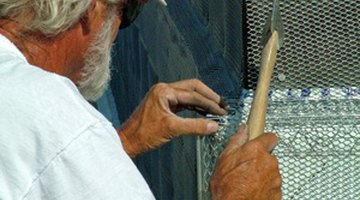
Clean the metal surface of any debris and dirt. Nail on a layer of roofing felt; then nail on a layer of 17-gauge metal netting, using the roofing nails. Cut the netting to size with tin snips.
-
Follow the directions on the ready-mix stucco to prepare the material for application. Use a trowel to apply the first layer of stucco to a depth of approximately ½ inch. Press the stucco through the wire mesh as it is applied. Mist the layer with water and allow the stucco to cure for several hours.
-
Drag a plaster rake across the stucco to create grooves 1/8-inch deep over the entire surface. Mist the surface with water again. Allow the stucco to cure for at least 24 hours, while keeping the surface moist by occasional misting. Slow curing allows for the greatest strength.
-
Apply the finish coat of stucco with a finishing trowel. Choose a pattern before beginning, as any mistakes are difficult to correct once the stucco has begun to cure. The finish layer should be approximately ¼-inch thick. Allow the stucco to cure for several days, periodically misting with water to keep it moist.
Tip
Finish by caulking around any windows and doors. Pigment can be added directly to the stucco when it is mixed, before applying it to the building.
Warning
Do not paint the stucco for at least six weeks. Use only a paint designed specifically for concrete or stucco.
The Drip Cap
- Stucco can be used internally or externally on any surface.
- Some surfaces such as brick or concrete do not require much preparation before the stucco is applied.
- Follow the directions on the ready-mix stucco to prepare the material for application.
- Mist the layer with water and allow the stucco to cure for several hours.
- Apply the finish coat of stucco with a finishing trowel.
Resources
Writer Bio
Based in Minneapolis, Dawn Marcotte has been writing for more than 10 years. Her recent writing has turned to nonfiction and includes articles on home and garden, education, crafts and automotive subjects. She currently has several eBooks published and available online. Marcotte has a Bachelor of Science in elementary education from the University of Iowa.
Photo Credits
- white stucco building in barbados image by Scott Slattery from Fotolia.com
- white stucco building in barbados image by Scott Slattery from Fotolia.com
- construction worker image by Greg Pickens from Fotolia.com
More Articles