Pavers, available in a wide range of sizes and shapes, are a relatively inexpensive way to build a path through the garden, from the street to the house, or out to the pool or garden shed. A curved walkway with square pavers is almost as easy as a straight-as-an-arrow path; it just takes a little extra planning. Whether you're recycling old paving stones or ordering a pallet of new pavers, take time to measure and map out the path and decide on the paver pattern to ensure a successful project.
Pavers and Patterns
Video of the Day
Pavers manufactured for outdoor use are often concrete, clay brick, or natural stone and range from rectangles of 4 x 8 inches to 24 x 36 inches and from 4 to 36 inches square with a height anywhere between 1 3/4 to 4 inches. A standard brick paver size is generally 4 x 8 x 2 1/2 inches, though that varies by manufacturer. You can also select from a range of colors, from concrete gray to terra-cotta to custom colors.
Video of the Day
In addition to the selection of sizes and colors, you can lay the pavers in patterns to add to their decorative appeal in the garden. The easiest pattern is the running bond; lay the pavers in rows with staggered joints. A herringbone path, with bricks set at an angle and fitted together to make a zig-zag pattern, is a dynamic visual pattern, and when set between bands of square or rectangular pavers, it can accommodate gentle curves. Sharper curves may require wedge-shaped pavers or cutting the pavers to fit the design.
Curved Path Construction
To lay out the path, measure first. Generally, a path should be a minimum of 18 inches and preferably 30 to 36 inches wide. Use stakes and string to mark straight edges. To make a curved path, use a garden hose to mark the curves.
Prepare the site by excavating and leveling the soil. Then, add layers of crushed gravel and then sand, tamping each layer. Add a flexible edging, staking it at least every 24 inches to ensure the pavers don't shift outward over time. Finally, lay the pavers.
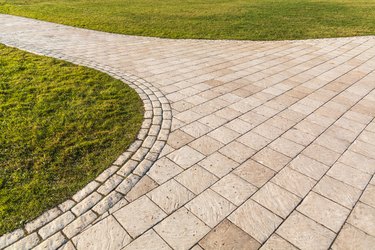
Curved Path With Square Pavers
Once the underlayment is ready, simply set each paver along the inside edge of the path at a slight angle following the curve. The pavers may be square or rectangular, but smaller pieces allow you to build a tighter curve without wide-angled gaps along the edges of the path. This allows you to build a curved paver walkway without cutting the stones. Align the next row along the first row, offsetting the joints.
Continue laying pavers end to end in rows along the walkway to make a running bond pattern. Alternatively, set the pavers in a herringbone pattern or another pattern. Measure and then add the flexible edging on the far side before installing the last one or two rows of pavers. Brush sand over and between the pavers to fill in the crevices.
Curved Paving Stones for Paths
While a sweeping walkway allows the use of square or small rectangular pavers, a tight radius may require wedge-shaped pavers, preformed and scored curved concrete pavers, or actually cutting the pavers to fit the flow of the path. Whether you cut the pavers with a hammer and chisel, paving stone splitter, or tile saw, be sure to put on safety gear, including earplugs, safety goggles, a dust mask, and gloves. Mark the cut line on the paver, wet it down, and trim to fit.