Things You'll Need
trim, jamb, stool & apron wood
1-5/8" drywall screws
paint or finisher
painting tools
razor knife
wood filler
putty knife
white, water soluble, non-shrinking, pintable caulk
power drill with clutch
expanding foam
steel tape measure
miter saw
hand saw
water level
shims
table saw
wood glue
2" finish nails
nail set
sandpaper
If you are installing completely new windows it is an excellent time to look into insulating the jambs and upgrading your wood casings and trim. It will save money, be more energy efficient and add value to your home.
Step 1
Rough measure windows for material - Measure the width and heights of R.O. (rough opening(s)) in order to calculate material needed. Your just trying to get an accuracey within inches, not fractions of an inch, in order to purchase the right amount of supplies.
Video of the Day
Step 2
Purchase materials - Shop for trim, jamb, stool and apron material. Purchase the wood, screws and any required paint or finisher.
Step 3
Acclimate the wood - bring indoors the frame and trim wood that will be used at least 2 or 3 days in advance to allow it to absorb or let off moisture consistent with your current indoor environment. The wood will actually slightly shrink or swell depending on how humid it is indoors but will then be "in sync" with the rest of the wood in the walls.
Step 4
Clean up the window opening - The first step will be to clean up the R.O. (rough opening, the 2x4 wood frame in the wall) in preparation for the new interior framing. Start with the old trim and returns (if present) removed down to the R.O. level. Trim back the excess drywall flush with the R.O. all the way around using a razor knife. Re-set or remove and replace any framing nails that have loosened, fill major wood gaps, and remove old paint build up and other residue with a putty knife.
Step 5
Seal drywall to the R.O. - this reduces air infiltration around the wall. Lay a bead of caulk all along the drywall / R.O. intersection and tool it into any existing gaps then attach the drywall to the R.O.. Use 1-5/8" drywall screws and a power drill with clutch set to "light" torque. Be careful not to over spin the screws but do bury the heads into the drywall, slightly. Space screws every 12" to 16". Firmly attaching the wall to the studs will cause some of the caulk to sandwich out from between the gap. This is the sign that there is an airtight seal forming. Clean off the excess caulk.
Step 6
Seal window to R.O. - this reduces air infiltration around the window frame. Apply caulk or expanding foam sealant around where the window frame meets the R.O. Fill gaps up to ¼" (maximum) using caulk and use expanding foam for gaps greater than ¼". Be careful with expanding foam.
Step 7
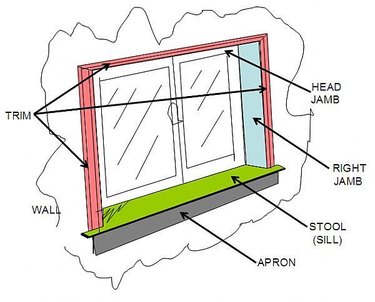
Measure stool width - the stool is also called the window sill and is the anchor for the new interior window frame and trim. Use a steel tape measure. The technique described here provides a 3/16" reveal (the visible portion between the trim and the jamb around the sides and top), about a 2" horn (the portion protruding to the left and right of the stool), and allows for 2" trim. Measure the distance between the inside of the R.O. at the bottom. Add 3/8" (0.375") for the reveal (2 X 3/16" on each side of the window), 4 ¾" (4.75") for casings (2 X 2 3/8" on either side of the window), and 1-½" for the horn (2 X ¾" on either side of the stool). Cut stool stock to length. Check cut accuracy of the stool.
Step 8
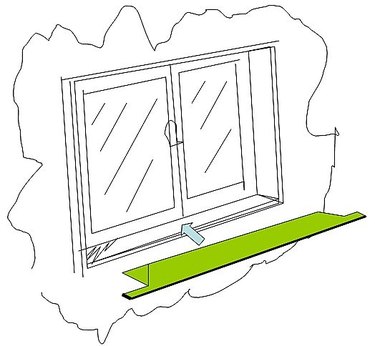
Notch the stool to slide into the R.O. - Hold the stool evenly against the bottom of the R.O. Ensure that the left and the right of the stool extends beyond the side of the R.O. the same distance. Mark either side at the drywall edge with a pencil. Measure the depth from the wall to the frame on either side as well. Mark this distance along with the earlier pencil mark to create a square to be cut out of the stool. Use a hand saw to remove the notched section allowing the stool to slide into the R.O. Loosely test fit stool using water level and shims but do not attach it to the wall yet. See above image.
Step 9
Measure and cut jambs - Measure width (depth) for new jambs first. This is the distance from the face of the drywall to the window frame, the depth of the hole. Measure the length of the top jamb, left to right. Subtract ¼" to allow 1/8" on either end. Cut the length of the header jamb with a miter saw and rip it to width using a table saw. Test fit the header for level and plumb then mark where the bottom of the header meets the R.O. on either side. Measure the length of the left jamb and the right jamb to within 1/16th inch. The length of the side jambs are the distance from the top of the stool to header jamb mark in the R.O. Cut the length of the side jamb with a miter saw and rip them to width using a table saw. Test fit jambs with shims and ensure a snug fit. Cut down as needed. See first image for clarifications.
Step 10
Attach stool - Shim stool to plumb and level, remove stool and attach shims using wood glue. Apply wood glue to bottom of R.O. and fit stool. Nail stool to sill through shims every 12" using finish nails. Add shims if needed.
Step 11
Attach jambs - Position and attach left and right side jamb. Shim as needed and tack in place using 2" finish nails. Position and attach top jamb using same technique as side jambs. When everything is in place and square then finish nailing.
Step 12
Seal and insulate new interior frame - Using caulk or expanding foam fill voids between new jambs and R.O. Seal under stool. Tool sealant to be flush with wall including under stool.
Step 13
Set nails - Using a nail set tap nails into wood just below surface. Fill the craters later when finishing trim.
Step 14
Measure, cut and install trim - Mark off 3/16th above right and left jambs. Measure top left corner to top right corner. This is the head trim. Using a miter saw cut off head trim at 45 degree angle. Tack head trim in place. Measure and install side trim.
Step 15
Measure cut and install apron - This is the piece that appears to be holding up the stool. The trick is to make the end caps. Again, a miter saw allows you to cut 45 degree wedges to fit the ends.
Step 16
Finish - Fill indentions, sand filler, prime jambs / stool / trim and paint.
Video of the Day