
Do it Yourself Exterior Stair Railing

Exterior stair railings can be as varied, if not more varied, as their interior counterparts. In residential settings, people use exterior stair railings on decks, porches, cellar entrances, pathways and stoops. Make your exterior railings from wood, metal, concrete, plastic or combine more than one of these elements.

Inside or out, safety is the number one concern in building a staircase railing.
Safety First

Build the exterior stair railing so that it is sturdy enough to support the weight of someone who is pushing down on the railing as she walks along. People using a staircase need to be able to hold onto the handrail to guide them along the steps. Build the railing so that it can support the weight of someone pulling down and out on it as he tries to regain his balance. People using the staircase need to be able to grasp the handrail in the event that they lose their footing while traveling on the steps. Follow all building and safety codes for your area to determine the specific heights and widths to use for the stairway components.
Wood Railings Are A Straightforward DIY Project
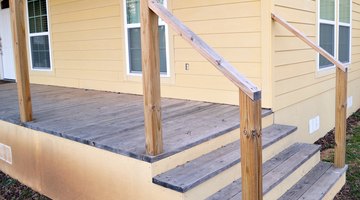
Do-it-yourself builders will experience the most success in building a handrail out of a wood product rather than metal or plastic. Measure the space for the railing from the top of the stairs to the bottom step or landing. Plan to build the railing so that a person’s hand can slide along the entire length of the railing from the top of the stairs to the bottom without interruption. You may interrupt the railing’s continuity if there is a newel post at a turn in the staircase. A newel post is the large post at the beginning, at a turn or at the end of a stair railing.
Purchase a 2 inch by 4 inch piece of treated lumber from a home improvement store or a lumberyard to use as the railing. Purchase the wood in the length you need, based on the stairway measurements. Make a mark on the newels 34 to 38 inches above the stair tread. Position the lumber railing against the inside of the stairway posts. Align the railing with the top rear corner of the top post, as well as with the marking that you made on the lower post. Hold the railing temporarily in place with deck screws.
Use a level to mark a straight line at the bottom end of the stairway rail, and remove the rail. Cut the railing to fit snug with any top or bottom posts on the staircase using a jigsaw or circular saw. Thoroughly seal the cut ends with a wood sealer rated for exterior use.
Position the stairway rail flush against the top edges of the posts. Drill 1/8-inch pilot holes, holes smaller than the width of the screw that help to prevent the screw from splitting the wood. Attach the rail to the posts with 2 1/2-inch deck screws that you drill through the pilot holes. Sand the wood. Paint or stain to protect the wood from the elements and to complement the exterior of the home.
References
- "Building Stairs;" Andy Engel; 2007
- Exterior Stairways: Guide to Outdoor Stair, Railing, Landing Construction & Inspection
Writer Bio
Lee Roberts has written professionally in different capacities throughout her career. She has written for not-for-profit and commercial entities since she received her Bachelor of Arts in sociology from the University of Michigan in 1986. She is currently writing an extensive work of fiction.
Photo Credits
- Melissa Kirk/Demand Media
- Melissa Kirk/Demand Media
- Melissa Kirk/Demand Media
- Melissa Kirk/Demand Media
More Articles