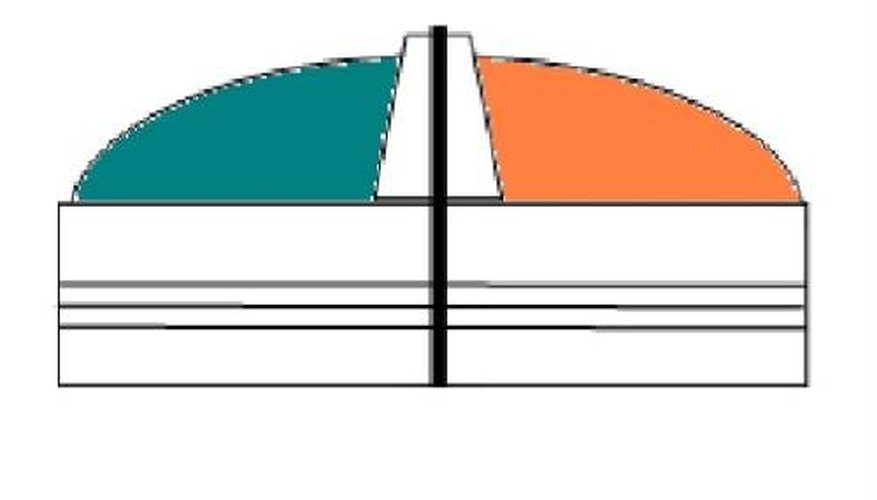


Boating at night means that, if a boat is less than 65.6 feet long and is not a rowboat, it must display navigation lights. On recreational boats, this means a combination (or bi-color) bow light with a red lens to port, a green lens to starboard and a white stern light. Although all manufactured boats come so equipped, the do-it-yourself sailor will have to wire these lights into his boat's electrical system in a manner that will pass muster should his boat be inspected. They should also be wired in a way that will alert the sailor should the bulbs burn out, so that they can be quickly replaced.
Items you will need
Combination bow light
Stern light
Toggle switch with an indicator bulb
Electrical wire
Wire ties
Waterproof wire connectors
Basic hand tools
Soldering gun and silver solder
Drill mounting and wiring holes for the bow light unit, using the template provided with the unit to mark the holes on the hull of the boat. Repeat the procedure for the stern light. Neither the bow nor stern lights can be obscured by any part of the boat, and they should be as far forward (for the bow light) and as a far aft (for the stern light) as practical.
Decide on the route the wiring for the lights should take. If necessary, fish the wire for both the bow and stern lights, and the wire from the stern light to the control panel, through walls, under decks or under the curve of gunwales to prevent tripping hazards resulting from the wires. As you fish the wires, mark each with with colored electrical tape, one color for the line from the battery to the bow line, one color for the wire from the bow light to the stern light and one for the stern light to the control panel.
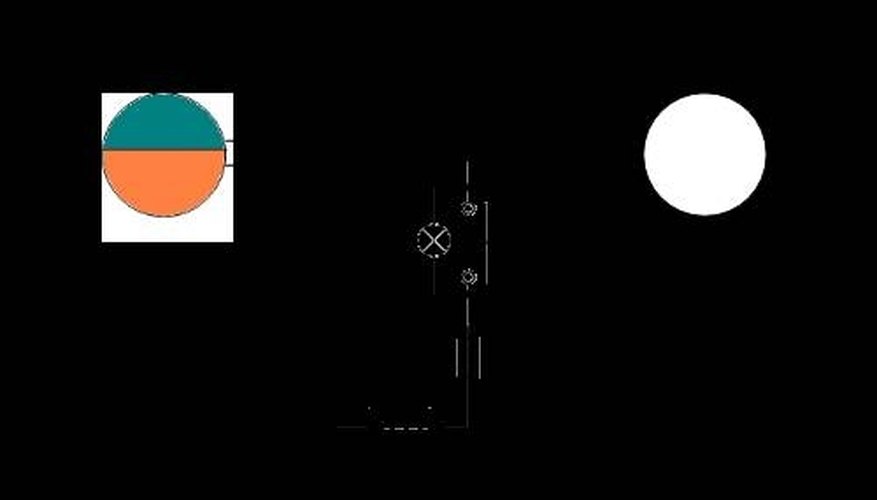
Schematic of wiring the bow and stern lights
Attach one end of the wire for the bow light to the positive terminal of the battery or a bus bar connected to the battery. Attach the other end of that same wire to the red wire of the bow light with a waterproof wire connector. Like the marine VHF radio, the navigation lights should be on an isolated circuit. Attach the black wire of the bow light to the wire leading to the stern light with a waterproof wire connector.
Attach the red wire from the stern light to the wire leading from the bow light with a waterproof wire connector and attach the black wire of the stern light to the wire leading to the control panel, also with a waterproof wiring connector. At the control panel, attach the wire from the stern light to one of the terminals on the toggle switch with a soldered connection. Connect the other terminal of the toggle switch to the fuse holder with a soldered connection. Finally, connect the unattached end of the fuse holder to the negative pole of the battery or the bus bar.
Test the lights. If either the bow or stern light is inoperative, the indicator light on the toggle switch will be dark. Even if the indicator light illuminates, check the navigation lights visually as well. The lights are wired in series so that should either light become inoperative, the indicator light on the control panel will warn the boater. Secure the bow and stern lights permanently in place and lock the toggle in place on the instrument panel.
Warnings
- As with any project involving electricity or the use of tools, caution is advised.
Tips
- If it becomes necessary to troubleshoot the lamps, first check for a dead or missing bulb, then loose wiring. A voltmeter is an invaluable tool for this task.
Tips
- If it becomes necessary to troubleshoot the lamps, first check for a dead or missing bulb, then loose wiring. A voltmeter is an invaluable tool for this task.
Warnings
- As with any project involving electricity or the use of tools, caution is advised.
Writer Bio
Will Charpentier is a writer who specializes in boating and maritime subjects. A retired ship captain, Charpentier holds a doctorate in applied ocean science and engineering. He is also a certified marine technician and the author of a popular text on writing local history.