
Microsoft Excel has a random number generator that makes it a breeze to create bingo cards in Excel. The Bingo card generator Excel is a very handy setup for bingo games. Create a single sheet of cards, print it, and then generate new numbers to print additional sheets.
Step 1
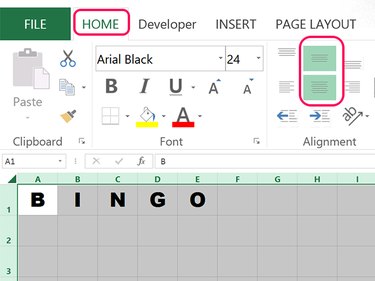
Open a blank Excel worksheet. Type B, I, N, G and O in the first row beginning with cell A1. Under the Home tab, select a thick font like Arial Black or Britannic Bold. Increase the Font Size to 24 pt to start. You can adjust the size later when you format the completed sheet. Click the Middle Align and Center icons in the Alignment section of the ribbon.
Video of the Day
Step 2
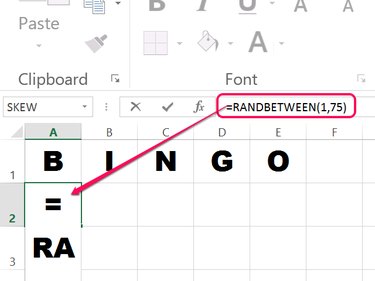
Click cell A2. Using Excel's RANDBETWEEN function, you can make Excel generate random numbers between any range you specify. The number range is placed in parenthesis after the function, with a comma separating them. Most Bingo cards use random numbers between 1 and 75.
Type =RANDBETWEEN(1,75) in cell A2 and press Enter. Note that every time you change the worksheet, the random numbers you generate change too -- this is normal.
Step 3
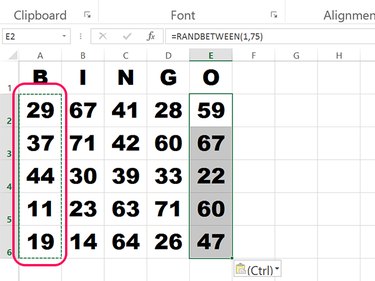
Select cell A2 and press Ctrl-C to copy it. Drag the cursor over cells A3 to A6 and press Ctrl-V to paste the function into those cells.
Highlight all the functions in cells A2 to A6 and press Ctrl-C. Click cells B2, C2, D2 and E2 and press Ctrl-V each time to paste the function into each column. You now have 25 random numbers.
Step 4
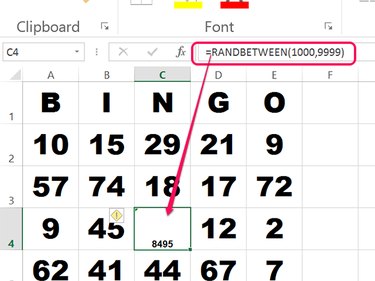
Click cell C4, which is the center number. This is the bingo card's free space, so a random bingo number isn't needed. However you can use this space to give the card a serial number to help you track the cards you distribute. Change the number range to (1000,9999). Click the Home menu, reduce the Font Size to 8 pt and click the Bottom Align icon in the ribbon's Alignment section.
Step 5
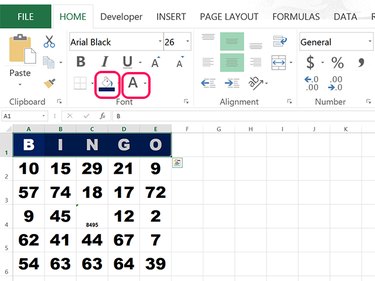
Highlight BINGO in the first row. Under the Home tab, select a dark Fill Color and then change the Font Color to White.
Step 6

Click the small Arrow beside the Borders icon in the Home ribbon while BINGO is still highlighted and select Thick Box Border. Highlight all the numbered cells, click the Borders Arrow again and then select More Borders. Select the thick line and then click the Outline and Inside icons in the Preset section of the Format Cells window.
Step 7
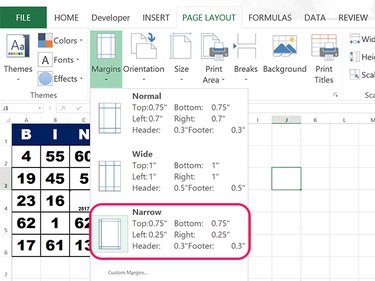
Click the Page Layout tab and select Margins. Click the Narrow margins option.
Step 8

Highlight all the cells in the card from cell A1 to E6 and press Ctrl-C. Click cells G1, A8 and G8, pressing Ctrl-V each time to paste three more cards onto the page. Note that there is a blank row and a blank column separating the cards for easy cutting.
Click the View tab and then select Page Layout so you can see how the cards will appear when you print them. Press Ctrl-A and then drag the line between any row numbers to adjust the row heights as needed. Drag the line between any two column letters to resize the columns to fill the page width. Adjust the Font Size if needed.
To reduce the spaces between the cards, click any cell to deselect all and then drag the line in the header for the spacer column and spacer row.
Step 9
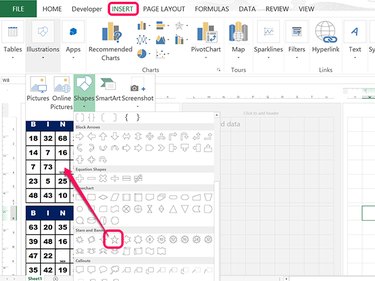
Insert a free space star by clicking the Insert tab, clicking Illustrations and then clicking Shapes. Click the Star in the Stars and Banners section and drag the cursor over cell C4.
Step 10
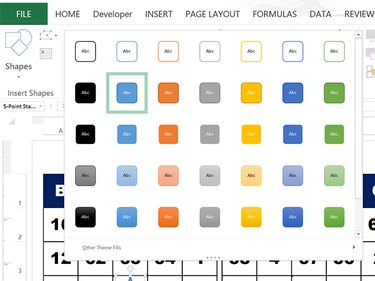
Click the Drawing Tools' Format tab and then click the Shape Styles menu to change the appearance of the star. Alternatively, use the Shape Fill and Shape Border icons in the ribbon to customize the star's appearance.
Copy the star by pressing Ctrl-C. Press Ctrl-V three times and drag the three copies to cells I4, A11 and I11.
Step 11
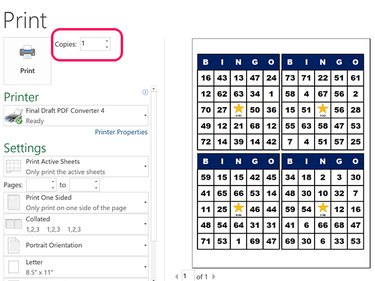
Click the File menu and select Print. Insert a piece of card stock in your printer and print only one card. Click the Back Arrow in the upper left corner of the Print screen to go back to the worksheet. Press F9 to refresh all the random numbers before printing a second sheet of cards. Repeat this process until you have as many cards as you need. Use scissors and a ruler to cut out the cards from each sheet. Now you have a Bingo card maker Excel.
Video of the Day