Things You'll Need
Hard wood
Thin wood stick
Ruler
Saw
Drill
Glue for wood
Wood nails
Paint for wood in various colors (black, white, red, blue, yellow, gray, skin color)
Frizzy gray hair
Fuzzy gray felt
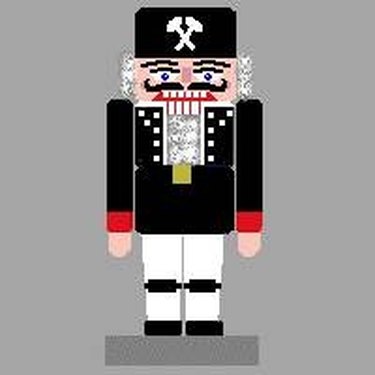
Nutcrackers are devices used to crack nuts open, allowing people to eat the meat within. Nutcrackers come in many forms including simple wood screw types with little decorative value or the more decorative standing wooden nutcrackers known throughout the world. Standing wooden nutcrackers were first seen in Germany around 1800. In 1872, the first commercial production of nutcrackers was begun by Wilhelm Füchtner. Today, a few famous companies produce high-quality nutcrackers, such as Steinbach and others. Lower-quality nutcrackers are made elsewhere, such as in China or Japan. This guide shows how to make a basic standing wooden nutcracker with a fully functional nut-cracking ability. Each piece is color-coded and diagrammed for easy reference.
Step 1
Gather the pieces of wood required for the nutcracker. Decide on the nutcracker's use once it is done. Will it be used as a decorative piece or will it actually be used to crack nuts? If just used decoratively, you do not need to be choosy about the type of wood used. If a fully functional Nutcracker is desired, a very hard wood should be used, especially for the mouthpiece because it needs to go through a lot of wear. The size really does not matter but the measurements are given for the nutcracker as an example.
Video of the Day
Step 2
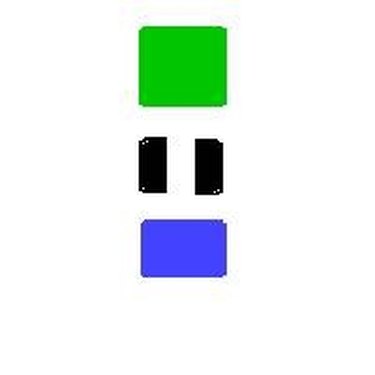
Gather the wood for the body. Three blocks are needed for the head (green), chest (black) and waist (blue). Each of these pieces of wood need to be the same width and shape but with different heights. Each should be about 6 inches across and cylindrical in shape with a rounded edge around the top and bottom edges. The head should be approximately 6 inches high. The waist should be approximately 4 inches high. The chest needs a little bit more work because it needs to be cut into pieces for the mouth pivot joint. The chest should be approximately 3 inches high. Cut the chest piece into three segments of 2 inches wide each. Set aside the middle segment for future steps and keep the two outer segments for the body.
Step 3

Gather the wood for the legs (purple), feet (gray) and base (orange). The wood for the legs needs to be cylindrical in shape and approximately 7 inches high or as tall as the chest and waist pieces from Step 2. The legs need to be wider on top (2-1/2 inch diameter) and taper slightly at the bottom (1 inch diameter), like chair legs. The feet need to be slightly wider than the tapered bottom of the legs, so approximately 1.5 inches in diameter and about 1 inch high. Cut a half circle about 1 inch in diameter out of the wood for the feet, as shown in the diagram below. This is so that the feet may fit over the bottom of the legs when the feet are in a horizontal position. The base needs to be the largest piece of wood and sturdy to support the whole nutcracker. Based on the 6-inch-diameter body, the base board can be approximately 8 to 10 inches square and about 1 inch thick.
Step 4
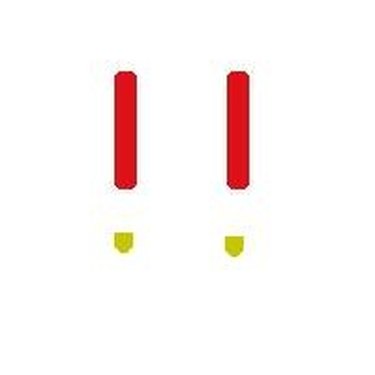
Gather the wood for the arms (red) and hands (yellow). The arms need to be cylindrical in shape, approximately 7 inches in length and 1 inch in diameter with rounded edges at the top and bottom. The hands need to be about 1 inch long and 3/4 inch wide with one edge completely rounded and the other end flat.
Step 5
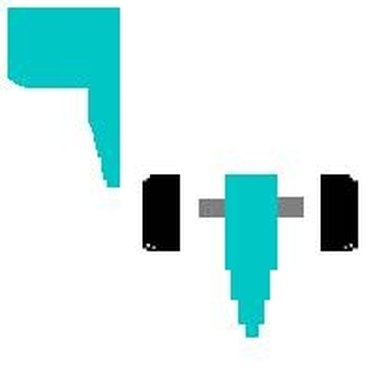
Create the pivot joint (turquoise). This is the joint that allows the mouth to be opened and closed and it requires the most work. The pivot joint attaches to the chest pieces from Step 2, one on either side. The pivot joint should be one solid piece of wood so that it is very strong, as this will take a lot of wear. Use the middle section that was cut out in Step 2 to judge the size of the wood that needs to sit between the chest pieces. It should be slightly thinner than the middle piece that was removed. For the example nutcracker, the middle piece should be approximately 1.75 inches wide, 2.75 inches high and 5.5 inches deep. Also, be sure to round the lower edge of the front to give the pivot space to turn. The tail of the pivot piece needs to be at least 7 to 8 inches long and taper to a nearly sharp edge, as seen in the diagram below. Drill a hole in the middle of the upper part of the pivot piece as wide as the thin wood stick (approximately 0.25 inch wide and 2.75 inches long). The stick needs to allow a 0.5-inch of length protrusion on either side of the pivot piece. Put some glue into the hole of the pivot piece to attach the stick securely and allow it to dry completely. Drill a 0.25-inch-wide, 0.5-inch-deep hole into the inner side of each of the chest pieces. Fit the pieces together to see if the pivot joint works. Glue a few inches of frizzy gray felt to the front and slightly under the pivot joint for the beard of the nutcracker.
Step 6
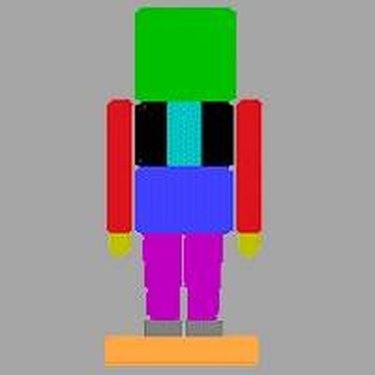
Assemble the nutcracker as seen in the diagram below. Each of the pieces has been color-coded as described in each of the previous steps, so the diagram shows how all the pieces will go together when done. Begin putting it together with the head (green), chest (black), mouth/pivot joint (turquoise) and waist (blue). Lay the waist piece on a flat surface and glue one of the chest pieces to one end of the waist and allow it to dry. Fit the wooden stick of the pivot joint (already pushed through the pivot piece) into the drilled hole of the chest piece. Attach the second chest piece to the waist piece, so that the drilled hole also allows the other end of the wooden stick to fit through it. Attach the headpiece on top of the two outer chest pieces, but be careful not to get any glue on the mouth/pivot joint because this piece needs to move freely. Allow the glue to dry completely, which will lock the pivot joint firmly into place. Attach the legs (purple) and feet (gray) to the baseboard (orange) and allow it to dry completely. Attach the body to the legs and base and allow it to dry completely. Glue the hands to the arms. Finally, attach the arms to the chest and waist piece. Use a nail in the shoulders to firmly attach the arms to the body.
Step 7

Decorate the nutcracker with paint and frizzy gray hair. The colors are up to you but one possible color scheme is shown in the diagram below. Feel free to add or change colors as desired. Make sure that a mouth and teeth are painted on the pivot piece and the head, which creates a mouth that opens and closes with the pivot. The frizzy gray hair can be attached to either side of the head after the paint has dried. A small triangular wood piece may be attached to the face with glue or just painted on.
Warning
Be sure to allow space for the wooden stick to turn within the chest. Allow a little extra room for the wood expansion.
Video of the Day