
If a friend or loved one of yours has a 40th birthday coming up, you can make the celebration extra special by creating a poster board to display some of the birthday boy's favorite things, or memories that are sure to make the birthday girl smiles all day. Using a few craft items and other creative details can make the poster stand out and serve as a sentimental keepsake for the recipient.
Choose poster board in the recipient's favorite color, or buy a white poster if you plan on adding lots of color.
Glue lace or ribbon around the sides of the poster board to create a border, or tie ribbons into bows and glue a bow onto each corner of the poster board. You can also use markers to create a border, or decorate the corners with drawn-on designs.
Use markers to decorate the poster by writing the words "Happy 40th Birthday" or "Over the Hill" in the center of the poster.
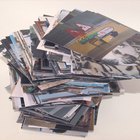
Add photos to the poster. Attach the recipient's baby picture to the poster board, as well as pictures that will remind your loved one of fond memories collected over the past 40 years. For instance, one of your sister's wedding photos can be attached to the poster, or you can attach a picture of you and your best friend as children. If you cannot find all the pictures you want, use the side of the poster (if it is large enough) to write down 40 great things about the recipient — with the help of your family and friends.
Add mementos to the board, such as ticket stubs for a concert you attended together or newspaper clippings. Make color photocopies of the original mementos if you don't want to use the originals.
Sign the poster with various marker colors; this is a great idea if the poster is a gift from a group of people. For instance, if you and your children are putting together a poster board for your husband, you can let your little ones sign their name at the bottom of the poster. Use a different color marker to write a loving message to your husband in the corner of the poster to complete the keepsake.
Related Articles
How to Make a Family Tree Using a Free ...
How to Make a Pinata With a Balloon

How to Prepare a 50th Birthday Collage

How to Tell Him He Is a Good Father

How to Make a Memory Book for a Gift

Ideas for a Birthday Video
Birthday Guest Book Ideas

Ideas for a 60th Wedding Anniversary ...

How to Word a Grandma Baby Shower ...

How to Make a Romantic Collage for Your ...

How to Say Thank You in a Loving Way to ...
How to Announce Being a Grandma

Gifts for Someone Whose Grandfather Has ...
Things to Say in a Birthday Card for a ...

Birthday Gifts for Moms Turning 65
Ideas for a Photo Slideshow Movie for a ...

Five-Year-Old Birthday Party Ideas for ...

Celebrity Themed Party Ideas

How to Announce You're Pregnant to Your ...
Ideas for Engraving
References
Writer Bio
Tamiya King has been writing for over a decade, particularly in the areas of poetry and short stories. She also has extensive experience writing SEO and alternative health articles, and has written published interviews and other pieces for the "Atlanta Tribune" and Jolt Marketing. She possesses a Bachelor of Arts in English and is currently pursuing higher education to become a creative writing professor.
Photo Credits
PhotoObjects.net/PhotoObjects.net/Getty Images