Things You'll Need
1 1/2 to 2 yards of fabric
Cotton batting
Ribbon
Tissue paper or tracing paper
Tape
Pins
Scissors
Sewing Machine
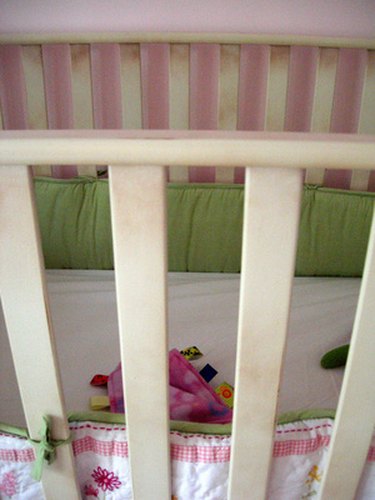
Making crib bumper pads is a simple sewing project ideal for beginners. Making your own crib bumpers can be an economical way to create the look you want in your nursery. Purchase softer flannel or smoother cotton fabric in whatever pattern and color you would like. Making your own bumper pads for a baby crib can make it easy to have an extra bumper pad in case one gets dirty or to replace the bumper pad for each new baby.
Step 1
Measure your crib and add one inch to both the length and height you choose. Remember to measure all the way around the inside of the crib.
Video of the Day
Step 2
Cut tissue paper or tracing paper in the size you want to make the bumper. You may need to use tape to connect several pieces of paper to get the correct length.
Step 3
Measure where the crib ties should be placed so that the ties will reach the crib slats. Mark these lengths on the pattern. .
Step 4
Fold the fabric right sides together. This means the pattern or front of the fabric is facing itself.
Step 5
Lay the pattern on the fabric and pin it together.
Step 6
Cut out the appropriate amount of fabric. You may need to cut several sections of fabric to get the correct length. If you do this, you will cut out the total number of pieces that equal the total length needed. Match the short ends of the fabric together and sew a seam to connect them. Continue to sew pieces together until you have the correct length necessary to reach all the way around the inside of the crib.
Step 7
Cut cotton batting to match the pattern. Lay the batting on the top of the fabric. The fabric is still right sides together. This will make the batting on the inside of the fabric when you turn the completed bumper right side out.
Step 8
Cut 12 pairs of ribbon ties at around 10 inches each in length.
Step 9
Lay the ribbon ties perpendicular to the seam along the fabric in each place you marked on the pattern. Pin the ribbon in place. The ribbon should be placed between the two pieces of fabric so that when the completed bumper is turned right side out, the ribbon will be visible on the outside and will extend past the fabric on both the top and bottom.
Step 10
Remove the paper pattern and pin the fabric together for sewing.
Step 11
Using a sewing machine, sew all along the edge at about ½ inch inside the edge. Leave one small end open to turn the fabric right side out, then stitch the end closed
Video of the Day