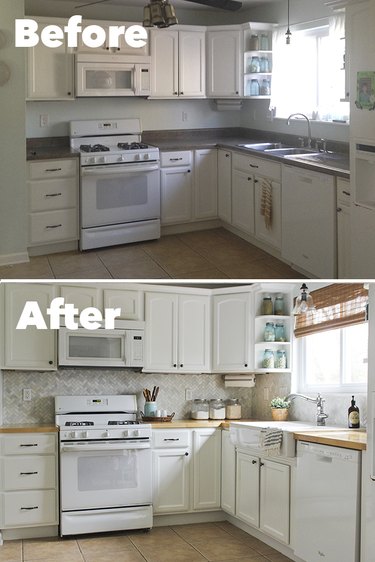
Kitchen updates don't have to be time-consuming or expensive. A perfect weekend project for beginners, adding a tile backsplash is one of the fastest and least expensive ways to give your kitchen a stylish new look. You'll not only boost its value, but add a lot of personality to your space.
Video of the Day
Things You'll Need
Flat blade screwdriver
Course grit sanding sponge
Painter's tape
Waterproof drop cloth
Measuring tape
Mosaic tile of choice with mesh backing
Bull-nose tiles (optional for tile edge that isn't against a wall or cabinet)
Straight edge or level
Graphite pencil or wax pencil
Wet tile saw
Utility knife
Mastic, 1 gallon per 25 square feet
1/4-inch "V" notched trowel
Wedge tile spacers, 1/8 inch thick
Large tile sponge
Large utility bucket
Pre-mixed grout with sealant, 1 gallon per 25 square feet
Grout float
Rubber gloves
Grout haze remover (optional)
Scrubber sponge (optional)
Microfiber cloth (optional)
Outlet extenders or 1 1/2-inch long #6-32 screws
Phillips screwdriver
White painter's caulk
Tip
To determine how much tile you will need for your kitchen, measure the distance from the countertops to the underside of the kitchen cabinets (standard height is about 18 inches). Then measure the length of the wall(s) that the backsplash will cover. Multiply these two numbers together to get the total area. Round this number up if the area is not a whole number, and add 10% to determine the total tile needed. If the backsplash goes around a window, less tile may be used, but the general rule-of-thumb is to purchase 10% more than the actual square footage needed, to allow for broken pieces or possible mis-cuts. If the edge of the tile does not butt up against a wall or cabinet, buy bull-nose tiles for those areas.
This tutorial assumes counters are level and walls are square. However, sometimes in older homes, sides walls are not square or perfectly level to the counters or they are not plumb with the back of the counters. Mosaic tiles are best used for walls that are slightly uneven because minor variations are not noticed, as they are with larger square or rectangular tiles. To account for any variation, use wood shims to make up the difference for the back of the counters (to make them plumb) before laying tile.
Video of the Day
Step 1: Prep the Walls and Edges
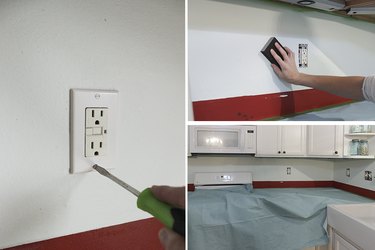
Remove outlet covers and switch plate covers using a flat blade screwdriver. Set covers and screws aside in a safe place.
Tape down a waterproof drop cloth along the counters using painter's tape. Use this same tape along the edge of the walls, underside of the cabinets, and backside of the sink to protect the surfaces from mastic and grout application later on.
To ensure proper mastic adhesion to previously painted walls, sand the walls with a course grit sanding sponge to take off the sheen and provide a bit of "tooth" or roughness.
Step 2: Dry-Fit the First Tile Square & Mark Straight Edges
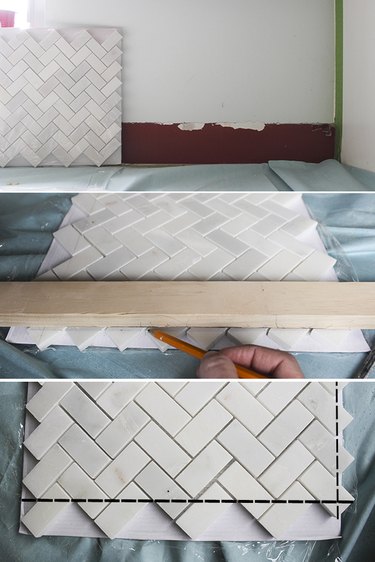
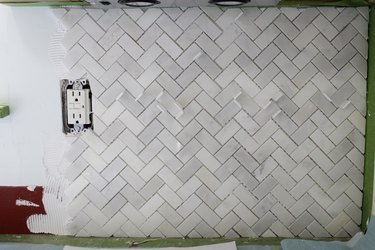
Because mastic sets within 30 minutes, you need to dry-fit small 2-foot-by-2-foot areas first. To dry-fit an area, measure and cut the necessary tile, making allowances for outlets and light switches. Assuming the counters and walls are level, the first mosaic tile square applied should be the one that butts against the counter and the wall, where having a perfect cut will be noticed and easily visible.
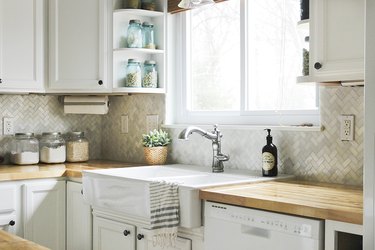
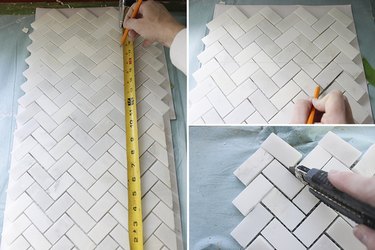
For herringbone mosaic tile, draw straight lines along two sides of the tile square with a graphite or wax pencil. Note that the corners of the herringbone rectangles all hit at the same point horizontally, so drawing a straight line can be done by simply getting a straight edge and lining it up with the corners of the herringbone rectangles, as shown below.
With circular mosaic tiles, you need a level to draw straight edges along the sides.
Tip
For the walls that are not perfectly level or square, use a level to draw a vertical reference line from the counter to the cabinet, 1 foot from the side wall (where you want to start laying tile). Then measure from the reference line to the side wall at the bottom, middle and the top. Note any minor variation in these three distances. Then, draw a level vertical line 1 foot from the reference line toward the wall (where the wall would be if it were perfectly level). This will be where you line up your initial tile square. If there is a minor (1/4 inch or less) gap, it can be filled and easily disguised with grout later on. If there is a gap that widens as much as 1/2 inch, mark the cut line with only a 1/4-inch difference from the bottom (counter) to the top (cabinet) on the first column of tile squares that will butt up against the adjacent wall. This slight diagonal cut will barely (if at all) be noticeable, and the remaining difference can be filled with grout later on.
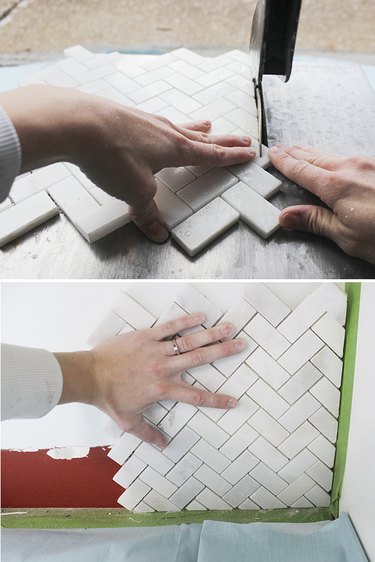
Step 3: Cut the Sides of the Tile Square
Cut along the two marked sides of the tile square with a wet tile saw. Move the tile through slowly to prevent chipping (although some may occur, which is normal), and keep small pieces that were cut off. Place the tile square on the wall to make sure it fits flush.
Step 4: Cut the Second Tile Square
Because the wall height between the counters and the underside of the cabinets is typically 18 inches, a partial tile cut will be needed for the remaining 6 inches above the tile square that you just cut in Step 3. To determine exactly how much, lay the cut tile square down and another whole (uncut) square lined up above it. Allow 1/8 inch spacing in between them and measure 18 inches up from the flat cut side (or the exact height of your wall). Mark with a pencil and draw a level line across the tiles at that measurement.
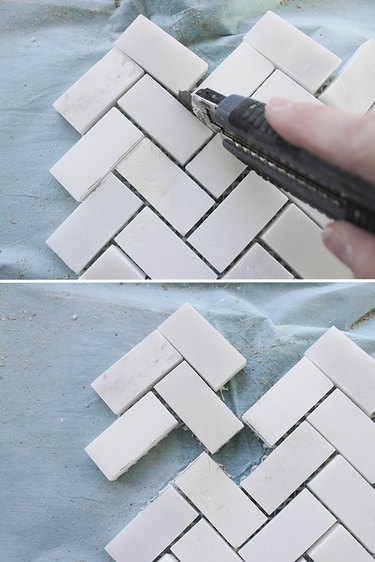
To minimize partial tile cuts on the wet saw, and utilize the partial tile pieces that are leftover from previous cuts, mark the edge of the row of whole tiles below where the line is drawn. Cut through the mesh with a utility knife above this last row of whole tiles. Use the leftover small pieces (from the initial cuts) to fit in at the top, where it will butt up against the underside of the cabinet.
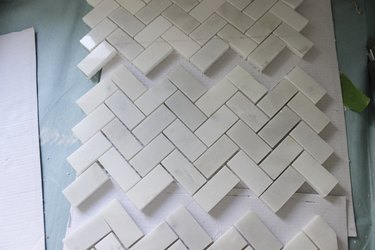
Step 5: Lay Out Tile in Front of Wall
Once the initial cuts have been made to the 2-foot-by-2-foot area (approximately), lay out the tiles, evenly spaced, in front of the wall where they will be applied. Double check all measurements to ensure a proper fit.
Step 6: Cut Tiles for Outlets and/or Window Sills
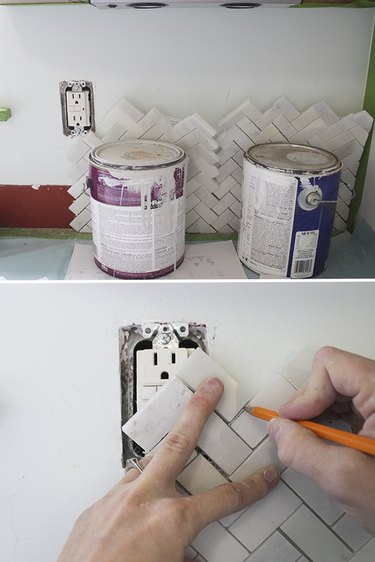
To cut mosaic tiles around outlets and light switches, hold a mosaic tile square in the position it will be once mastic is applied. If doing this job solo, position cans of paint to hold the tile squares in place, so you can mark the location of the outlet.
Mark the edges of the tiles that need to be cut, and then use a utility knife to cut through the mesh backing so that when the mosaic tile square is put into position, the entire outlet is visible. Smaller cuts to the rectangular tiles will be made once the tile squares are actually placed on the wall.
Using the same method that was used for the outlets, mark that tiles need to be removed for partial tile cuts around window sills, sink lip, etc., and them remove with a utility knife.
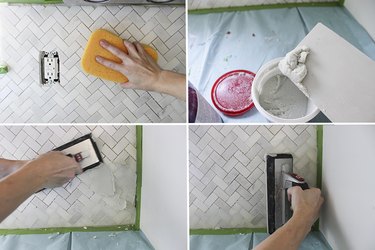
Step 7: Apply Mastic to Wall
Mastic has the consistency of thick peanut butter and should be applied generously to the area of the wall where the tile will be placed with a small "V" notched trowel. Smooth the mastic to the wall edges, and then remove any excess by holding the trowel at about a 45-degree angle and scraping it away along the wall. The "V" notches, will allow the perfect amount of mastic necessary for the mosaic tiles to adhere, without too much squishing up in between the tiles.

Tip
Mastic is a pre-mixed flexible tile adhesive that is best used for kitchen backsplashes where quick, strong adhesion is needed. It works best for areas, like backsplashes, that are not exposed to excessive water. Thinset is not pre-mixed and is best used for wall tile in bathrooms where excessive moisture is common.
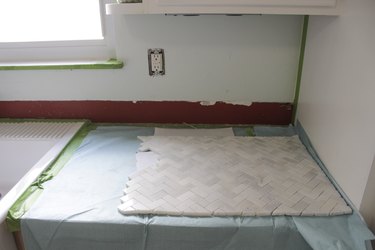
Step 8: Place Tile on Mastic
Starting at the corner with the first tile square you cut, place the mosaic tile flush against the wall, pushing it into the mastic in a wiggly motion. Go over each individual tile on the mosaic and press firmly, so the mastic pushes up slightly on all sides.
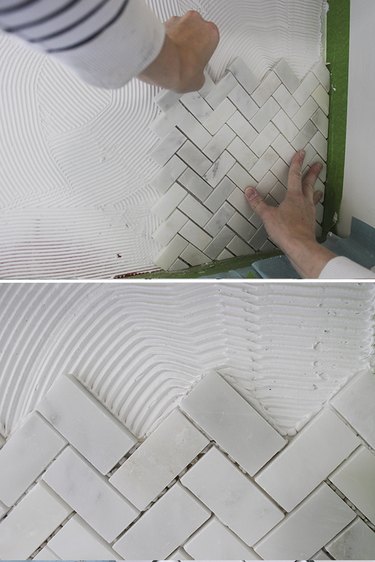
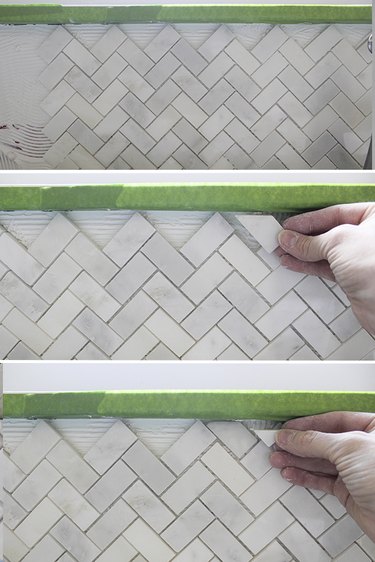
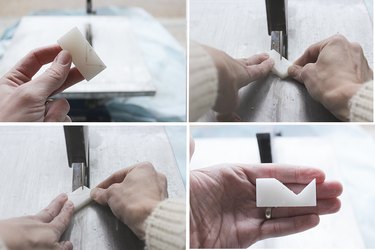
Continue this process for the remaining pre-cut mosaic pieces, using 1/8-inch wedge spacers in between the tile squares to keep the distance consistent. Spacers can also be used along the bottom of tile squares bordering the countertop, to allow easy removal of the painter's tape.
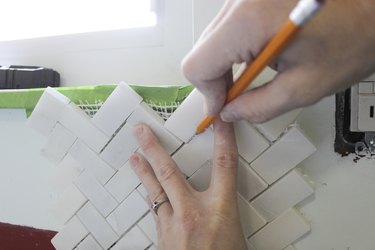
Step 9: Cut and Fit Individual Pieces Along Edges
Once the pre-cut tile mosaics are in place, use individual loose tiles cut from the mosaic to fill in around the edges of outlets, walls, window sill, or other areas that require tiny pieces to fit in.
If multi-direction cuts need to be made in a single tiny rectangle, move the piece of tile through the saw blade very slowly, so as to not break the tile before you pull it out to cut in it another direction.
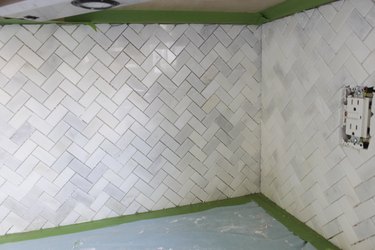
Step 10: Continue Tiling Adjacent Walls
Repeat Steps 3 to 9 until all walls are tiled, as desired. When the tile meets another wall, instead of continuing on the adjacent wall from where you are, repeat Step 2 on the opposite end of the wall so that the perfectly straight cuts are made where it is most visible, and the mosaic "fit-in" pieces are in the corner where they both meet each other. Let the mastic dry according to label directions before grouting the tile.
Tip
Using a pre-mixed single component grout with a built-in sealer saves the necessary and messy step of applying a sealer afterward. This type of grout dries very quickly, and the excess is removed immediately instead of 30 to 40 minutes later, as it is with normal grout.
Step 11: Apply Grout
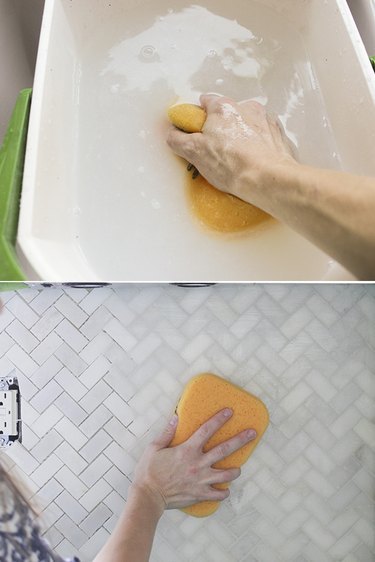
Pre-moisten the wall with a wet sponge. Then, using a tile float, smear a generous amount of grout on the tiles and push it in between the spaces. Turn the float at a 45-degree angle and scrape off any excess grout. A thick residue will coat the tiles, so working in small 2-foot-by-2-foot areas at a time will prevent the grout from forming a hard film on the surface of the tile, which can be hard to remove.
Step 12: Remove Excess Grout
Using a clean, wet sponge, wipe off the grout residue, first rubbing in a circular motion to re-moisten and soften the grout, then with a clean sponge, wiping with a steady pressure . It will take about four to six wipe-downs before the tiles are clear from the residue.
Do not push hard with the sponge when wiping or too much grout will be removed from the spaces between the tile. If this happens, just reapply the grout in that area with the float, wipe off excess, and remove residue with the sponge.
Tip
The bucket full of rinse water will need to stay fairly clean, so dump outside and refill with fresh water every 6 feet of backsplash.
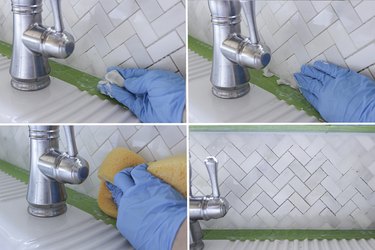
Step 13: Use Gloves to Apply Grout in Hard-to-Reach Places
When applying grout along the edges behind the sink faucet, it may be difficult or impossible to reach with a float. If this is the case, use a rubber glove and with a small amount of grout on your fingertips, rub the grout into the edges or difficult places. Remove excess with fingers and wipe clean with a sponge.
Step 14: Remove Grout Haze From Tiles
Depending on the color of the tile selected, a haze may appear on the surface of the tile after the grout has dried (24 hours later). This is easy to remove with a haze remover found at most hardware stores. Just apply a small amount of haze remover with a scrubbing sponge, lightly scrub the tiles, and then wipe clean with a microfiber cloth.
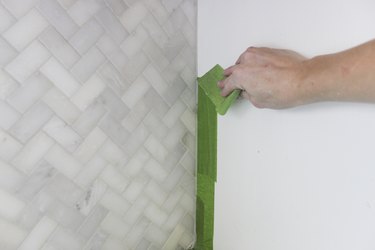
Step 15: Remove Tape and Dropcloth
Before the grout is completely dry, remove the painter's tape and the dropcloth. Make any grout touch-ups as necessary. If any small mosaic tiles move, firmly reposition with a dab of mastic and let the grout cure for 24 to 72 hours.
Step 16: Replace Outlet Covers
With the added thickness of the backsplash tile, the outlets and light switches will need to be extended. To do this, first shut off the breaker switch in the kitchen and confirm that the power is off. Unscrew the outlets from the wall (keeping the wires in place), and replace the screws that were removed with a 1 1/2-inch screw and a nut on the opposite side, keeping it securely in place. Outlet extenders can also be used.
Once all the outlet covers have been screwed back into place, turn the electricity back on.
Step 17: Caulk the Edges
Caulk the edges of the backsplash along the counters, cabinets and window sills.
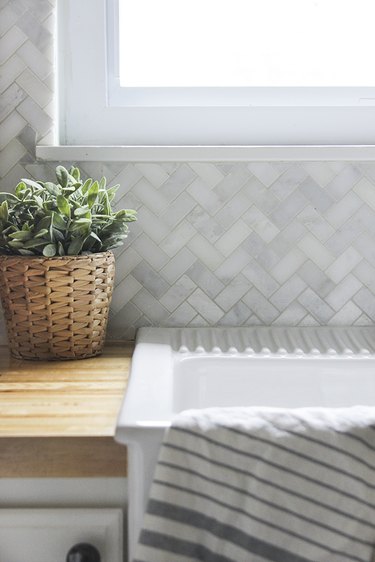
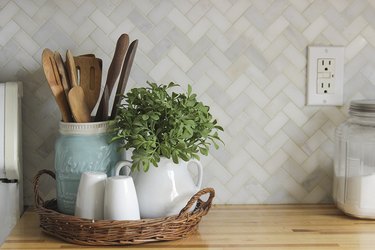
The finished product makes quite the difference and elevates a builder's grade kitchen into a much more custom and stylish space.