
How to Install Crown Molding on Rounded Corners

Crown molding looks beautiful on any wall where it connects to the ceiling, but crown molding is also used for other projects. Crown molding is used to build birdhouses and gazebos. Decorative flowerpots, large and small, are created with crown molding.
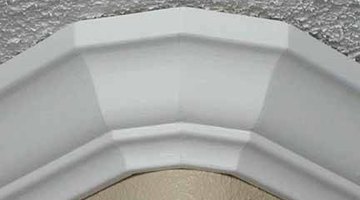
Most crown molding is applied from corner to corner but occasionally crown molding will extend past rounded corners. If you need to learn how to install crown molding on rounded corners read through the following steps.
Things You Will Need
- Miter saw
- Crown molding
- Caulk
- Pencil
- 10-penny nails
- Nail gun
Tip
Sometimes a contractor will place small 2-by-2 blocks behind the crown mold and attach them to the plates at the top of the wall. Instead of nailing the crown mold to the wall studs and ceiling joists, they will drive a 16-penny nail right through the center of the mold into the block.
Warning
Do not attempt to make a cut without double checking all marks to ensure proper angle cuts. If your cuts are not angled correctly your crown molding pieces will not line up.
-
Cut a length of crown molding at a 22 1/2-inch angle. Cut another length of molding for the other side of the wall at the same angle.
-
Cut two small pieces of molding, both about 4-inches wide, with 22 1/2-inch angles. Install these two pieces on the rounded corner of the wall where it meets the ceiling.
-
Place a bead of caulking along the edges of both pieces and insert them up against each other. The angles should meet together in the center with no gaps.
-
Place marks with a pencil across the length of the walls where the wall studs and the ceiling joists are located. Tap on the wall to find the studs. A hollow sounding tap means there is not a stud behind it.
-
Place a bead of caulk along both edges of the crown molding and install them in place. Make sure to butt the angles right up against the angles on the smaller pieces of molding.
-
Hold the molding in place and nail through the molding, with 10-penny nails, into the marked wall studs and ceiling joists. Use a nail gun for simplicity.
-
Place your first nails 2 feet away from the corners spaced 16 inches apart.
-
Make sure the angles line up perfectly with the corner molding angles. There should be no gaps.
The Drip Cap
- Crown molding looks beautiful on any wall where it connects to the ceiling, but crown molding is also used for other projects.
- Decorative flowerpots, large and small, are created with crown molding.
- Cut a length of crown molding at a 22 1/2-inch angle.
- Place a bead of caulk along both edges of the crown molding and install them in place.
- Make sure to butt the angles right up against the angles on the smaller pieces of molding.
Writer Bio
Lacy Enderson is an Addictions and Recovery Counselor. She is Certified with the American Association of Christian Therapists and holds a Master's Degree in Biblical Counseling. She is currently enrolled in Liberty University's Master of Divinity Degree program with Chaplaincy. Lacy is a graduate of Rhema Correspondent Bible School and has completed the first section of Berean School of the Bible. Lacy is the author of, "Addiction: A Personal Story" and "So You Want to Lose Weight But You Can't Stop Eating." Her newest novel is a teenage Christian fiction titled, "Honey Sweetheart."
Photo Credits
- http://www.compoundmiter.com/images/bull2.jpg
- http://www.compoundmiter.com/images/bull2.jpg
More Articles