Even the most uncomplicated of families extend beyond Mom, Dad and kids. You most likely have aunts, uncles and cousins to take into account, and if you're building a family tree, you might like to include them. Fortunately, creating a family tree that features extended family members is a pretty simple process.
Gather Family Information
Before you start your tree, make a list. Include every family member you plan to put on your family tree, including aunts, uncles and cousins. In total, your list should feature:
- Parents
- Brothers and sisters, including half-siblings
- Children
- Grandparents
- Aunts and uncles
- Cousins
- Nieces and nephews
Next to each name, record the information you'd like to feature on the family tree, such as dates of birth and death if applicable, medical histories, height and weight and anything else you think would be relevant.
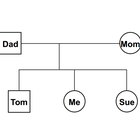
Create a Symbol Key
First, choose the symbols to use to represent each type of family member and relationship. Traditionally, rectangles stand for males and circles for females. Vertical lines connect parents to children, and horizontal lines connect spouses and siblings. However, feel free to make your own symbol key with different shapes or dotted lines, if you'd like.
Draw Your Tree
Now, take pen to paper. Start with yourself, either at the bottom or center of the page, since most often older generations will go above you. (But again, it's your tree, so you can design it to branch out in any direction you choose.) Place your brothers and sisters next to yourself, with older siblings on the left and younger on the right. Draw vertical lines coming up from each sibling, connected at the top by a horizontal line.
Draw your parents above yourself and a horizontal line connecting them. Put a vertical line between their spousal connection and your sibling connection. Your immediate family is complete now, so it's time to add in those extended family members.
Draw your parents' siblings – your aunts and uncles – next to your parents on the tree, connecting them with that horizontal sibling line. Do your best to keep them in order from youngest to oldest, but you might not be able to, depending on how many kids each has and the design of your tree. Next, include your siblings, connecting them directly to their parents or their parents' spousal relationship line.
Continue filling out your tree using the same patterns until it includes all the family members on your original list.
Related Articles
How to Make a Family Tree With Ex ...

How to Make a Free Genogram

Family Tree Rules

How to Make a Family Tree for the 5th ...
How to Draw Genograms

How to Draw a Family Tree When There Is ...

How to Make a Genogram Chart

How to Do a Genogram

How to Make a Family Tree Using a Free ...
How to Find Twins on Pedigree Charts

Family Tree Book Cover Ideas
How Are Second Cousins Related?

What Are the Genogram Symbols?

How to Create a Family Shield

The Difference Between First and Second ...

How to Construct a Kinship Diagram
What Is a Paternal Family Tree?

How to List Stepparents in a Wedding ...

How to Tie Shoelaces With a Ladder ...

How to Create a Wedding Vow Renewal ...
References
Tips
- For the paper family tree, decorate by drawing leaves around each name and coloring it in using a light green pencil.
Writer Bio
Brenna Swanston is a freelance writer, editor and journalist. She covers topics including environment, education, agriculture, travel, immigration and religion. She previously reported for the Sun newspaper in Santa Maria, Calif., and holds a bachelor's in journalism from California Polytechnic State University. Swanston is an avid traveler and loves jazz, yoga and craft beer.