
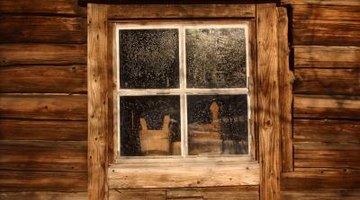
How to Frame the Exterior of a Log Cabin Window

Log cabins and log homes are popular options for vacation homes and as an alternative to conventional home construction for builders and residents who want their homes to stand out or blend into natural settings. Many details can make a log cabin look rustic and authentic, including exterior window framing. While most modern log cabins use custom-built windows, exterior trim helps blend these modern touches into the log walls. Exterior window trim can also make a log cabin's windows more energy efficient by improving the quality of insulation around them.
Step 1
Measure the space around your log cabin's windows from the outside. Note the height and width of the window jamb, which will serve as the inner dimensions for your exterior frame.
Step 2
Select lumber to use for your window frame. Pick material that either complements or contrasts the design of your cabin. You might prefer rough, hand-peeled logs with one hewn, or flat, side, or more finished wood with an attractive grain pattern.
Step 3
Lay each piece of lumber across a pair of sawhorses. Measure the size of one side of the exterior window frame and cut it to length with a hand saw. Repeat the process for all four pieces of lumber.
Step 4
Put on a pair of heavy work gloves. Press foam insulation, by hand, into the gaps and indentations between the logs that form your log cabin's walls near the window.
Step 5
Locate the piece of cut lumber that will form the bottom edge of your exterior window frame. Hold it against the window jamb. Lay a carpenter's level on top of the wood to ensure that it's level.
Step 6
Hammer 3-inch galvanized nails into the bottom piece of the frame at a downward angle. Drive them through the window frame and into the logs that form the wall below them. Space the nails about 4 inches apart from one another.
Step 7
Nail the sides of the window frame into place, angling the nails outward so they go into the log walls rather than the window jamb. Nail the top of the frame into place last, nailing at an upward angle.
Step 8
Press foam insulation into any gaps created by the corners of your window frame, especially where the lumber doesn't create a flush seam against the other parts of the frame.
Step 9
Apply chinking compound with a putty knife around the seam where the inside edge of your frame meets the cabin's window jamb. Spread the compound evenly around that seam and over any visible gaps where you inserted insulation.
Tips
- Only use exterior grade lumber for your cabin's exterior window frame. Select a thicker piece of lumber if you want a protruding window sill or if you want the top of the window frame to deflect rain water.
Warnings
- Wear work gloves when installing foam insulation to prevent the cuts and irritation that can come from handling fiberglass insulation.
Photo Credits
- Hemera Technologies/AbleStock.com/Getty Images
More Articles