If you're going to a Renaissance fair, you don't have to break the bank to outfit yourself nor do you have to be an expert seamstress. This step-by-step tunic sewing tutorial is about as fast and easy as it gets for beginner sewing projects. You don't need to know how to sew anything more elaborate than a straight line to pull it off, and you won't even need a tunic sewing pattern. Match it with a pair of black or brown cotton slacks or leggings or a colorful skirt along with an old pair of scuffed boots, and you'll fit right in at the fair.
Things You'll Need
Two pieces of fabric
T-shirt
Tape measure
Chalk
Scissors
Pins
Safety pins
Sewing machine or needle and thread
Grommets
Hammer
Shoelace or ribbon
Elastic
Video of the Day
Choose fabric for the tunic top
To make your own tunic, choose a comfortable, light cotton fabric. How much you need will depend on your size, but you'll probably want each piece to be at least 2 yards. To estimate, hold the piece of fabric against your body. It should go from your neckline to slightly longer than you want the tunic to hang and should be at least as long as your two arms spread out wide. It always pays to have a few extra inches to work with to be safe.
Video of the Day
Fold one piece of the fabric in half lengthwise and lay it out on your work surface.
Create the DIY tunic sewing template
Good news. You can use your own clothes for assistance. Get one of your T-shirts to use as a template. It should fit well—not too large but not tight. When you wear it, it should not be stretching to fit you but should be hanging comfortably.
Fold it in half sleeve to sleeve. Lay it on the piece of folded fabric so that the fold in the T-shirt and the fold in the fabric are against each other.
Take and record measurements
Take a tape measure and have a friend measure from your shoulder to your wrist. Then, measure from under your arm to the length you want your tunic to be. Normally, they hang just past the buttocks, though you could adjust it to your preference. Write down these measurements.
Measure the sleeve
With a piece of chalk (a different color than that of your fabric), trace the neckline of the T-shirt onto the fabric and over the shoulder. Use your tape measure to measure the sleeve. It should start at the shoulder seam of your T-shirt. Extend it out past the end of the T-shirt sleeve to 3 inches longer than the arm measurement that you took earlier.
Trace and mark
Trace the bottom part of the T-shirt sleeve from the underarm and again continue to the same length as the top part of the sleeve. Make a line connecting the two lines that mark the end of the sleeve.
Measure for the tunic length
Starting from under the arm again, measure downward to the length you want your tunic to be plus an additional 2 inches. Draw the line with chalk. Finish by drawing a line across to mark the bottom of the garment.
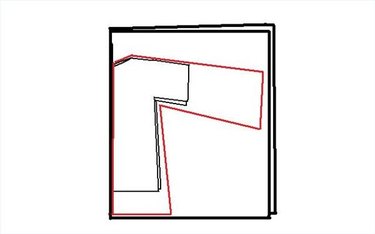
Pin and cut
Remove the T-shirt. At this point, you may want to use straight pins to pin the two sides of the fabric together without disturbing it, but if you are confident with your scissor skills, you can just cut on the lines. Cut out the tunic shape. This will be the front of your tunic.
Fold and trace
Fold your second piece of fabric in half lengthwise for the back part of your tunic. Lay the folded front section on it the same way you did the T-shirt. Use chalk to trace it so that the back piece will be exactly the same. Remove the front part of the tunic and pin and cut the fabric.
Position the fabric pieces
Open both pieces of fabric. Lay one out on the table front side up (the side that will show in the finished product). Lay the second piece on top of it front side down so that your fabrics will be front to front.
Pin the edges together
Use safety pins to pin the edges (about 1/2 inch from the edge) together from the neck opening to the edge of the sleeves. Then, pin from the underarm to the edge of the sleeve and then pin from the underarm to the bottom of the tunic.
Try on the tunic
Your tunic is currently inside out. Turn it right side out and try it on with the safety pins. Look at how it hangs on you. If it is too big or too small, turn it inside out again and adjust the safety pins, putting them more inward to make it smaller or closer to the edges to make it bigger. Turn it right side out and try it on again.
Sew the pinned edges
Begin sewing along the edges that you have safety-pinned together when you are satisfied with its shape. You can use a machine if you have one or just do it by hand with a needle and thread.
Hem the bottom
While the tunic is still inside out, fold up 1/2 inch of the bottom edge. Pin it and sew to hem the bottom of the tunic.
Draw and cut
With your tunic inside out, lay it flat on a table with the side that will be the front of the garment facing upward. Use a tape measure to measure and find the center of the neckline. Draw a chalk line straight down, approximately 6 inches from the top of the neckline. Cut along the chalk line. Do not cut through both sides of the tunic. Only cut the line down what will be the front of the garment.
Fold and pin
Fold down the edge of the neckline approximately 1/2 inch and pin it with straight pins. Fold over the edges along the cut approximately 1/2 inch and pin them in place. Turn the tunic over and fold down the edge of the back neckline 1/2 inch. Pin it in place. Stitch the neckline all the way around and down the front center cut.
Add the grommets
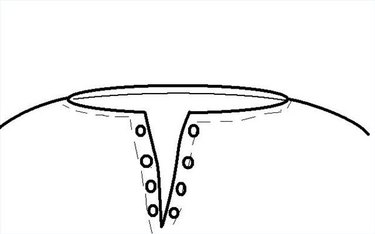
On each side of the front center cut, tap in approximately four to five grommets with a hammer. The smooth side of the grommet should be on the outside of the shirt—the part that will be showing. Space out the grommets so they are evenly spaced from each other. The grommets on one side should match up evenly with the grommets on the other side.
Lace the grommets
Thread a shoelace or narrow ribbon through the grommets from the bottom of the opening and criss-crossing your way to the top. You can tie them or leave the ends hanging.
Pin and stitch the sleeves
Fold up the edges of the sleeves approximately 1 inch. Pin it in place. Stitch almost all the way around, leaving a 1- or 2-inch opening.
Cut elastic for the waist
Use 1/2-inch-wide elastic. Measure your wrist. Cut two pieces of elastic, each about 3 inches longer than your wrist measurement. Place a safety pin on one end (do not loop it) of the elastic.
Cinch the sleeve
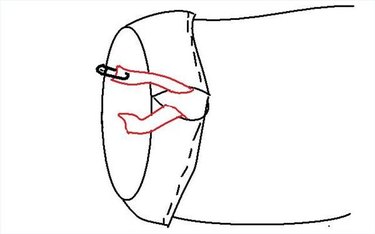
With the elastic trailing, slide the closed safety pin into the opening you left on one of the sleeves. Maneuver it through the "tunnel" of the hem until it comes back out the opening. Safety pin the two ends of the elastic together. It will cinch the sleeve together.
Check the sleeve for fit
Try to slip the end of the sleeve over your wrist to see if it is comfortable. Make the elastic tighter if necessary by moving the pin farther from the edges. It should fit snugly but not tightly around your wrist and stretch wide enough to slide over your hand without pulling too much. Take the sleeve off your wrist.
Sew the elastic
Stitch the elastic together at the point you have pinned it. Remove the safety pin and cut off any excess hanging elastic. Repeat the entire process on the other sleeve with another piece of elastic.
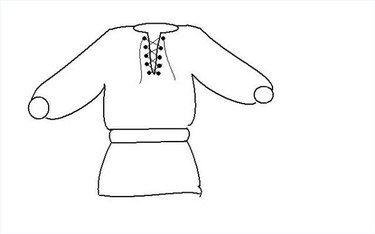
Finish your tunic
Turn your DIY tunic right side out and try it on. Put a belt or sash around your waist and your easy tunic is ready to meet the queen at the Renaissance fair.