Things You'll Need
Miter box
Miter saw
Crown molding
Clamp
Crown molding can dress up the looks of a room. These decorative pieces of wooden trim go at the junction of the wall and ceiling, adding a decorative look and feel to whatever room you put it in. An essential part of installing crown molding is knowing how to cut the molding so there are clean junctions at the corners. With the right tools and an understanding of how to cut the corners for crown molding, you can do the job, and do it well.
Step 1
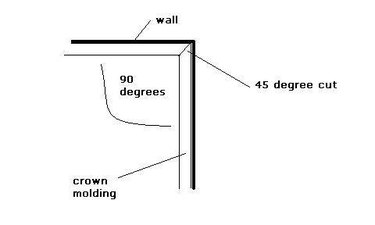
Examine the corner you'll be cutting crown molding for. We'll choose as an example the most common type of corner, the inside corner. As you can see in the diagram, the 90-degree angle of the corner will be achieved by cutting two pieces of crown molding so that they terminate in 45-degree angles.
Video of the Day
Step 2

Place your first piece of crown molding into the miter box. Hold the backside of the crown molding against the guide (the side wall) of the miter box. Clamp the crown molding into position so that it doesn't move. Cut as indicated in the diagram so that you end up with a 45-degree angle at the end of the board.
Step 3
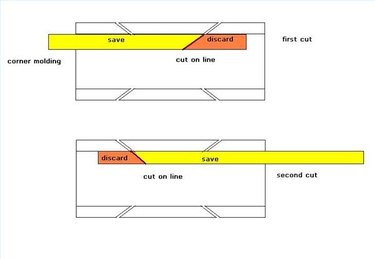
Place the second piece of crown molding into the miter box. Hold in position with a clamp and cut as indicated. Remember that this cut is the opposite of the first cut -- the two complementary 45-degree angle cuts add together to make the 90-degree angle of the wall's inside corner.
Video of the Day