Much like humans, coniferous trees have specialized male and female sex organs. male pine cones have close-knit "scales," that hold pollen sacks, the pollen acting as air-borne "sperm;" female pine cones have looser scales and lie lower on a tree to make pollination easier. Scientists consider conifers, which include cedars, pines, spruce and redwoods, gymnosperms. Their needle-like leaves lose water slowly. This allows conifers to keep their needles during periods of extreme cold, such as winter, when water is scarce. Gymnosperms include the longest-living organism on earth (a 5,000-year-old bristlecone pine), the tallest (a 115-meter-high coast redwood) and the largest in volume (a giant sequoia with a volume of 1,540 cubic meters).
TL;DR (Too Long; Didn't Read)
Male pine cones release pollen, and have tight "scales," while female pine ones have unfertilized seeds, looser scales, and sit lower on a tree.
Male Pine Cones
Male pine cones have smaller forms than female cones and only live a few weeks. Brown, tube-like clusters on the branches of a pine, the cones contain scales, or microsporophylls, around a central stem. Each scale holds a pollen sack, or microsporangium, and each pollen sack contains pollen grains, each called a microgametophyte, or microspore.
Through mitosis, microspores in the male microsporangium become male gametophytes, which are commonly known as pollen. The male gametophyte has two air bladders that will help it float on the air when it is released by the male cone. In some conifers, male cones sit higher in the tree than female cones, allowing the pollen when released to take advantage of this added height in floating farther when the wind or breeze carries it off.
Female Pine Cones
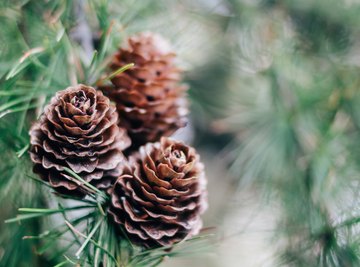
Female pine cones stand as quintessential pine cone. They live for several years, unlike male cones, and extend their scales in a broader fashion than male cones. Often, female cones sit lower on the tree to take advantage of the downward fall of pollen. Like male cones, female pine cones have scales, but these scales are much more prominent and are called megasporophylls. The scales orient themselves around a central stem.
Also like male cones, the female pine cone has a sporangium structure, referred to as a megasporangium. Through mitosis, a female megaspore in the megasporangium becomes a female megagametophyte. Each megagametophyte then produces one or more structures called an archegonium, each of them with an egg inside.
Gymnosperm Life Cycle
When the male pine cone releases its pollen, breezes and winds carry the pollen to another pine tree. Here the pollen can become caught between the central stem of the female cone and a megasporophyll, known as the pollination. The pollen then produces a pollen tube, which grows into the female megasporangium, also called an ovule. The process can take over a year.
When the tube has formed, sperm moves down the tube from the pollen to the female egg, a process called fertilization. The fertilized egg will produce an embryo. The embryo will sit enclosed in a seed case made up of part of the megasporophyll. The seed case will have a small wing that will help the wind disperse it effectively. As soon as the seed is mature, the female cone will open to release it. Many pollen grains pollinate and fertilize many female eggs at the same time in a female pine cone.
Gymnosperms and Angiosperms
Gymnosperms differ from angiosperms, or flowering plants, in having exposed seeds. For example, a cherry or peach seed is enclosed by fruit; apple and cherry trees are angiosperms. A plant's female clone produces the seeds of a gymnosperm. When the seeds mature, they shoot out as bare seeds to drift with the wind, fall to the ground and germinate.
References
About the Author
John Woloch writes professionally for various websites. He has published in the Dutch journal "Crux" and writes frequently on oil painting, classical languages and topics involving math and biochemistry. Woloch holds a Master of Arts in English from the University of Chicago, a Master of Arts in classics from Ohio State University and a postbaccalaureate pre-medical degree from Georgetown University.