Dioramas are essentially three-dimensional representations that students create to show what they know about a certain historical period or subject. The Cherokee people are a group of Native Americans originally from the Southeast region of the United States who were dislocated as far west as Oklahoma in the infamous 1838 migration known as the "Trail of Tears." You can use inexpensive craft materials to create a shoe box diorama to illustrate how the Cherokees lived and what they wore in historical times.
Things You'll Need:
- Card Stock
- Scissors
- Paintbrushes
- Acrylic Paint
- Shoe Box
- Fake Craft Moss
- Hot Glue Gun
- Pencil
- Craft Glue
- Ruler
- Sand
- Modeling Clay
- Construction Paper
- Colored Pencils
Turn a shoe box or other similarly sized box on its side and press dark brown air-dry modeling clay on the inside bottom to form the ground around a river that winds from one side of the box to the other. The Cherokee typically lived near rivers. Make the majority of the surface flat, with the banks of the river slanting down toward the bottom of the box. Paint the cardboard with blue acrylic paint for the river and wait 24 hours for the clay to dry.
Paint a background on the back and side panels of the inside of the box with acrylic paint that depicts forests around the clearing of the Cherokee village, with hills or mountains off in the distance. Wait eight hours for the paint to dry.
Brush craft glue along the banks of the river and sprinkle sand on the glue. Dump the excess sand out of the box. Glue fake green craft moss in various spots to represent vegetation. Wait at least two hours for the glue to dry.
Measure and cut light beige card stock to four 1-inch squares for the walls of each "wattle and daub" house. Wattle and daub houses were square, thatched-roof homes made of wood, river mud and covered in plaster. Glue the bottoms of each square to the ground near the river with a hot glue gun so that they form the house. Create the thatched roof by cutting light brown or yellow strips of construction paper that are 1 1/2 inches long by a quarter inch wide. Glue them in place with craft glue from the top edges of the walls to where they meet at the peak.
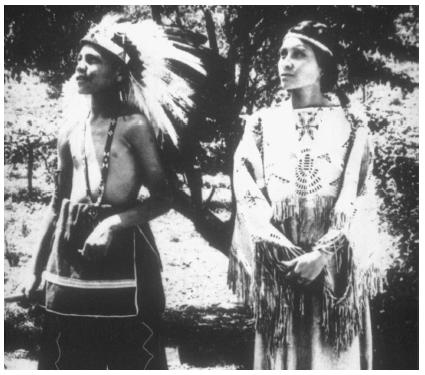
Draw on card stock a half-inch-tall man and woman wearing traditional Cherokee clothing. Refer to pictures to see what the clothing looked like (see Resources). Draw moccasins on their feet and a wraparound skirt and a poncho shirt for the woman. Draw a breech cloth on the man with a pair of leggings underneath. Color them in and cut them out. Glue the bottom edges of the people cutouts to the bottom of the diorama.
Draw bean, corn and squash plants on the card stock, color them in and cut them out. Glue them in lines on the bottom of the diorama with hot glue to represent the crops the Cherokee grew. Wait 20 minutes for the glue to harden before displaying the diorama.
References
Resources
Writer Bio
Angela Neal is a writer for various websites, specializing in published articles ranging from the categories of art and design to beauty and DIY fashion. Neal received her Associate of Arts in administrative assisting from Bohecker College.
Related Articles