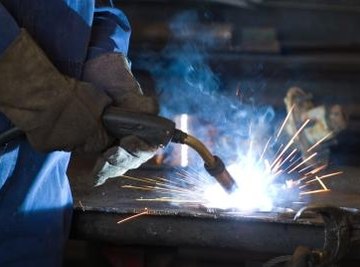
Welding materials is an effective way to join them together without employing fittings. MIG welding, TIG welding and stick welding are three types of electric arc welding. Arc welding refers to welding that is achieved by streaming an arc of electricity between an electrode and a workload. Most methods of welding use a shielding gas to promote smoothness at the weld point, prevent contamination at the weld point, improve quality of the weld and stabilize the live arc of electricity between electrode and workload.
MIG Welding
Gas metal arc welding refers to MIG welding; it is a method of welding that is often used when working on steel. The process essentially involves melting a fill-metal onto a workload. MIG welding is a relatively clean process; only a little spatter is produced while welding is taking place. Welders can perform longer welds without interruption using this method of welding because few starts and stops are required in the process. The typical shielding gas employed in this type of welding is either argon or an argon mixture containing oxygen or carbon dioxide. Perhaps some of the only drawbacks linked with this type of welding are that it can be difficult to create an arc to begin the whole process, and the welds this process creates can be heavily oxidized.
TIG Welding
Gas tungsten arc welding refers to TIG welding; it is a welding method often employed while working with magnesium, aluminum, titanium, nickel and copper alloys. TIG welds can be made with or without fill-metal. TIG welds can be created much smaller than MIG welds because heat is better pinpointed in TIG welding systems. One drawback to this type of welding when compared to MIG welding is that TIG welds take longer to produce than MIG welds. This type of welding is one of the cleanest methods because no spatter is produced. Argon alone or in combination with helium or hydrogen is often used as a shielding gas for this type of welding.
Stick Welding
One of the first methods of welding available, shielded metal arc welding is also referred to as stick welding. This method of welding is ideal for use on bridges, metal art, piping, tractors and other outdoor welding applications because outdoor elements like rain will not compromise the integrity of the weld. Proper stick welding can be difficult and is only recommended for very experienced welders.
References
Photo Credits
Jupiterimages/Photos.com/Getty Images