Making your own gravel patio is a great way to add an outdoor enjoyment space without spending a fortune. This type of patio is an easier DIY project than a concrete or flagstone patio, as the gravel is more forgiving when it comes to creating a level patio surface. There are no limits to the shapes you can make with a gravel patio either. No matter what the layout, the project still requires digging several inches of soil out of the site to create space for the base gravel, landscape fabric and top gravel layer.
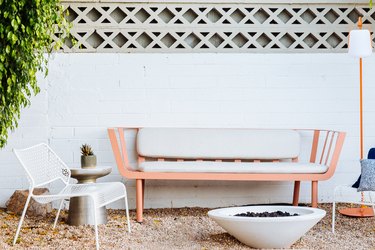
But once it's complete, you'll have a modern-looking patio space — all you need is to pull your patio furniture around, hang up some string lights and invite a few friends over to enjoy the fruits of your labor.
Video of the Day
Video of the Day
Planning Your Patio Project
While it's tempting to get started on your DIY gravel patio right away, safety comes first. No matter what your home state, call 811 at least a few days before you intend to dig out the space for your new patio. This allows time for a crew to come out and mark the locations of all underground utilities, preventing major issues and service interruptions that could occur if you just dug under the assumption that nothing was buried in your yard. Expect at least a couple days after dialing 811 before a crew marks your land; wait times vary by state and by the crew's schedule.
Plot the ideal patio size, location and layout while you wait. The patio should be within close range of a door should you plan to use the space for grilling, for instance. Look for tree roots in the project area as well because you don't want to harm your backyard trees by cutting too many. If you see a large root bulging out of the ground, you may want to adjust your patio layout to avoid removing part of such a crucial root.
Start your layout with twine or a garden hose and then stand within the area and visualize whether it has enough space for your patio set, grill or fire pit. Once you're relatively happy with the layout, mark it with spray-on lawn chalk or marking paint. If you plan to have a perfectly square or rectangular patio, you can mark the sides of the space with stakes and mason's line and then transfer the layout to the ground with chalk or paint for digging.
To Edge or Not to Edge
Landscape edging around the perimeter of the patio isn't completely necessary, but it's worth the time and effort to install it, as it does a good job of keeping the patio gravel contained to the patio. Edging helps create a clean border between the patio and yard. If you're planning a patio with a unique flowing or rounded shape, for instance, the edging helps keep that shape visible and intact over the years.
A quality metal edging that barely sits above ground level once installed is ideal for keeping stones in their places. Steel edging is sturdier than aluminum, although aluminum is more flexible for creating numerous curves. Edging installation varies from one style to the next, but they generally all require tapping down the edging with a hammer using a scrap block of wood between the top of the edging and the hammer to prevent damage to the edging.
Selecting and Calculating Base Gravel
Choose a material for your base gravel layer based on prices and local availability. Choose a compactible type of gravel rather than loose gravel, such as pea gravel, which doesn't pack as well. Coarse 3/4-inch crushed stone is a great option, as it's often inexpensive if quarried in your region. The stone matter may be limestone or other types of stone in your area. It's likely going to be dusty, so wear a dust mask when working with it. Washed gravel costs a bit more but doesn't contain dust. Quarry process or dense-graded aggregate, which is gravel mixed with stone dust, is also a nice choice since it packs down well; the dust fills the gaps between stones.
Figure out how much base gravel you need by measuring the square footage of the patio area. An 8 x 10-foot patio covers 80 square feet, for instance. If the area isn't evenly shaped, calculate the general square footage of the greater area anyway, as it's good to have a little overage. The base gravel layer needs to be about 2 inches deep, or 1/6 of a foot, which is 0.17 rounded up.
Since stone is sold in cubic yards rather than cubic feet, you'll have to figure out total cubic yardage. Multiply square footage by depth in feet; in this case, 80 x 0.17, to get 13.6. Divide that number by 27 to figure out total cubic yards, which comes to about 0.50 cubic yard in this example. If math isn't your strong point or if you want to verify your calculations, many gravel supply companies offer gravel calculators on their websites.
Choosing the Surface Gravel
When it comes to surface material, a DIY pea gravel patio is an excellent choice, but it's not the only option. Other choices include 1/4-inch washed clean stone, crushed granite or marble chips, although other types may be available in your area. A pea gravel patio is one of the most common gravel patio types, as these stones have somewhat smooth edges that make it relatively easy to walk upon. Pea gravel also has more color variation than some other surface gravels, such as washed stone or granite. No matter which material you choose, stick with a 1/4-inch to 3/8-inch size, as anything much larger than that is difficult to walk upon.
Washed stone is what often comes to mind when thinking of gravel. It's usually gray and does not have smoothed edges, so it may be a little less pleasant underfoot. It's relatively inexpensive, as is pea gravel, although prices could vary greatly depending on regional availability. Crushed granite is often similar in appearance and price. Check with your local supplier to determine if the granite is washed and screened for size, as some types of crushed granite contain smaller dusty particles that tend to get stuck in shoe treads and tracked indoors. The granite supplier may offer several different shades of this stone depending on availability, but the color variation generally isn't significant.
Marble chips are generally white with some streaks of gray or black. Some pieces sparkle in sunlight, making them attractive as a patio surface. Depending on the supplier, these chips may be more coarse than pea gravel, so they might not feel as good underfoot. The pricing depends on regional availability, but it could be a little higher than the cost of pea gravel or crushed stone.
Buying Landscape Fabric
Landscape fabric keeps the base gravel separate from the surface gravel, but it serves more than one purpose. It also helps keep the patio area free from mud when the ground gets saturated. Landscaping fabric also discourages weed growth. It doesn't prevent weeds entirely, but it could prolong the amount of time before weeds sprout through the gravel patio.
Choose a high-quality, permeable geotextile or landscape fabric. The permeability is important so rainwater doesn't pool on the patio. Chances are that you'll have to overlap pieces of landscaping fabric since the roll isn't likely to be as wide as your patio. Buy enough to account for a 6-inch overlap from one installed piece to the next.
How to Build a Gravel Patio
Whether you choose to build a pea gravel patio or use another small gravel for the patio surface, you'll need a solid base to support it. This means digging down a good 4 1/2 inches to provide enough depth for the base gravel layer and your chosen surface gravel.
Step 1: Excavate the Patio Area
Use a square-point shovel to dig out the grass and soil to a depth of about 4 1/2 inches following the perimeter lines you've marked. If the ground is too hard and dry to dig comfortably, wet the area with a hose to soften the soil, and if it's still too tough, rototill the soil first. Level the soil so it is smooth and ready to pack down, filling in low spots as needed. Compact the soil with a hand tamper so it's as level and firm as possible across the entire project area.
Step 2: Install the Edging
With your edging resting on the ground around the patio perimeter, choose an end as your starting point. Hold the edging piece completely vertical and hammer it into place using a block of wood between the hammer and the top of the edging. Some types of metal edging have connector sleeves for joining the pieces, while others require a wood stake and metal screws. Work your way around the entire patio perimeter, keeping the edging as vertical as possible. Use metal snips or a hacksaw to cut edging to size as needed.
Step 3: Spread the Base Gravel
Shovel a 2-inch layer of base gravel into the patio area and spread it evenly throughout with a rake so the depth is relatively consistent. If working with a gravel blend that contains stone powder, wear a respirator or dust mask to avoid breathing in the fine particles.
Step 4: Compact the Base Gravel
Use a rented plate compactor to pack down the base layer as firmly as possible. Use a long spirit level to check the stone for level from time to time. It doesn't have to be completely perfect, but a long level set atop the stone makes it easier to visualize dips and hills that need to be corrected and packed down again.
Step 5: Install the Landscape Fabric
Unroll a band of landscape fabric at one end of the patio area and cut it so it's slightly longer than the span it covers. Cut the next piece in a similar fashion, overlapping pieces by about 6 inches. Secure each piece with landscape fabric stakes.
Step 6: Spread the Surface Gravel
Installing the top layer of gravel is much like installing the base layer; it should be about 2 inches thick. Spread out the stones evenly with a garden rake and your shovel. Use the back side of the rake head to help level the surface. The goal is a total depth of about 1/2 inch lower than the top of the edging or surrounding landscape if you chose not to edge the area.
Step 7: Tamp and Maintain the Gravel
If necessary, tamp down the entire area with a hand tamper to help keep the stones from shifting too much as you walk upon the patio. Over time, they'll settle in a bit more on their own. A metal landscape or garden rake helps remove stray twigs and debris that may accumulate over time. Raking also levels out the stones should hills and indentations arise after heavy patio use, such as playing fetch over the area.