
How to Tape and Spackle Wallboard - Drywall Joints For Beginners
Using tape and joint compound, also called mud, on wallboard or drywall joints can be a frustrating job for beginners who aren't familiar with the ins and outs of this kind of project.
Traditional paper tape must be applied smoothly, with the right amount of mud both under and over the tape, and must be free of air pockets. It sounds complicated, but there is an easy method for beginners to achieve professional results.
Things You Will Need
- Tarps and/or plastic sheeting
- 6-inch putty knife
- 10-inch putty knife
- Medium-grit sandpaper
- Sponge
-
Remove furniture from the room, cover what furniture you can't move out and hang plastic over doorways to contain dust.
-
Check to be sure that all screws or nails are "sunk" into the wallboard, which means the heads are not higher than the wall surface, so the putty knife doesn't hit them when it's passed over the surface. Screw in or hammer any that are not deep enough.
-
Measure the joints and cut lengths of self-adhesive mesh tape accordingly. Apply the tape, adhesive side against the wallboard, to the joints and smooth gently with your hand.
-
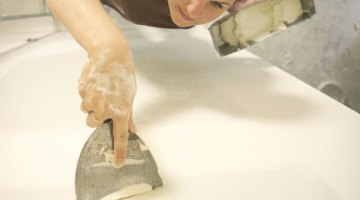
Use a 6-inch putty knife to apply the first coat of joint compound, or mud, to the joints directly over the mesh tape. There is normally a depression along the factory edges of the wallboard where pieces are seemed together -- this forms a "channel" for the joint compound on the first coat. Not every seem will have this channel, as smaller pieces of cut wallboard are used when an entire wall is covered. Fill the channel with mud using the 6-inch knife; and then pull the 10-inch knife over the same seem to remove the excess. Do not attempt to achieve a smooth, finished look on this first coat, especially on the cut seems. This first application needs just to be a thin, even coat that covers the mesh tape.
-
Fill the screw and nail head holes as you make your way around the seems in the room. Do this by pushing some joint compound into the hole and then dragging the knife across to scrape off the excess. Allow to dry completely.
-
Apply a second coat of mud to both joints and screw/nail head holes, and allow to dry thoroughly.
-
Use sandpaper to smooth any spots that are visibly rough or that have ridges from the ends of the putty knife. Brush away the dust from the sanding.
-
Add a little water to the joint compound to make it flow more easily, and apply a third coat. This time, use the 10-inch putty knife and use long, even strokes. Don't worry too much about the areas where the seems cross each other. This is the most difficult part, even for professionals, and you will sand them smooth later. Allow this coat to dry completely.
-
Sand lightly any visibly rough spots. Then wipe the entire wall with a damp sponge. Allow to dry before priming.
-
Inspect the wall after priming. The primer will make it easier to see where you may need to sand a bit more to make the wall perfectly smooth before you apply the final paint.
The Drip Cap
- Using tape and joint compound, also called mud, on wallboard or drywall joints can be a frustrating job for beginners who aren't familiar with the ins and outs of this kind of project.
- Use a 6-inch putty knife to apply the first coat of joint compound, or mud, to the joints directly over the mesh tape.
- Fill the channel with mud using the 6-inch knife; and then pull the 10-inch knife over the same seem to remove the excess.
- Don't worry too much about the areas where the seems cross each other.
- Sand lightly any visibly rough spots.
- Allow to dry before priming.
References
Writer Bio
This article was written by PocketSense staff. If you have any questions, please reach out to us on our contact us page.
Photo Credits
- Brand X Pictures/Brand X Pictures/Getty Images
- Brand X Pictures/Brand X Pictures/Getty Images
More Articles