Numbers and dates can be problematic in a Microsoft Word Mail Merge, especially when the data source is an Excel workbook. Some issues are more easily solved than others. Numbers without decimal values, such as a five-digit ZIP Code or an integer count, can be converted to text values in Excel. However, to avoid problems with dates and numbers in decimals, you need to insert formatting codes in these merge fields to format these values correctly in the documents produced.
Merging Integer Numbers
Video of the Day
Formatting integers is best performed before importing the source data into Word. This section discusses using Excel.
Video of the Day
Step 1: Open the Data Source
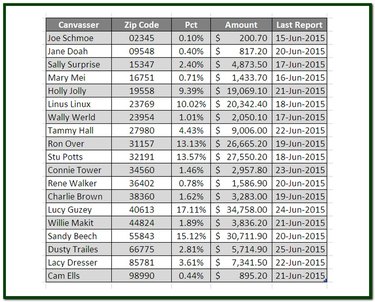
Open the Excel data source workbook and, if there are multiple sheets, click on the tab of the worksheet containing the source data for the Mail Merge.
Step 2: Format Integers as Text
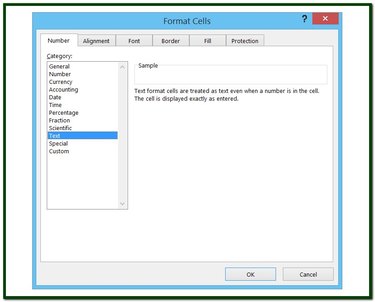
Select a column containing integer values. Right-click the selected cells and choose Format Cells from the pop-up menu to display the Format Cells dialog box. Click on the Text selection in the Category list. Click OK to apply the format change. The data in the selected cells is now in text format.
Merging Numbers with Decimal Values
For decimals, you can easily format the number directly in Word.
Step 1: Display Merge Fields

To format the number of decimal places in a numeric field, such as currency, percentages or any number with decimal values, add formatting codes to the merge field. Open the Mail Merge document (letter, email, etc.) to display its merge fields, which appear as <
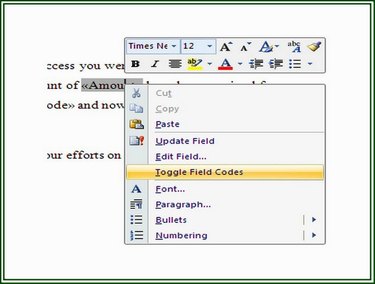
Step 2: Toggle Field Codes
The merge field <
Step 3: Insert Formatting Codes
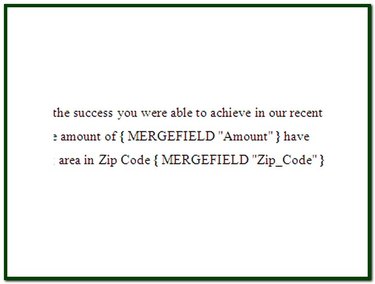
The <
- # - Indicates that formatting follows.
- $ - Designates a character to be displayed at the front of the field.
- , (comma) - Indicates commas are to be inserted, if applicable, in a numeric value.
- # (number sign) - Indicates the number of fixed digits to display.
- .00 - Indicates that a decimal value of two places (in this case) is to be displayed. A number without decimals displays with zeros after the decimal.
Merging Percentages
Like any number calculated by a formula in Excel, the raw values may not be limited to only two fixed decimal places, regardless of what displays in the cell. As shown in the previous step, the length of a number, especially any decimals, can be set to a fixed number of positions.
Actions in Formatting Codes
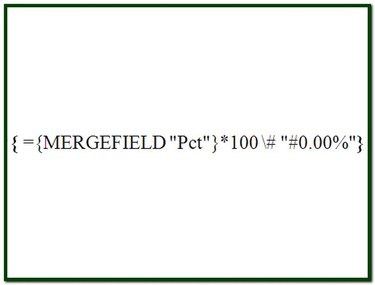
In some cases, it is necessary to merge a data field before it can be acted upon. The "Pct" field in the example is a case in point. To have this data appear in the merged document as a two-decimal percentage with at least one significant digit and a percent sign, requires two actions.
Step 1: Retrieve the Data
Replace the existing MERGEFIELD statement with the innermost action of the new statement MERGEFIELD "Pct". This statement clause retrieves the data from the data source and makes it available to the remainder of the formatting code. After entering the innermost clause, use the CTRL-F9 keys to enclose the statement in braces.
Step 2: Format the Data
Enter an equal sign ("=") before the statement entered in Step 1. This tells the Merge function that the statement includes an operator. Next enter the remainder of the formatting code, *100 # "#0.00%", immediately behind the rightmost brace of the inner statement. This clause multiplies the merge value by 100 (to shift the decimal place), formats the value as a two decimal percentage and displays the percent sign. At this point, the merge field should be ={ MERGEFIELD "Pct"}*100 # "#0.00%". Use CTRL-F9 to enclose the entire statement in braces and active it.
Merging Dates
To merge a date from Excel in the format of M/d/y, for example 6/15/2015, you don't need special formatting. This date format merges as is just fine. However, if you wish to display the date in any other format, such as June 15, 2015, some formatting codes are needed.
To merge a date field and display it as day, month, year, the formatting code is "@ "MMMM d, yyyy", where "@" indicates a date format and " MMMM d yyyy" indicates the month in text, the day with no leading zero and the year as a four-digit number