
Like a drop-in sink, a drop-in bathtub has a rim that rests on an enclosure, and building the enclosure, or tub surround, is the most important part of drop-in bathtub installation. The surround is most commonly a rectangular box built into an alcove, jutting out from a wall or sitting in the middle of the floor. No rule specifies that the surround has to be rectangular, and many aren't, but it's easier to build a rectangular surround than a round or oval one.
Most drop-in bathtubs are made of lightweight acrylic or fiberglass, but you can find heavier ones made from cast iron, porcelain, stone and solid surface materials. Heavier materials hold heat longer for better soaking, and a good soak is the main reason most people want a drop-in bathtub. Even a lightweight acrylic tub becomes heavy when filled with water, though, so the rim isn't designed to support the tub all by itself if at all. Some manufacturers, such as Kohler, recommend allowing a 1/16-inch (2-mm) space between the rim and the tub decking, leaving the tub supported entirely from underneath by a mortar bed resting on a solid subfloor.
Video of the Day
Video of the Day
An undermount bathtub is a variation of a drop-in tub that some people prefer because the lack of an exposed rim makes it easier to keep the tub deck free of water, and that prevents slipping and reduces the chances of mold growth. In terms of installation, the main difference between them is that you may have to build the surround around an undermount tub, whereas you can place a drop-in tub into the surround after framing it.
An Overview of Drop-In Bathtub Installation
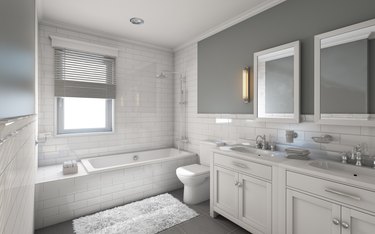
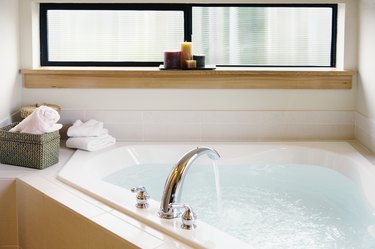
Like a freestanding tub, a drop-in tub can be located pretty much anywhere plumbing is available, so the first step in a drop-in bathtub installation is to choose the best location for it. Because it's primarily a soaking tub, you may want to place it next to a window so you can enjoy the view, and if you want, you can even set it in a living room with a suitable waterproof floor. It simplifies the plumbing installation if you build the surround next to a wall because that allows you to run the water pipes behind the wall just as you would for a conventional alcove bathtub. In fact, it's common to locate a drop-in tub in an alcove.
Installation begins with construction of the surround, which must be solid enough to support the tub and the right height to allow the tub to rest on the floor when the rim is resting on the surround decking (with any gap specified by the manufacturer). Most people cover the surround with wood or tile, and it's best to install the covering after setting the tub to make it easier to finalize the plumbing connections, but there's one exception. You should cover the decking before installing the tub to allow the rim to rest on the finished surface, which makes installing the decking easier and avoids leak-prone gaps around the rim that are likely if you cover the decking after tub placement.
Once you've built the tub frame and installed the drain assembly onto the tub, you typically lay a 1- to 2-inch mortar bed on the bottom of the surround and drop in the tub before the mortar sets. You then connect the drain and cover the surround, and if you're wise, you build in an access panel so you can take care of plumbing repairs without demolishing part of the surround. If you're installing a whirlpool tub, a panel is required by code to provide access to the electrical components.
Preparing for a Drop-In Bathtub Installation
You need a level and solid subfloor for a drop-in tub, which can weigh as much as 600 pounds when filled with water and occupied by someone weighing 200 pounds. If the existing subfloor feels unstable, consult a contractor and make any recommended repairs. The last thing you need under your new bathtub is rotted or sagging floor joists. If the floor is solid but out of level, you can usually correct it yourself by screwing a sheet of 3/4-inch plywood to the floor with shims underneath it to make it level.
If the tub surround is next to a wall, you can install the water pipes, faucet valve and tub spout in the wall, and you'll probably want to do this before building the surround, especially if you're tiling both the wall and the surround. It isn't always necessary to install the faucet before setting the tub, though. The faucet for a freestanding tub is often mounted on the floor next to the tub, and it can also go in before or after you set the tub. It's probably better to do it after so you can avoid having pipes in the way when you're lifting the tub into the enclosure.
The drain line for the tub comes in under the floor, and while you (or a plumber) can do the drain rough-in after setting the tub, you will need to make a cutout in the subfloor for the pipe that connects the tub drain and overflow drain. The cutout should extend from the tub drain to the front edge of the tub, a distance of about 12 inches, and be about 3 inches wide to allow the horizontal part of the tub drain assembly to hang below the floor.
How to Install a Drop-In Bathtub
Step 1: Measure the Height of the Rim
Unpack the tub and set it upright on a pair of 2x4s to raise it off the floor, making sure the drain opening in the bottom of the tub and the overflow drain opening are accessible. Set the tub as close to the installation location as possible to minimize the distance you have to carry it.
Measure the distance from the underside of the tub rim to the surface of one of the 2x4s. Add the manufacturer's recommended gap allowance and then add an inch for the mortar bed to get the height you need to build the enclosure. If you're going to finish the enclosure deck before setting the tub, don't forget to subtract the thickness of the finish material.
Step 2: Build the Frame for the Enclosure
Construct the tub enclosure frame with 2x4 lumber or, to be on the safe side, 2x6 lumber. Using 2x6 lumber not only strengthens the frame but it makes a wider deck for holding toiletries and drinks. The frame needs to be wide enough to allow the tub to drop while providing at least 1 inch of overlap for the rim on the deck. Check the manufacturer's specifications for the exact inside dimensions of the enclosure.
Drop-in alcove-style tubs may have flanges on three sides that you fasten to the walls. The enclosure frame should include ledger boards on all three sides to support the rim. The top of each ledger should be at the same height as the deck on the front wall, and all ledgers should be dead level.
Step 3: Cut Out the Drain Opening
Measure the location of the bathtub drain with respect to the sides and end of the tub and make a mark on the subfloor the same distance from the sides and front end of the enclosure. Using a reciprocating saw, cut an elliptical hole in the subfloor that extends from the front wall of the enclosure to a distance of about 2 inches behind the mark and that is about 3 inches wide.
Step 4: Install the Bathtub Drain Assembly
A bathtub drain assembly comes as a kit that includes elbow connections for the drain and overflow holes, a sanitary tee, pipes to connect these components, a drain flange that gets screwed onto the drain elbow from inside the tub and an overflow plate with screws to hold the overflow elbow. These come in metal and PVC versions, and if you're doing a DIY home improvement project, choose PVC because it's easier to work with.
Measure the distance from the drain opening to the front of the tub or look it up in the manufacturer's specs and cut a length of pipe to that length plus 2 inches of overlap (1 inch on either end). Dry-fit the drain and screw on the flange loosely and then dry-fit the tee and measure the distance from the overflow opening to the tee inlet. Cut another length of pipe to span the distance with a 2-inch overlap and then dry-fit the entire assembly to make sure it fits before gluing everything together.
Secure the drain fitting to the tub by packing the flange with plumbers' putty, inserting it through the drain opening and screwing it loosely into the drain elbow. Install the overflow plate and tighten the screws with a screwdriver. Then, tighten the drain flange with a drain tool.
Step 5: Prepare the Mortar Bed
Mix a bag of mortar with water to a dry, crumbly consistency. Shovel the mortar onto the subfloor and spread it evenly with a trowel to the depth that you predetermined when you built the enclosure, keeping in mind that the tub will compress some of the mortar and push it out of the way as it settles. Some builders recommend embedding steel netting in the mortar to prevent it from cracking, and it's a good idea to put plastic sheeting under the mortar to keep moisture out of the subfloor.

Step 6: Drop In the Bathtub
Place 1/16-inch spacers on the tub deck oriented in such a way to make them removable when the tub rim is resting on them. Lift the bathtub over the enclosure and lower it gently onto the mortar bed. This is a two- or three-person job depending on the weight of the tub. Check the level of each of the tub rims and move the tub as needed to level the tub in all directions and allow it to settle onto the spacers.
When the tub is level and at the right height, wait for the mortar to harden. Then, affix the rim to the enclosure using the hardware or other means provided or recommended by the manufacturer and then remove the spacers. For an alcove installation, secure the flange to the wall studs using screws or nails.
Step 7: Seal the Rim With Silicone Caulk
Run a bead of silicone caulk along all exposed edges of the rim to prevent water from seeping under the rim and behind the walls of the enclosure. If it's an alcove tub, install the wall covering over the nailing flange and seal the gap between the bottom of the wall covering and the tub rim (this gap should be less than 1/4 inch) with caulk.
Step 8: Finish the Tub Surround
Cover the tub surround frame with drywall or, if you plan to tile it, cement board. Install the final covering, which may be wood panels, tiles or some other material.
Step 9: Hook Up the Plumbing
Connect the tub drain assembly to a P-trap and connect the trap to the drain line. If the drain plumbing will be inaccessible when you cover the ceiling in the room underneath, it's best to use an ABS glue-together drain rather than one with compression nuts that could potentially leak.
If you haven't done it already, install the water supply lines, the tub faucet valve, the tub spout and the showerhead. Leave the drain pipes uncovered until you have a chance to fill the tub and check for leaks.