Things You'll Need
Paneling
Jig saw
Small paneling nails
Tack hammer
Pine wood shingles
Sharp utility knife
Ruler or measuring tape
Pencil
Wood glue
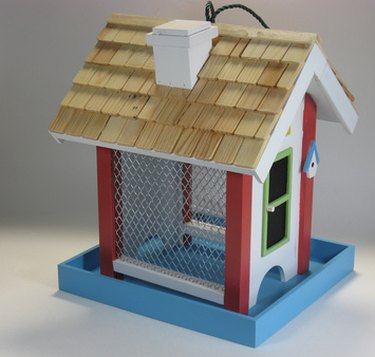
Pine wood shingles are less common on residential homes today, with most people opting for asphalt-based shingles. However, pine wood shingles are still popular enough that they are relatively easy to find at a commercial hardware store and can make a good roof covering for a birdhouse. Depending on the size of the birdhouse that you want to roof, it might be necessary to cut the shingles down in size using a sharp utility knife before placement.
Step 1
Cut a piece of wood paneling, or other thin wood, to the size and shape of the birdhouse roof using a jig saw. Attach both sides of the roof along the tops of the walls of the birdhouse with paneling nails.
Video of the Day
Step 2
Cut a shingle in half with a vertical cut using a sharp utility knife. Depending on the size of the birdhouse roof, you may need to cut the shingle in half again horizontally to create four small shingles from a single large one. You may need to cut more than one shingle if the roof is large. The smaller shingles will give the birdhouse roof a more realistic look with overlapping pieces.
Step 3
Find the exact middle point along the bottom of the roof using a ruler or measuring tape. Mark the center with a pencil.
Step 4
Line the middle of the first small shingle up with the middle of the roof. Allow a small amount of the shingle to overhang off the bottom of the roof and attach the shingle with a small amount of wood glue and two nails.
Step 5
Continue the row of shingles across the bottom of the roof working from the middle to the edges in both directions. If one shingle covers the entire width of the roof, move on to Step 7.
Step 6
Line up the second layer of shingles one half shingle to the left, so that the seams of the fist layer of shingles are staggered with the second layer.
Step 7
Allow the shingles to overlap by a small amount and attach with wood glue and two nails per shingle.
Step 8
Continue to stagger the shingles all the way to the top of the roof.
Step 9
Repeat the process on the other side of the roof, starting at the bottom middle and working to the top.
Tip
For a professional look on your birdhouse, when you have completed both sides of the roof, use a piece of corner trim to cap the top seam of the roof created by the shingles; this is known as a ridge-cap.
Video of the Day