
Whether it's in geometry class or a craft project, precision is important when dividing a circle. It is essential to identify the exact center point of the circle before proceeding to divide it; this point is easy to know if you start by drawing the circle from scratch with a compass. Once you've divided the circle into halves and then quarters, the process can be repeated to continue to divide the circle into equal segments.
- Compass
- Ruler
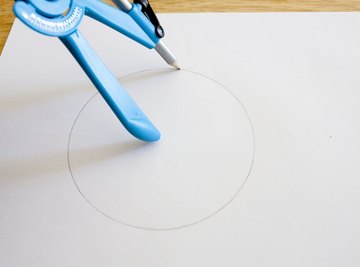
Draw a circle on a piece of paper using a compass. Pull the legs of the compass apart until the space between them measures one-half of the desired diameter of your circle. Place the needle of the compass down on the spot that will be the circle's center point. Put down the leg with the pencil and use your thumb and forefinger to turn the compass around to form a full circle, holding the needle leg in place.
Draw a straight line through the middle and two sides of the circle using a ruler. Place the ruler so that the line passes through the circle's center point. Extend the line all the way through the edges of the circle. Two equal segments will now appear on the circle.
Label the center point of the circle "A." Label one point where the center line intersects with the circle's edge "B" and the other such point "C."
Open the compass so the space between the legs is greater than one-half the circle's diameter.
Place the needle of the compass at point "B." Draw one arc that passes through two edges of the circle. Without adjusting the compass size, repeat this action by placing the needle at point "C." This will create two arcs in the circle that intersect at two points.
Draw a line through the center point of the circle and through the two points at which the arcs intersect. Four equal segments will now appear on the circle.
Label the second line's intersect points "D" and "E." To continue dividing the circle into equal segments, place the compass needle on one of the outer intersect points B,C,D or E and create an arc on the outside of the circle. Intersect this arc with another arc drawn from the next point on the circle. Draw a straight line from the center point of the circle to where the two arcs intersect. Continue until the entire circle has been divided in the same way.
Things You'll Need
About the Author
Catherine Lovering has written about business, tax, careers and pets since 2006. Lovering holds a B.A. (political science), LL.B. (law) and LL.L. (civil law).
Photo Credits
Ariel Gonzalez/Demand Media