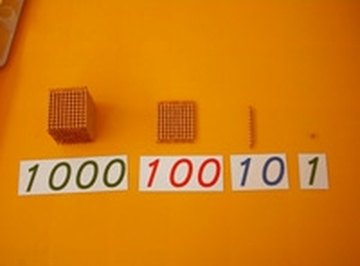
Montessori golden beads are golden beads, all the same size, that are used to help students understand unit quantities of tens, hundreds and thousands. A single bead comprises one unit, or a point. Ten beads strung on a wire indicates ten, or a line. One hundred is indicated by ten bars side by side, which makes a square, and one thousand is ten one hundreds stacked on top of each other, making a cube. You can use these various manifestations of these numbers to introduce the decimal system and, later, practice using it. This should be done after the child has mastered counting.
- 1 golden bead
- 10 beads in a bar
- 100 beads in a square
- 1000 beads in a cube
- Dark green mat
Sit side by side with the child. You should be on the same side of the mat on the floor or the table.
Introduce the one and the ten bar. Put the single bead on the mat and ask the child how many that is. The child should answer, "one." When he does so, remove the bead and replace it with the line of ten beads. Ask how many beads are in the line and let the child count them to reach ten.
Count out the hundred square together. Place the square on the mat in front of you both and tell the child, "This is one hundred." Make it sound impressive so that it will be easier to remember. After all, one hundred is a pretty big number. Count the lines of ten in the hundred square by saying and pointing together, "One ten, two tens, three tens, four tens, five tens, six tens, seven tens, eight tens, nine tens, ten tens." This demonstrates that you can use tens to build up to one hundred. Reinforce this with each counting by ending it with "Ten tens adds up to one hundred." Once the child seems comfortable counting the lines of tens in the hundred, move on.
Count out the thousand cube together. Put the cube on the mat in front of you both and tell the student, "This is one thousand" and repeat the word thousand several times. Count the hundred squares in the same manner in which you counted the ten lines in the hundred. Start out by saying "one hundred, two hundreds, three hundreds," and end with, "...ten hundreds. Ten hundreds add up to one thousand."
Test the child's recall of the various units of measurement. Put the bead, the ten line, the hundred square and the thousand cube all on the mat. Then name various quantities and ask the child to point to the number you just named. If you wish, count them out again as you go. This also will help the student compare the quantities to each other visually.
Ask the child directly about various quantities. Show her the line, for example, and ask him its name. Do this with all of the quantities until the child appears very familiar with them.
Keep the golden beads on an accessible shelf. The student can retrieve them whenever he wishes and name them, count them and look at them. It is very important that this is a regularly visited lesson during the child's lesson time even when you are not supervising.
Things You'll Need
Photo Credits
http://www.mymontessorihouse.com/images/golden_beads.jpg,http://www.rtcreations.com/maths-golden-beads.jpg