
How to Build a Tire Jump

The tire jump is an interesting variation on a normal hurdle. It is constructed of a frame with a large hoop in the middle that resembles a tire, hence the name tire jump. It is fairly easy to build at home, and will help make your dog a pro in the agility ring.
Things You Will Need
- 2 – 48-inch PVC pipe 1 ¼-inch diameter
- 2 – 60-inch PVC pipe 1 ¼-inch diameter
- 4 – 16-inch PVC pipe 1 ¼” diameter
- 2 – 1 ¼-inch PVC joints
- 2 – 4 way PVC joints
- 4 – PVC caps
- 2 Eye screws
- 7 Eye bolts
- 4 Double-ended snaps
- PVC glue
- 1 – 96-inch length of flexible tubing, such as drain pipe
- 1 – 24-inch section chain
- 2 – long bungee cords
- Duct tape
- Paint or tape
Warning
Do not leave any rough edges or sharp items protruding from your tire swing. You do not want to cause injury to your dog on any obstacle.
Tip
Let all your components dry before attaching them together. If the paint or glue is not dry before you put them together, they will stick. Be sure to adjust your tire to the right height for your dog. You can shorten or lengthen the chain as necessary.
-
Place one section of the 16-inch PVC pieces in opposing arms of the 4-way joint, so that the joint lies flat on the ground with an opening on top and in the middle. These joints will serve as a base for your tire jump, and the remaining pieces will be fitted into them.
-
Attach the two u-shaped PVC joints to one end of each of the 60-inch pieces of pipe. Place one of the 48-inch pieces of pipe between the two longer pieces and push them together to secure them.
-
Run the remaining piece of 48-inch pipe between the two base pieces, and push the ends of the pipe into the holes in the 4-way joint. This completes your base section and adds stability to your tire jump.
-
Push the two 60-inch pieces of PVC into the upwards-facing holes in the 4-way joint. These tall pieces make up the upright section on the tire jump. They are quite long due to the fact that you can make your jump adjustable to fit dogs of varying heights. You now have a completed frame for your tire jump.
-
Paint your PVC frame now if you like. Be sure to use a paint that is approved for PVC pipe, as some paints will not stick to the pipe. Color choice is really not an issue, as long as your tire portion contrasts with the frame itself.
-
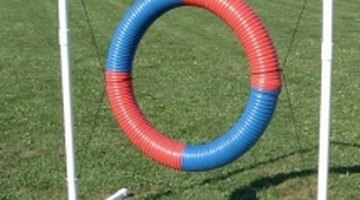
Assemble your tire portion. Take your tubing and run both of the open ends together, to form a solid ring. You can adjust the size as needed by feeding more of the tubing inside itself, but a 24-inch diameter is a fairly standard size. Duct tape or glue the ends to secure the tubing once you have your size decided on.
-
Measure 10 inches from both ends of the top and bottom of your frame, so you have four clear markings on your frame. Drill a hole through each of these marked areas, and attach one of your bolts to each section, with the eye hook portion facing the inside of the frame.
-
Mark a spot exactly in the middle of the top bar of your frame, and drill a hole there as well. Fit one more eye bolt in that section, and secure firmly. Place one of your double-ended snaps on each end of your chain, and hang your chain from that middle eye bolt. That is the adjustment area of your tire jump, so you can shorten or lengthen the chain as necessary.
-
Decide the 3 o’clock, 6 o’clock, 9 o’clock and 12 o’clock spots on your tire, and screw an eye screw into the 9 o’clock, 12 o’clock and 3 o’clock areas. You will use these eye bolts to attach your support cords to your tire portion. Attach the chain to the 12 o’clock bolt, and adjust it to the appropriate height.
-
Run your bungee cords through the 9 o’clock and 3 o’clock eye bolts, and secure them to the top and bottom of your frame. You can now slide your tire up and down on the cords, and know that your tire is securely fastened to the frame.
-
Paint or tape off your tire now if desired. Many people paint their tires in contrasting colors to make them easier to distinguish for the dog when running the course. Once your paint is dry, you and your canine partner will be ready to train on your new tire jump.
Tips
- Let all your components dry before attaching them together. If the paint or glue is not dry before you put them together, they will stick.
- Be sure to adjust your tire to the right height for your dog. You can shorten or lengthen the chain as necessary.
Warnings
- Do not leave any rough edges or sharp items protruding from your tire swing. You do not want to cause injury to your dog on any obstacle.
Writer Bio
Louise Lawson has been a published author and editor for more than 10 years. Lawson specializes in pet and food-related articles, utilizing her 15 years as a sous chef and as a dog breeder, handler and trainer to produce pieces for online and print publications.
Photo Credits
- http://www.thedogsupplyco.com
- http://www.thedogsupplyco.com
More Articles