
Laminate flooring is a popular choice for DIY home improvement projects because it is one of the easiest flooring materials to install without a professional. Learning how to install laminate flooring begins with deciding which type of laminate to use, but there are some initial steps to consider before starting the installation.
Consider purchasing a laminate floor installation kit, which typically costs about $20 and includes special tools like spacers, pull bars and a tapping block to help make installation a little easier.
Video of the Day
Video of the Day
Types of Laminate Flooring
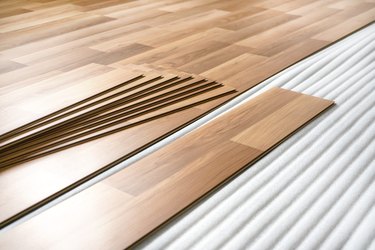
Laminate flooring comes in two types, each of which uses tongue-and-groove planks that snap together and has a thickness of approximately 1/4 inch. The difference between the two types of laminate flooring lies in of what they are made.
Plastic laminate has a hard top coat and internal plastic components. Designed to mimic the look of real wood, plastic laminate flooring comes in a variety of wood-grain prints that most people won't distinguish from the real thing. Engineered laminate, however, offers an even more realistic imitation of natural wood because it includes a thin top layer made of genuine hardwood.
Which type of laminate flooring is best for you depends on your personal preferences and budgetary constraints. Engineered laminate flooring will cost you at least double what you can expect to pay for plastic laminate, but it is more vulnerable to dents, scuffs and stains. However, despite being more susceptible to damage, engineered laminate is more durable than plastic laminate because it can gain new life from sanding and refinishing.
Things You'll Need
How to Install Laminate Wood Flooring
Preparation and careful planning are key components of successful flooring installation. While some basic carpentry skills are necessary, the average homeowner taking on laminate floor installation as a home improvement project can usually get the job done in one weekend.
Step 1: Let Your Laminate Breathe
Remove the laminate from its box and give it 48 to 72 hours of time to sit openly in the room where it will be installed. This process will give the laminate a chance to get acclimated to the humidity level and to go through its initial expansion phase before flooring installation.
Step 2: Assess and Clean Your Subfloor
Laminate planks can be installed over virtually any subfloor except for carpeting as long as the floor is flat, level, in good condition and clean.
Use an 8-foot straightedge to inspect your subfloor for low points. If necessary, use a leveling compound to fill in any low points. Thoroughly check your subfloor for damage and repair as needed.
If your subfloor is concrete, use a moisture meter to check for excess moisture. For a tile subfloor, fill in grout and cracks to create a smooth, flat and level surface.
Use a broom to thoroughly sweep away all debris and loose particles.
Read more: What Is a Subfloor?
Step 3: Consider the Baseboards
Whether or not you remove the existing baseboard molding prior to installing laminate flooring depends on their condition and ease of removal.
If the baseboards are in good condition and are easy to remove, taking them off and setting them aside for reinstallation after the laminate flooring is installed will make your flooring installation somewhat easier. However, if the baseboards are in poor condition or removal runs the risk of incurring damage, it might be best to leave them in place.
If you decide not to remove the baseboards prior to installing your laminate flooring, you can install quarter round molding to cover the expansion gap and attach the molding to the bottom of the existing baseboard rather than into the flooring.
Step 4: Install the Underlayment
Underlayment is a layer of material that protects your new laminate flooring and gives it more stability. Certain types of underlayment also include a vapor barrier or an extra layer to help it better absorb sound. Underlayment comes in large rolls that are easy to install. Simply unroll the underlayment one row at a time, lay it on the subfloor and use a utility knife to cut away any excess.
Step 5: Undercut Doorjambs and Casings
Laminate flooring is designed to be a floating floor product, which means you'll need to leave enough space to allow for movement. Stack a scrap piece of laminate flooring on a strip of underlayment and use that to gauge how much you'll need to cut from your doorjambs and casings (door moldings). The goal is to undercut the doorjambs and casings enough for the flooring to easily slip underneath. Use a handsaw for this.

Step 6: Plan the Layout
Use the longest and straightest wall in the room to help you decide the direction in which you'll lay the laminate planks. It's a good idea to avoid laying a narrow strip against the focal-point wall and to make sure that the planks in the last row are at least 2-inches wide. Takes these things into consideration when trimming and cutting your planks to size.
Step 7: Trim the Laminate Planks
The most challenging component of installing laminate flooring involves trimming and cutting the laminate planks to navigate around obstacles and fit properly into the space required. According to Home Flooring Pros, it can take some practice before the average homeowner can perfectly trim and cut laminate planks.
Use a jigsaw to make cuts in the laminate planks so they better fit around pipes and other obstacles. You can also use the jigsaw to cut the boards to width and length, although a table saw or circular saw is better. Don't forget to use a tape measure to measure the amount required when cutting to length.
Read more: Laminate Flooring: What You Need to Know
Step 8: Read the Manufacturer's Directions
While it may sound like a no-brainer, some novice floor installers forget to read the instructions that come with the flooring they've purchased. Some manufacturers might have specific suggestions of which you need to be aware, like cutting off the tongue edge of laminate planks that are facing walls. Carefully read the manufacturer's instructions for how to install laminate flooring before you get started so you don't run into any surprises down the road.
Step 9: Install the First Row
Install your laminate flooring one row at a time. Install the first row of planks with the tongue side facing out. Use the tongue-and-groove edges to connect one plank to another. Ensure a snug connection by using a tapping block to gently tap the pieces together.
Step 10: Install Additional Rows
After you have completed your first row of installation, continue installing additional rows one at a time. For each new row, stagger the seams by 12 or more inches to keep the space from looking too uniform. You might be able to start the next row using the piece from the last plank you cut to end the previous row.
Step 11: Install the Last Row
When installing the last row, slide the laminate planks into position at an angle. Remember that there needs to be a 1/4-inch expansion gap between the last row and the wall. Use a pull bar to help you properly position the last row into place.
Step 12: Reinstall the Baseboards
If you removed your baseboard molding prior to installing your laminate flooring, you can reinstall it after all your laminate planks are snugly in place. Use a hammer and finishing nails to reinstall the baseboards.
Step 13: Connect Laminate to Adjoining Surfaces
Once your laminate planks are installed and the baseboard moldings are in place, use transition strips to connect the laminate with any adjoining surfaces, like carpet, tile or other flooring in an adjoining room. Nail the transition piece through the trim and wall rather than through the floor.
Gluing Laminate Flooring
Some installers use laminate glue or waterproof adhesive when installing laminate flooring. The idea behind this is to prevent water from spills or cleaning from seeping into the floor, which is why glued laminate is most often used in bathrooms or mud rooms where water contact with the floor is common. The glue is applied to the planks so that they stick to each other as opposed to gluing the planks to the subfloor.
Gluing laminate planks could void the warranty on your new flooring, so be sure to check the manufacturer's warranty details before doing anything that could compromise it. Another thing to consider when thinking about using adhesives with your laminate flooring installation is that it would make it far more difficult to replace a plank if damaged. You'll need to weigh the pros and cons carefully to determine if gluing your planks is worthwhile.