Not many plants have been honored with a color and fragrance bearing their name, but lavender (Lavendula spp.) makes the list of honorees. Grow lavender in a pot to enjoy this classic indoors and outdoors. These sun-loving herbs, perennials in U.S. Department of Agriculture plant hardiness zones 5 through 10, depending on species and cultivar, fill the midsummer garden with fragrance from their silvery leaves and white, rose, lavender-blue or deep-purple blooms.
French, or fringed, lavender (Lavandula dentata, zones 8-10) grows especially well in pots and is easily trained as a topiary. Other container-suitable varieties include English lavenders Munstead (Lavandula angustifolia 'Munstead,' zones 5-8) and Hidcote (Lavandula angustifolia 'Hidcote,' zones 5-8).
Video of the Day
Video of the Day
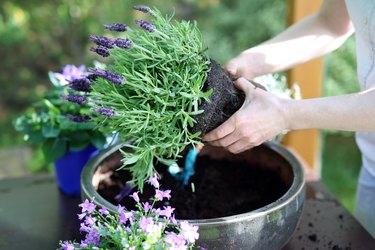
Choosing a Lavender Pot
Lavender appreciates a tight fit. When you grow lavender in a pot, choose a pot with a diameter no more than 1 to 2 inches larger than the plant's root ball. Most lavenders need a pot at least 12 inches in diameter to accommodate their shrubby habits. Terra-cotta containers lose moisture more quickly than plastic ones, and reduce the chances of wet soil causing root rot. As an herb adapted to dry Mediterranean soils, lavender requires a container with drainage holes in its base.
Preparing Potting Mix
The best potting mix for lavender is light, slightly alkaline and enhanced with slow-release nutrients. Finding a good commercial soil may be difficult, but making one isn't. Mix equal parts of sterilized garden soil, moistened sphagnum peat moss and perlite in a large container. A 12-inch pot holds about 12 quarts of potting mix.
Adjust the moss and perlite amounts until the mix feels light and fluffy. Fill the container deeply enough that the top 1 inch of the lavender's crown remains exposed, and mix 1 tablespoon of alkalizing dolomitic lime into the potting soil.
After planting the lavender, sprinkle 1/2 cup of 3-0.5-3 alfalfa meal fertilizer over the potting mix and scratch it in. Alfalfa meal supplies nitrogen for healthy leaves and potassium for strong roots.
Sun Requirements for Lavender
Set the pot where it gets at least eight hours of daily sun. In a cool-summer climate, potted lavender benefits from being on or next to a heat-reflecting concrete surface, such as an entryway, walkway or patio.
Indoor lavender plants also need a sunny spot. A sunroom or a room with a south-facing window is ideal to give your potted lavender as much direct sunlight as possible. If the plant looks spindly or stops growing flowers, it's likely not getting enough sunlight. When you find an ideal spot, rotate the plant each week to ensure it grows well on all sides. Choose an indoor spot away from heating and cooling vents to keep a consistent temperature.
Ongoing Care to Grow Lavender
Check the soil to determine when your lavender plant needs to be watered. Stick your finger into the soil to determine when the top inch of the soil is dry as an indicator. Water the lavender plant until liquid runs from the drainage holes. Too much water can cause your lavender to develop powdery mildew or root rot.
Lavender isn't a heavy feeder, but it does benefit from some fertilizer. For indoor potted lavender, use half-strength liquid houseplant fertilizer once a month. A half-strength, water-soluble, all-purpose fertilizer works for outdoor plants. Fertilize monthly during the spring and summer months, and withhold fertilizer during the fall and winter months.
In a cold-winter climate, move the lavender to an unheated shed, garage or enclosed porch for overwintering. Stop fertilizing, and water only if the potting mix alternately freezes and thaws. In that case, water every two weeks. In spring, new growth emerges at the base of the old, grayish stems. Cut the grayish portions back to slightly above this new growth using clean, sharp pruning shears disinfected in between cuts with rubbing alcohol.