Maya has four panels or Viewports visible on the interface: Top, perspective, front and side. Click the Panels tab above the viewport window and select Orthographic to change a viewport to the desired view.
Maximize and Minimize a Viewport
- Hover the cursor over any viewport window and press the spacebar to maximize the viewport.
- Press the spacebar again to return the viewport to a four-panel view.
Video of the Day
Video of the Day
At the top menu, select Window and then View Arrangement to alter the window sets in Maya.
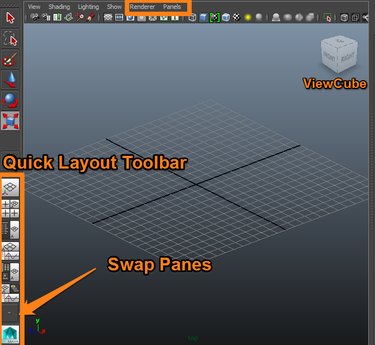
Use the Toolbar
Another way to adjust the panel layout is to use Maya's Quick Layout buttons located underneath the Toolbar on the left side of the interface.
For a comprehensive list of panels, click the arrow on the bottom of the Quick Layout toolbar to swap panes or panels. Each arrow on this button represents a panel. In the Four Panes layout, four arrows correspond to each pane. In a Single Pane configuration there is only one option to swap panes.
Use the Viewcube
Instead of using menus to change viewports, you can use Maya's Viewcube, which is a visual representation of the orthographic views shown as faces on a box. If the Viewcube is not displayed, click Renderer found next to the Panels tab and select Legacy Default Viewport to display the Viewcube.
On the Viewcube click, hold and move the left mouse button to change the perspective by hand. Right-click to access additional menus.
- The small arrows change the view direction.
- The rotate arrows change the orientation.
- The home icon resets to the default setting.