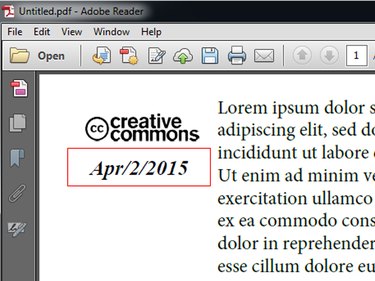
You can insert date fields into your PDF files in Adobe Acrobat XI and display the date automatically from the system clock when a reader opens the document. This is accomplished by using a short JavaScript script. Acrobat can hide the date field and run the script when the document is printed. In this case, the field is only displayed on the printout.
You don't need to know JavaScript to insert the date field.
Video of the Day
Video of the Day
Step 1
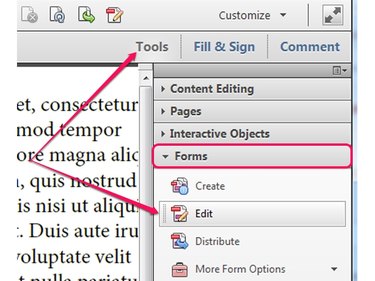
Open the PDF file you want to edit in Adobe Acrobat XI or create a new PDF. Click the Tools button, select the Forms option and then click the Edit button to switch to form editing mode. Alternatively, press Ctrl-Shift-7 to enter form editing mode.
Step 2

Click Yes if Acrobat warns you that there are no forms in the PDF file to enter form editing mode.
Step 3
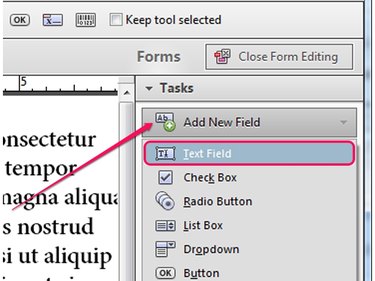
Click the Add New Field button in the Tasks group of the right pane and select Text Field from the drop-down box to insert a new text field into the document.
Step 4
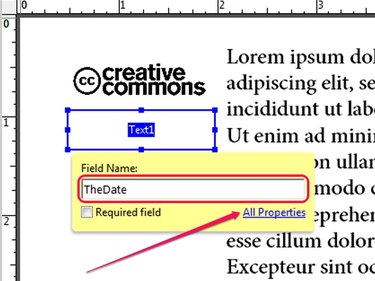
Click and drag with the mouse over the document to define the size and position of the new field. Type a label for the new text field -- "TheDate" for example -- into the Field Name field and then click the All Properties link to display the Text Field Properties window.
Step 5
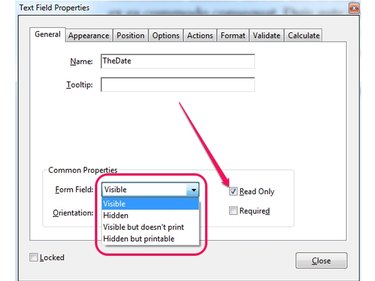
Select an option from the Form Field box on the General tab to change how the field is displayed.
If you select Visible, the field is always visible. Select Hidden but Printable to display the field only when the document is printed; the field is invisible to the reader until he prints it. Select Hidden to make the field invisible. To avoid printing a visible date field, select Visible but Doesn't Print.
Step 6
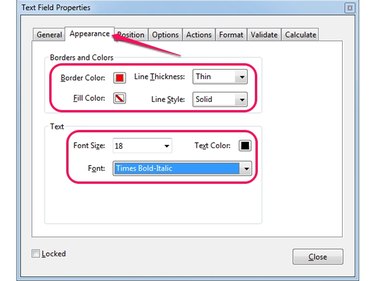
Switch to the Appearance tab to change the appearance of the field. You can add a border around the field by selecting a color from the Border Color box or fill the field by selecting a fill color from the Fill Color box.
Change the font in the Font box and the font size using the Font Size field. You can select a different font color from the Text Color box.
Step 7
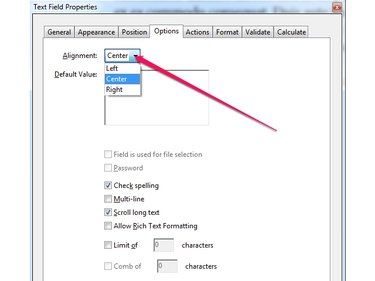
Switch to the Options tab and select the alignment of the text in the text field from the Alignment box. You can choose to align the text to the left, center or right. Click the Close button to apply the changes and close the Text Field Properties window.
Step 8
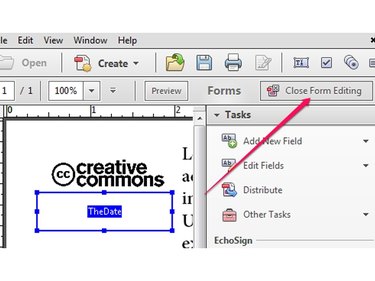
Click the Close Form Editing button to exit form editing mode. The field is not visible until you create and use the JavaScript script.
Step 9
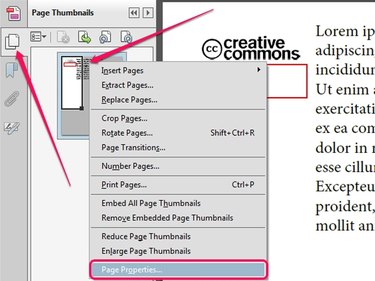
Click the Page Thumbnails button in the left-side toolbox to display the Page Thumbnails page, right-click the thumbnail of the page that contains the text field and select Page Properties from the context menu to display the Page Properties dialog.
Step 10
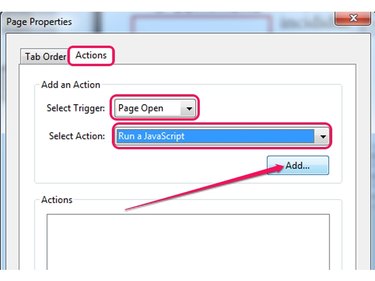
Switch to the Actions tab and select Page Open from the Select Trigger box to run the script when the page is opened. Select Run a JavaScript from the Select Action box and then click the Add button to display the JavaScript Editor dialog.
Step 11
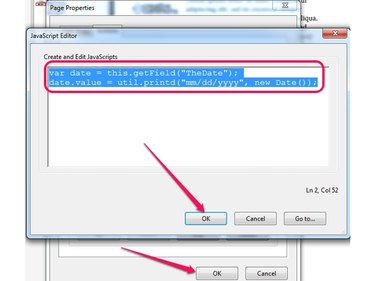
Type var date = this.getField("TextFieldLabel"); into the Create and Edit JavaScripts box to assign a variable to the text field. Make sure to replace TextFieldLabel in your script with the label you used when you created the field -- "TheDate," for example.
Press Enter to start a new line and type date.value = util.printd("mm/dd/yyyy", new Date()); to add the date from the system clock to the field. The mm/dd/yyyy section controls how the date is displayed; you can safely change the order of the three variables.
Click OK to save the script and then click OK to save the changes and close the Page Properties dialog.
Step 12
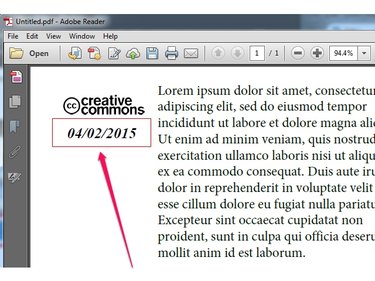
Press Ctrl-S to save the changes to the PDF file and then open the document in Adobe Reader or another PDF viewer to test the date field.