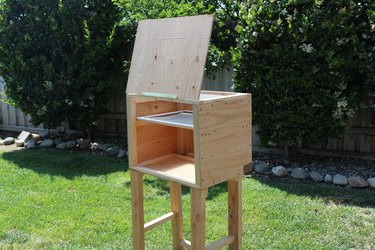
Building a sun-powered food dehydrator is a great alternative to an electric dehydrator, which can be expensive and consume a lot of energy. Since this model is lightweight, you can move it around to the sunniest spots in your yard. Choose from a variety of fruits, vegetables and herbs to dehydrate.
Video of the Day
Things You'll Need
1 pine one-by-two, 20 feet
18-by-24-inch clear acrylic plastic sheet
Miter saw
Wood glue
Clamps
Rotozip
18 screws, 1/2 inches
1 sheet of 3/4-inch plywood
Circular saw
Power drill
7/16 drill bit
1 box of 1 1/4 inch screws
16 screws, 2 1/2 inches
1 pine two-by-two, 14 feet
1 pine two-by-four, 10 feet
Sawzall
Hinge
Screen material
Scissors
Staple gun and staples
20-by-18-inch window screen
Warning
Be sure not to use chemically treated woods, as the toxic fumes could leach into the food during dehydration. Follow all safety warnings on power tools when operating them and wear safety goggles.
Tip
When choosing the wood, lay it on every side to ensure that it lays flat on all sides. Do not cut all the wood ahead of time; to save on errors, cut it when you need it. Double-check all measurements before cutting.

Step 1: Create the Top of the Box
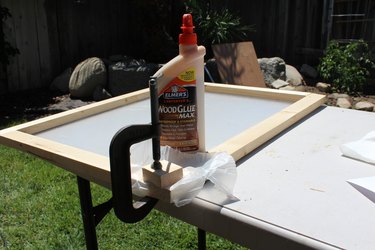
The top of the dehydrator box will be made using the clear acrylic plastic sheet and pieces cut from the one-by-two to frame it. Use the miter saw to cut the one-by-two into two 16-inch pieces and two 25-inch pieces. Glue the wood pieces together into a rectangle shape with wood glue. Clamp and let dry.
Video of the Day
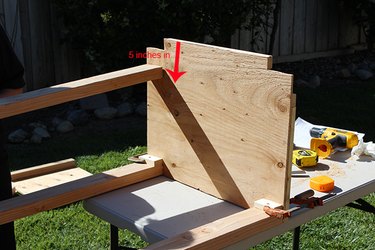
Once dry, place the wood rectangle onto a flat surface and place the clear acrylic sheet on top of it. The sheet should be about 1 inch from all edges when centered. Use the rotozip to drill through the plastic into the wood, drilling five evenly-spaced holes on the longer sides and four holes on the shorter sides. Be sure to use a low torque setting to prevent the plastic from cracking. Screw in 1/2-inch screws where you pre-drilled the holes. You now have the top of your dehydrator.
Step 2: Cut Out the Box Pieces
Cut out all five pieces for your dehydrator box from the plywood using the circular saw:
- Bottom, front and back pieces: 19 by 25 inches
- Left and right side pieces: 19 by 19 inches
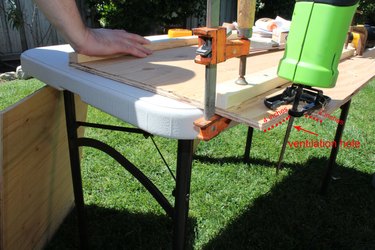
On the bottom piece, use the miter saw to cut out two rectangular 2-by-4-inch ventilation holes on one of the 25-inch sides, one hole in each corner.
Step 3: Reinforce the Bottom Piece
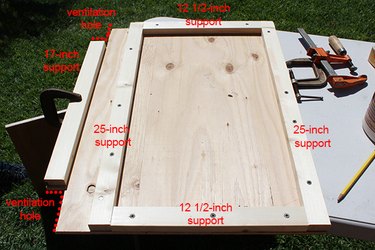
Next, cut the reinforcements for the bottom piece. Cut a 17-inch piece from the one-by-two. Place this on the bottom piece between the two ventilation holes. Drill three evenly-spaced holes through the reinforcement piece into the bottom piece with the 7/16 drill bit and screw 1 1/4-inch screws into the holes.
Then, cut the one-by-two into two 25-inch pieces and two 12 1/2-inch pieces. Place the first 25-inch piece flush with the front of the bottom piece, and drill five evenly-spaced holes through it into the bottom piece to help prevent cracking before drilling in 1 1/4-inch screws. Place the 12 1/2-inch pieces flush with either side and attach each with three evenly-spaced screws. Place the remaining 25-inch piece flush with the ends of the 12 1/2-inch pieces and attach with five evenly-spaced screws.
Step 4: Attach Legs to the Dehydrator Box
Using the miter saw, cut four pieces from the two-by-four that are each 2 1/2 feet long. These will be the legs. Take one of the legs and place one end lengthwise underneath the front-right corner of the bottom piece. Drill two holes through the bottom piece into the leg using a 7/16 drill bit and then drill 2 1/2-inch screws into the holes. Repeat with another leg on the opposite front corner.
Then cut two 3-inch pieces from the one-by-two for support pieces. Place each of these pieces at the top-back part of the legs using glue. Drill in a 1 1/4-inch screw in each to hold in place. Now line the two back legs up with the reinforcement piece on the other side, 5 inches in from the back, and connect them by drilling two 2 1/2-inch screws through the reinforcement piece into each leg.
Step 5: Add Support Beams to the Legs
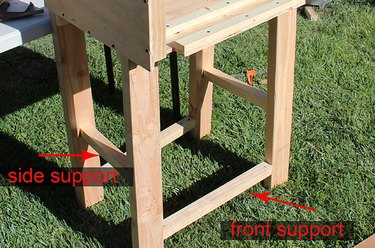
Cut two 1-foot pieces and two 18-inch pieces from the two-by-two. Place an 18-inch piece between the two front legs, about 5 inches from the ground (or what would be the ground, since you will most likely be holding this upside-down). Drill a 2 1/2-inch screw at an angle into each side to fasten the support beam into place between the legs. Do the same with an 18-inch support piece between the two back legs. For the side support beams, place the 1-foot pieces between the front and back legs on each side, about 18 inches from the ground, and drill in place with 2 1/2-inch screws.
Tip
Be sure to pre-drill the holes with a 7/16 drill bit before drilling in the screws to avoid splitting the wood.

Step 6: Build the Sides of the Box
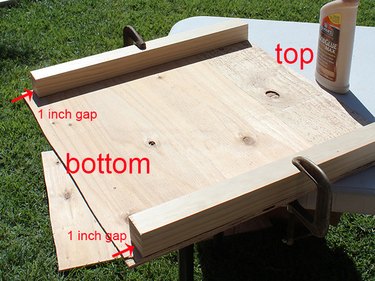
Start by cutting the two-by-two into four 18-inch pieces and two 16 1/2-inch pieces. Gather both 19-by-19-inch side pieces that you cut in Step 2. Glue one of the 18-inch pieces along the side of a side piece, flush with the top so there is a 1-inch gap from the bottom. Do the same on the opposite side. Drill five 1 1/4-inch screws from the outside of the box into each two-by-two to secure them into place. Now take a 16 1/2-inch piece and place it flush with the top of the side piece, fitting it snugly between the two 18-inch pieces and gluing it in place. Drill three 1 1/4-inch screws from the other side of the board into the support piece. Repeat on the other side piece.
Step 7: Attach the Side Pieces to the Bottom
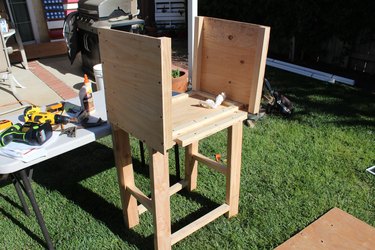
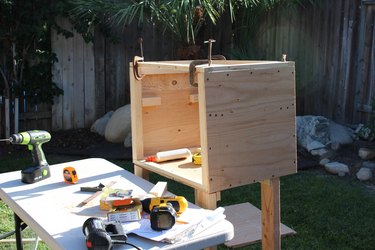
Coat the area on the bottom piece with wood glue where the side piece will attach to it. Place a side piece on the glue sitting flush and squared with the bottom piece, with the support pieces facing inside the box. Have a helper hold the side piece in place while you drill four evenly-spaced holes, using a 7/16 drill bit, through the bottom of the side piece into the bottom piece. Now drill 1 1/4-inch screws into those holes. Do the same for the other side piece. You should now have two walls of the box up as shown. It may seem like you have an overhang at the back where the ventilation holes are, but that is how it should look.
Step 8: Attach the Top of the Box
Apply some wood glue to the tops of both side pieces. Place the top piece on top of the side pieces, making sure to line it up precisely with both walls. Clamp down each corner once you have it perfectly lined up and everything is flush. Use the rotozip to carefully drill four evenly-spaced holes through both sides of the top piece down into the side walls. Now drill 1 1/4-inch screws into those holes to secure in place.

Step 9: Add the Shelf Supports
Cut four 2 1/2-inch pieces from the two-by-two to act as shelf supports. Place one of them on the inside of a side wall, flush against the front support beam and about 12 inches up from the bottom. Have a helper hold it in place while you drill two holes into it from outside of the wall using a 7/16 drill bit. Now drill 1 1/4-inch screws in those holes to secure it. Screw another 2 1/2-inch piece on the same wall against the back support beam, making sure it is level with the other one you just installed. Repeat these steps on the opposite wall.
Step 10: Add the Shelves
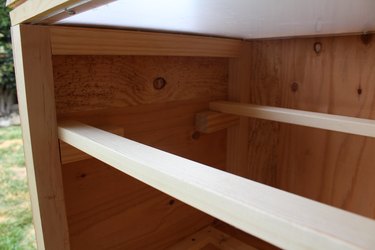
Cut two 24 1/2-inch pieces from the one-by-two to create the shelf you will place your screen on. Place them horizontally inside the box on top of the two-by-twos you just installed in the previous step.
Tip
You can also add extra shelves if you would like. Take note, though, the more shelves you add, the less ventilation you will have, which will make the top shelf a lot hotter than the others.
Step 11: Attach the Back of the Box
Line up the back piece of the box so it's flush with the side walls and bottom piece. Use a 7/16 drill bit to drill five evenly spaced holes along the bottom of the back piece into the bottom piece, and drill four evenly-spaced holes along the left and right sides into the side pieces. Drill 1 1/4-inch screws into these holes.

Step 12: Attach the Front Piece
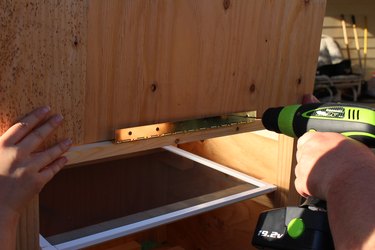
Place one side of the hinge centered along the top of the dehydrator box and drill through each of the holes using a 7/16 drill bit. Use the screws that came with the hinge and a hand screw driver -- not a drill -- to screw them in place. Now do the same with the other side of the hinge, but place it centered on the inside of the front piece. You will most likely have to hold the front piece in the open position to get a proper angle when installing the hinge.
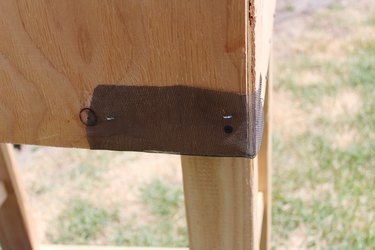
Step 13: Cover the Ventilation Holes
To prevent bugs from getting in to eat your treats, you'll need to cover up those ventilation holes at the bottom of the dehydrator box. Take the mesh screen material and cut two 4-by-6-inch pieces to cover the 2-by-4-inch holes. Use the staple gun to secure the screen material in place, making sure to pull the screen tight after each staple.
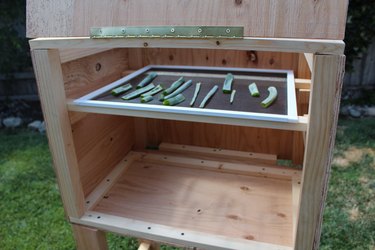
Step 14: Time to Dehydrate Food
Finally, you can place the window screen on top of the shelf inside the box and start dehydrating your favorite fruits and veggies. Spray fresh lemon juice to prevent food from turning brown during the dehydration process. When placing food on the shelves, place them far enough apart so air can get between them. Once your food is dehydrated to your liking, store your dehydrated items in plastic bags or mason jars.

Tip
If you note any cracks in the wood or parts that aren't flush, you may use a wood sealant to seal it properly, to make sure heat stays inside and bugs stay outside.