
Drivers that run printers frequently go awry. Fixing the problem is not difficult, if you know what to do. By uninstalling and/or reinstalling your printer drivers, you can get back to business.
Step 1
Click on "start" in the bottom left of your screen from the desktop. Make sure all programs are closed.
Video of the Day
Step 2
Right-click on "Computer" and select "properties" from the pop-up window. If using Windows XP, continue to Step 3. Windows Vista users, proceed to Step 4.
Step 3
XP users, click on the "Hardware" tab in the properties window. Near the top of the next window you should see a button that says "Device Manager." Click it and continue to Step 5.
Step 4
Vista users, click "Device Manager" in the top left of the sidebar in the system information window. You will most likely be prompted by Vista to continue or cancel. Click "continue."
Step 5
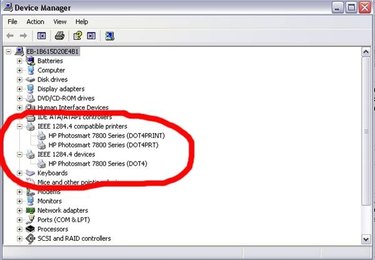
Locate your printers from the list of expandable hardware sections in the Device Manager window. Generally they will be under the IEEE compatible hardware section. If the IEEE section is not expanded, click on it to expand it. There may be more than one of these sections. You will need to locate each one. See the image here as a reference. If there is a yellow triangle with an exclamation point in it next to what appears to be your printer drivers, skip to Step 8. If not, continue with Step 6.
Step 6
Right-click on any one of your printer driver instances. Select "Properties" from the pop-up menu.
Step 7
Select the "Driver" tab at the top of the Properties window. Locate the "Uninstall" button near the bottom of the window and select it. When prompted, click "ok" to continue. This will ensure that your driver is uninstalled. Return to the Device Manager window.
Step 8
Right-click on your printer instance from the Device Manager window. It should now have a yellow triangle with an exclamation point in it next to it. Select "Update Driver" from the pop-up menu.
Step 9
Select "Yes, this time only" when prompted by the hardware update wizard as to how to update the driver. This will require an Internet connection. Click "Next." Select "Install the software automatically" and click "Next." This will automatically search the Internet for the most current driver for your printer and install it. If it installs correctly, the yellow triangle should go away and you can repeat these steps for any other instances necessary. If it does not automatically install your driver, continue to Step 10.
Step 10
Search for your printer make and model online with your usual search engine. Make sure you include the word "driver." Locate a site with a download for the most updated driver for your printer. It should be from the manufacturer's website, but you can download from any reputable location. Save it to your desktop and follow the steps for uninstalling the problem driver if necessary.
Step 11
Close everything and double-click the driver icon on your desktop. To install, you can simply hit "Enter" through the prompts. You do not need to modify the installation defaults. Once the installation has finished, your new drivers are in place.
Video of the Day