Things You'll Need
Large roll of paper (heavy or light paper will work)
Pencil with eraser
Ruler, curved and straight
Tailor's tape measure
Full length mirror to ensure accuracy while taking measurements
A basic bodice pattern is the foundation for all other patterns. Once drafted, it can be used to create more intricate patterns for more interesting silhouettes through various pattern manipulation techniques. A basic bodice pattern can also be used as a comparison tool for commercial patterns. By laying your drafted pattern over a commercial pattern, you can see what changes need to be made. But you don't have to go to fashion school to learn how to draft the basic bodice pattern. With a few measurements and steps, you can be at the top of the class when it comes to pattern making.
Measurements + Draft
Step 1

Once you've assembled all the necessary materials, you're ready to start drafting your front bodice sloper pattern. Please see the last slide for an itemized list of tools and materials.
Video of the Day
Step 2

Wearing undergarments or tight-fitting clothing (exercise/yoga attire), tie a string around your waist, not too tight and not too loose. Wiggle from left to right and let it fall where it wants to – this will establish a waistline. Standing in front of a full-length mirror, measure and record the following (make sure tape is level/parallel to floor for all width measurements):
Full length: shoulder at neck to waistline Center front length: hollow at center front neck to waistline Shoulder length: shoulder at neck to shoulder tip Shoulder width: shoulder tip to shoulder tip, measured on back, and divided by 2 Bust depth: shoulder tip to bust point Bust span: bust point to bust point, divided by 2 Bust width: from armpit to armpit (or just below). Measure around the fullest part of the chest and divide by 2 Armhole depth: shoulder tip to armpit (usually a 1/2 inch to and 1 inch below actual armpit) Shoulder slope: waistline at center front, over bust point, to shoulder tip Side seam: armhole/armpit to waistline Waist: measure around waistline and divide by 4
Step 3
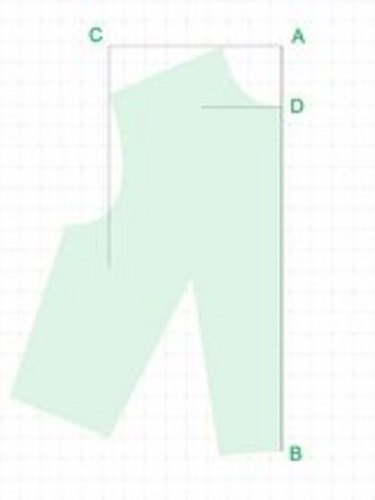
Please note, a shaded outline of the pattern has been superimposed in all steps to visually illustrate the final pattern.
A-B: Full length A-C: Square a line out from point A equal to shoulder width Square a line down from C equal to 10 inches B-D: Center front length minus 3/8 inch Square a line out from D equal to 4 inches
Step 4
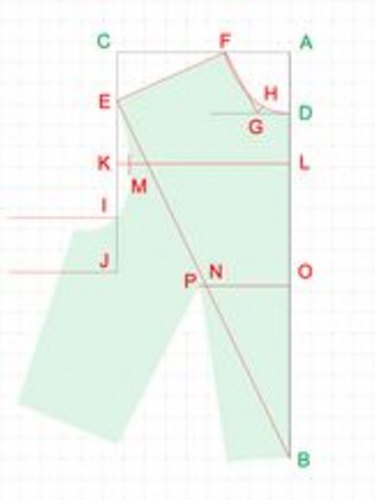
B-E: Shoulder slope with E falling on C guideline E-F: Shoulder length with F falling on A-C line Square a line down from F with line falling on D guideline and label G G-H: 1/2 inch diagonal line that is at a 45 degree angle between F-G and G-D lines Using a curved ruler, draw neckline with line passing through points F, H and D. It is okay if line does not follow F-G exactly but it is important that necklines intersects B-D at a 90 degree angle. E-I: Armhole depth I-J: 2 inches Square a line out 5 inches from I and J E-K: 1/2 of E-I K-M: 1/2 inch E-N: Bust depth (on E-B line) O-P: bust span, squared from line B-D and passing through point N
Step 5
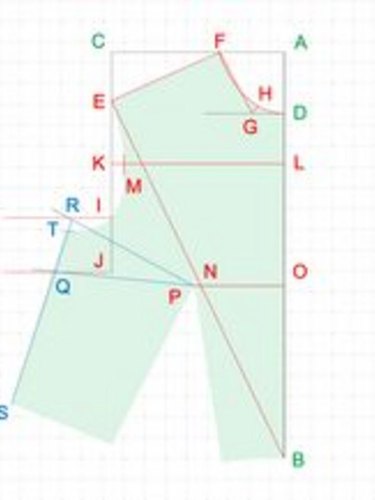
O-Q: Bust width. Draw a line from point O to point P, then pivot line upwards to J guideline and mark Q P-R: P-Q plus 1/2 inch with R falling somewhere on I guideline R-S: Side seam length with line passing through point Q R-T: 1/2 inch
Step 6
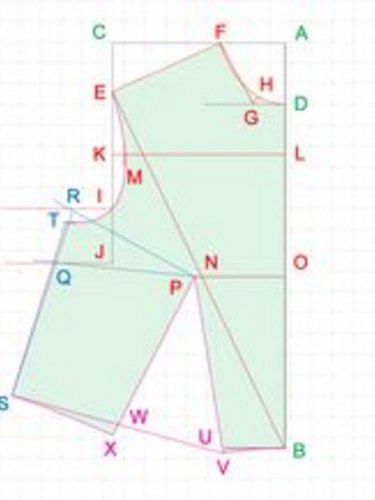
B-U: Dart placement squared from B (dart placement = 3/4 inch less than bust span) U-V: 3/16 inch squared down from U Draw a temporarily line (you may change line later) from S to V To find point W, subtract B-U from waist measurement. With this measurement, measure from point S on S-V line and mark W Draw a line from point P to point V P-X: P-V (it is okay if line extends past point W. This is where you may have to change S-V line) T-Y: 1/8 inch squared out from T Using a curved ruler, draw armhole.
Video of the Day