When you're used to paying from your checking account by debit card or electronic transfer, it's easy to get out of practice at writing checks. While online banking, direct deposit and mobile payment services are increasingly the way of the world, paper checks aren't obsolete. Brush up on your skills for the next time you whip out your checkbook, by following this step-by-step guide to required information on checks.
Enter the Current Date
Video of the Day
Before you do anything, make sure you are writing in non-erasable pen, to prevent any of the information from being altered after you submit the check.
Video of the Day
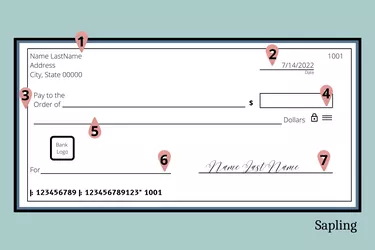
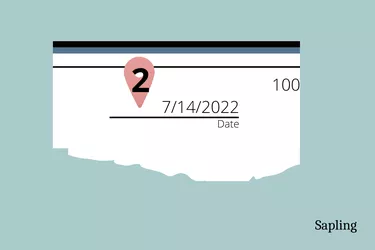
To begin, fill out the date line (image item 2) in the top right corner of the check. The date you enter will most often be the date you write the check.
If you choose to postdate a check, you will write the earliest future date you would like the person receiving the check to cash it or deposit it. For instance, if you submit a rent check early, you may want to put the date the rent is due rather than the current date.
A postdated check is legal tender as soon as it is signed, so ensure the recipient is aware of the postdate when you submit the check.
Enter the Recipient’s Name
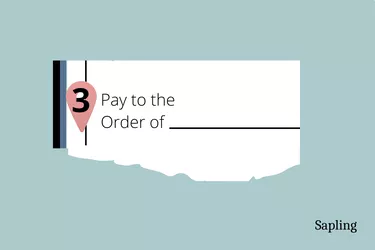
The payee or recipient name is the name of the person or company who will be receiving your paper check. Enter the payee's full name on the line (image item 3) that begins with: "Pay to the order of."
Write Dollar Amount in Numerals
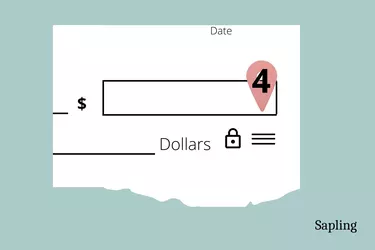
The small box to the right of the payee line is the amount box (image item 4). Enter the payment amount in numbers. Write the full dollar amount of the check, including dollars and cents. Example: $127.85.
Spell Out Dollar Amount
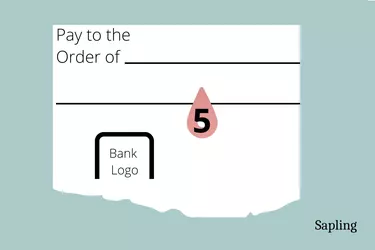
Below the payee line is another line (image item 5) where you enter that same dollar amount using words.
Spelling out the payment amount allows the financial institution to verify the dollar amount you intended to pay. This is an important step. According to the Consumer Financial Protection Bureau (CFPB), the amount spelled out in words is used when the words and numbers don't match.
The numeric amount of $127.85 used above would be written as "one hundred twenty-seven dollars and eighty-five cents" or "one hundred twenty-seven and 85/100 dollars." If the word "dollars" is already printed at the end of the line, you don't have to write it again.
Saying the number out loud can help you with this step. You can also use an online calculator to help you get comfortable spelling out payment amounts.
Use the Memo Line
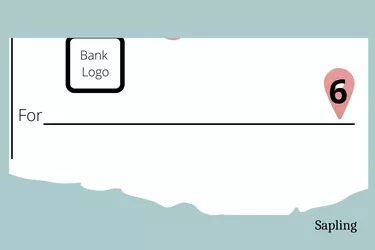
The memo section in the bottom left corner of a check (image item 6) is optional. It is a blank space where you can record what the check is for or include any additional information. For instance, if you are paying a utility bill, you can write your utility account number on the memo line.
Sign on the Signature Line
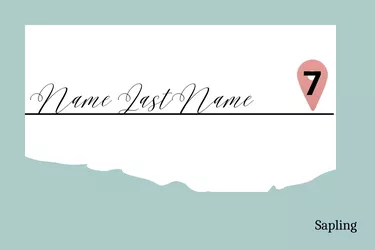
Your paper check isn't legal tender until it is signed on the signature line (image item 7). Sign your name on the line at the bottom right corner of the check. Your signature doesn't have to be in cursive, but it has to be your authentic signature and should match the one your bank has on file.
Record Payment in Check Register
There is a nearly instant electronic transaction record when you use a debit or credit card. When you write a paper check, the transaction will show up on your online banking account once the check is processed.
In the meantime, you can track your transaction in your check register by recording the check number, payment amount and payee.
Even if your checkbook has carbon copy checks, it's a good idea to use the register to do the math. That quick calculation helps you keep an eye on your account balance and avoid an overdraft of your checking account.
If You Make a Mistake
If you misspell the payee's name or write in the wrong dollar amount, you can choose to void the check and write a new one, or you can make check corrections. If it's a simple mistake, strike through the error, correct it and put your initials beside it. If it's something that will make the check difficult to read, it may be better to start with a fresh check. Some banks may return the check for illegibility and charge you a bounced check fee.
The Back of the Check
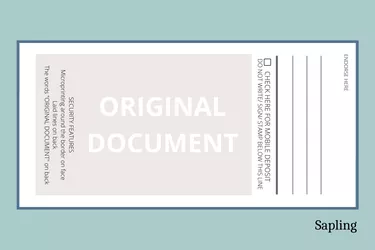
When you are the one writing a check, you don't need to do anything on the back of it. The back of the check is where the payee signs to cash or deposit your check. Signing the line on the back of the check is called endorsing a check, and the payee's signature is called the endorsement.
Deposit Into Checking/Savings Account
If you receive a check from someone else, you are the one who will endorse it. Once endorsed, you can deposit a check or cash a check at your bank or credit union or through the mobile banking app. Check with your financial institution to learn specific requirements for endorsement.
If you receive a check you would like to cash, but don't have a bank account, you can bring your endorsed check to a check cashing place to complete the transaction for a fee.
How to Order Checks
Ensure you have blank checks from your current bank or credit union with your current contact information in the top left corner (image item 1.) Your name and address must be up to date and should match your photo ID.
If you don't have current checks, contact your financial institution. There are also third-party sites that may offer checks at a lower price. When ordering checks, you'll need to know your bank's routing number and your checking account number.
You may be familiar with these two numbers, as you often need them to submit an electronic check payment. If you are ever in doubt, you can check both of these numbers via your financial institution's online banking app.
Note that if you are requested to pay for a purchase by certified check or cashier's check, these are special types of checks that you order from your bank in a separate process. Those are not checks you write from your checking account.
- IRS: Pay by Check or Money Order
- University of Notre Dame: Tax Assistance Program - Sample Check
- Office of the Comptroller of Currency: Checking Accounts: Understanding Your Rights
- Consumer Financial Protection Bureau (CFPB): [Numbers and Words for Check Amount Are Different]
- CFPB: My bank/credit union cashed a post-dated check...
- Department of Revenue: Washington State - Paying by Electronic Check
- Consumer Reports: Does Postdating a Check Prevent Anyone From Depositing It Early?
- EnchantedLearning: Checks and Checkbooks