Dropping and breaking a beloved coffee cup or mug can be upsetting, especially if it was a gift or has sentimental value. Your mug may have a small hairline crack, a large or small chip, or a broken-off handle. Here's how to repair that cracked coffee mug and possibly get it back in action.
Use Nontoxic Glue to Fix a Cracked Coffee Mug
Video of the Day
Be sure to use nontoxic glue to repair your mug. Just because it's nontoxic, though, doesn't necessarily mean that it's safe for you to drink from. Even if you use a nontoxic glue, use the mug as a keepsake or pen holder, but don't use it for drinking unless you're only repairing the handle.
Video of the Day
Warning
Wash a repaired cup or mug by hand, not in the dishwasher. Exposing your mug to the hot water and heavy-duty detergent of a dishwashing cycle can dissolve the glue and wreck your repair.
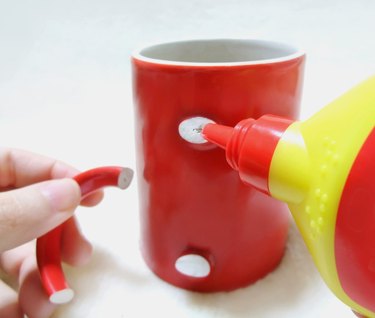
Apply the Glue to the Broken Mug
Before applying any glue, wash and fully dry the mug and any broken parts. Wear protective gloves when applying the glue to avoid getting it on your hands or accidentally cutting your fingers with any sharp edges of the mug. Read the directions on the product packaging for specific application instructions and recommended drying and curing times and allow the glue to dry or cure completely before using it. Following are general steps for repairing a coffee cup with glue:
- Gently squeeze a tiny amount of glue onto the broken pieces and then place them together.
- Wipe off any excess glue as quickly as possible so that it doesn't dry and leave any glue bumps or lines. If you don't align the pieces accurately the first time, gently realign them before the glue sets.
- Apply gentle pressure until the pieces seem firmly attached. It may take a minute or more for the glue to set, depending on the product you're using, so hold the mug as still as possible during this time.
- Set the mug in a safe place to dry overnight or even for a few days depending on the specific product instructions.
Tip
For hairline cracks in a ceramic mug, squeeze the glue into the crack from both sides of the mug. Wipe off any extra glue immediately before it dries.
Provide Extra Support for a Mug Handle
If the handle of the mug has broken off completely or you're gluing it back together, you may need to support the handle to allow it to dry securely in place. You can tape the handle to the mug with painter's tape for extra support. Simply place the tape around the handle and secure it to the base of the mug.
You can also create a small sandbox to place the mug in so that it can set properly with the sand supporting the handle. Fill a small container with sand and gently set the mug inside, adjusting it so that the handle is resting on its side and the sand is underneath it holding it in place. For both a taped and untaped handle, you can also let the handle touch the side of the container for additional support. Leave the mug in the box until it's fully cured and wash it thoroughly before use.