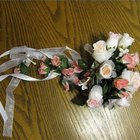
The rose is so perfect in its beauty that a simple bridal bouquet of long-stemmed roses makes a strong statement. Roses symbolize love and elegance, making them a traditional choice for many brides. Making your hand-tied bridal bouquet may sound like a job for the experts to tackle, but it is actually a simple project for the novice. You can save considerable money by doing it yourself and you will enjoy professional results with these easy instructions.
Remove the foliage and thorns from the stems of the roses. Wear protective gloves while you are doing this.
Cut the very ends of the stems at a slant and place them in a vase with warm water. Allow them to drink for at least two hours before working with them.
Choose the largest rose and hold it about 6 inches below the blossom in one hand. This flower will be the center of your bouquet.
Surround the center rose with a circle of roses. Surround that circle of flowers with another circle of roses and continue this process until you have arranged all of the flowers in the bouquet. Each circle of roses should be slightly lower than the first circle so that your bouquet has a slight dome shape to it.
Place three rubber bands around the stems, spacing one band 6 inches below the flowers, one band halfway down the stems and the last band 6 inches from the bottom.
Begin wrapping the ribbon around the stems by taking one end of the ribbon and tucking it into the stems 6 inches below the flowers. Spiral down the stems with the ribbon and back up again. Tuck the second end securely into the stems. The ribbon should be tight enough to secure the flowers and should cover the rubber bands. Make certain the ends of the ribbon are firmly anchored.
Cut the ends of the stems of the roses so that they are uniform in length. You want about 6 inches of stems extending below the ribbon.
Related Articles

How to Make Indian Wedding Garlands

How to Make a Wedding Cascade Bouquet

How to Make a Bridal Cascading Bouquet ...

How to Make Artificial Bouquets

How to Make a Cascading Orchid Bridal ...

How to Make Wedding Corsages With Silk ...

How to Design a Crescent Floral ...

How to Make Renaissance Headpieces

How to Make a Corsage for a Man
How to Make Bows for Wedding Bouquets

How to Make a Flower Scarf Fold
How to Make a Silk Calla Lily ...

How to Make a Nosegay

How to Remove Thorns in Roses for ...
How to Make a Paper Bouquet Holder

How to Make a Presentation Bouquet
How to Arrange Church Altar Flowers

Traditional Flowers & Plants for a 50th ...

How to Make Your Own Wire Cake Topper

How to Make a Large Wedding Altar ...
References
Writer Bio
In 1982, Mary Love's first book, "Shakespeare Garden," was published. She also authored professional brochures. Love was the subject of a PBS special profiling Northwestern Pennsylvania artists, highlighting her botanicals and birds. She holds a Bachelor of Science degree in art education from Edinboro University in Edinboro, Pennsylvania.
Photo Credits
PhotoObjects.net/PhotoObjects.net/Getty Images