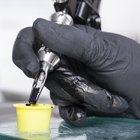
One of the most important tools a professional tattoo artist uses is stencil paper. A tattoo artist learns how to use a stencil during an apprenticeship. A tattoo stencil provides a map for the tattoo artist to follow when performing the procedure. Each line is detailed in a contrasting purple color on the skin for the artist to see and tattoo over. The stencil can withstand the wiping away of ink while the artist works and remnants of the stencil can be removed after the tattoo is finished by normal washing with soap and water.
Transfer the tattoo design onto the purple stencil paper by tracing over the design while it is placed on top of the paper. The paper that the design is on should have a purple outline of the design on the back when you are finished tracing. Trim extra paper off from around the stencil with scissors and set aside, purple side up.
Put on a pair of latex or nitrile gloves. Spray a paper towel with green soap and clean the area of skin to be tattooed. Throw the paper towel into the trash.
Shave the area with a disposable razor to remove any hair. Wipe down the area with a paper towel and green soap again. Throw the disposable razor, paper towel and gloves into the trash.
Put on a fresh pair of gloves and wet down the skin with the green soap spray bottle. Apply the tattoo stencil, purple side directly onto the skin. Smooth out any folds or bubbles in the stencil with your thumbs. Peel the stencil off and throw into the trash with the gloves. Allow the stencil to dry for several minutes before beginning the tattoo.
Related Articles
What Is Tattoo Green Soap?
How to Keep Your Tribal Tattoo Black
How to Clean the Green Discoloring on ...

Is it Safe to Get Tattoos While ...

How a Tattoo Stencil Is Made
How to Get Ink Off Fingers

How to Get Rid of Green Stuff on Glasses

Green Tea Remedy for Blackheads

How to Fix Peeling Ink on Shirts
How to Remove Crayola Paint From ...

How to Restretch a Sweater

Things That Fade Tattoo Ink

How to Remove Henna Tattoos Quickly

How to Slow Cook Brown Rice & Chicken

How to Take Care of 100% Cotton ...
How to Dye Pantyhose

How to Shrink Cotton Shirts

How Do I Clean Water Cress?
How to Take Out Scratches From Silver ...

How to Get Rid of Yellow Age Spots on ...
References
Writer Bio
Maude Coffey retired after 10 years working as a professional body modification artist in the tattoo industry. She is certified in principles of infection control and blood-borne pathogens. Coffey received additional training and classes, such as anatomy, jewelry standards and aftercare, from the Association of Professional Piercers. Coffey aims to educate about safe tattooing and piercing practices while writing for various websites.