Things You'll Need
Measuring tape
2-by-4 inch spruce wood board, 8 feet long
Table saw
Pencil
Drill
Hole drilling bit
Sandpaper
Stain
Soft cloths
Varnish
Paintbrush
4 No. 6 screws, 1-1/2 inches long
Wood glue
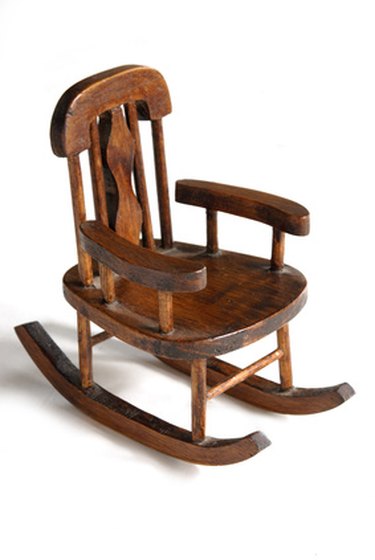
Converting a regular chair into a rocker is a surprisingly tricky process. What makes the process difficult is measuring the wood correctly so that both rockers are identical. There is a lot of measuring involved that is time consuming. This style of rockers is designed to attach to a chair that has four bottom legs like many dining chairs. To give the chair an authentic rocker look, use a chair that has arm rests.
Step 1
Cut two 31-inch pieces of wood from the spruce board. Adjust the length for the size of your chair. The rockers should extend about 18 inches from the width of the chair legs. .
Video of the Day
Step 2
Draw the outline of the rockers onto the side of the board. Make sure the angle is the same for both boards. The middle of the board should be the thickest part of the rocker, and the ends should taper to a slightly thinner measurement. Keep the bottom and top edges rounded similar to a happy face.
Step 3
Cut out the rockers with the table saw.
Step 4
Place the chair on top of the rockers. Place the front legs about 6 inches away from the front of the boards. Mark the area where the chair legs hit the top of the rocker for the front and back legs. More wood should extend behind the rocker than in front for safety.
Step 5
Measure the circumference of the chair legs. Mark a circle around the mark on top of the rocker equaling the circumference of the chair legs. Drill out the circles for the back legs about 3/4 of an inch deep. Drill out the front holes about 1/3 of an inch.
Step 6
Slide the chair legs into the rocker holes. Adjust the size of the holes as necessary to give the chair legs an even and snug fit. The seat of the chair should slope toward the back.
Step 7
Sand the rockers until they are smooth to the touch. Wipe with a damp cloth. Stain the rockers the same stain color as the chair. Work the stain into place with a soft cloth. Allow the stain to dry for two hours.
Step 8
Varnish the wood using a paint brush. Allow the coat to dry for one hour, then apply a second coat. Allow the final coat to dry for two hours before installing the rockers.
Step 9
Place the rockers over the chair legs. Flip the chair over. Screw the rockers to the chair legs using 1-1/2 inch screws. You can also glue the legs in place with wood glue if you do not want to use screws.
Video of the Day