Night vision is the ability to see well with little or no light around. Many animals have adaptations that help to make this possible, including humans. The major night vision adaptations include pupil dilation, rod cells in the eye and a special membrane that nocturnal animals possess on their retinas called tapetum lucidum. There are a few simple tests to do on yourself or to a nocturnal animal to see if night vision is present or working at the time.
Testing for Pupil Dilation
Sit in a dark space for about 20 minutes to give your pupils a chance to dilate and adjust to the dark.
Cover one eye with a blindfold or your hand and shine a flashlight at your other eye for about five minutes. Doing this in a mirror or to another person should show you a quick change in pupil size as the light is turned on.
Turn off the flashlight again and return your eyes to darkness. Take turns covering one eye and looking around, then covering the other eye and looking around in the dark. The eye that was covered during the flashlight section should be able to see significantly better than the other eye. The eye that was covered is now equipped with night vision.
Testing Rod Cells
Adjust your eyes to the darkness for about 20 minutes.
Focus on a small object in the darkness, such as a pine cone on a tree or a star in the sky. Try to notice as many details about that object as possible.
Look just to the side of that object and notice if you can see it better by focusing on it with your peripheral vision. Humans should be able to, showing that the rod cells in the eye are concentrated in the periphery of the eye, contributing to night vision.
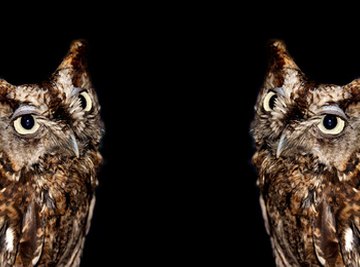
Testing for Tapetum Lucidum
- Flashlight
- Blindfold
Humans do not have tapetum lucidum, while dogs do. You can compare the two to get an understanding of what eye shines look like before testing other animals.
It takes about 20 minutes to regain night vision after looking into a light, so give yourself enough time to get it back before testing.
The experiment involving shining a light in one eye may cause dizziness afterward. If you feel dizzy, sit down and close your eyes for a few minutes to readjust to the dark before trying to walk around.
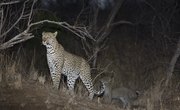
Shining lights in wild animals’ eyes may cause them to become stressed. Don’t do this near a road where they could get injured, and don’t provoke a dangerous animal to attack by continually spotlighting it.
Take an animal that you want to test outside into a dark area. You can do this on a wild animal if you can locate one.
Walk about 10 feet away from the animal and shine a flashlight at the animal’s eyes.
Watch for “eye shines,” meaning the animals’ eyes will almost glow when flashed with the flashlight. If you see eye shines, this animal has the tapetum lucidum membrane in its eyes that creates night vision. If you do not see these eye shines, the animal does not.
Things You'll Need
Tips
Warnings
References
Tips
- Humans do not have tapetum lucidum, while dogs do. You can compare the two to get an understanding of what eye shines look like before testing other animals.
- It takes about 20 minutes to regain night vision after looking into a light, so give yourself enough time to get it back before testing.
Warnings
- The experiment involving shining a light in one eye may cause dizziness afterward. If you feel dizzy, sit down and close your eyes for a few minutes to readjust to the dark before trying to walk around.
- Shining lights in wild animals' eyes may cause them to become stressed. Don't do this near a road where they could get injured, and don't provoke a dangerous animal to attack by continually spotlighting it.
Photo Credits
double vision image by Dwight Davis from Fotolia.com