
Who says money doesn't grow on trees? Money trees are tabletop branch arrangements decorated with dollar bills folded into floral shapes. They make great gifts for birthdays, graduations, weddings and practically any occasion that you want to give cash. It sure beats giving a check, especially when you want to give something more personal.
Gather Materials
Video of the Day
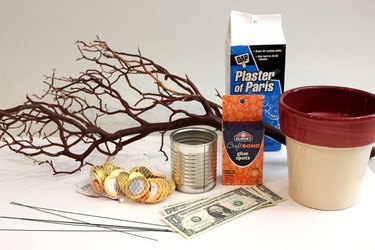
- Branch
- Dollar bills
- Chocolate coins
- Wire
- Tin can, washed
- Plaster of Paris
- Planter
- Glue dots
Video of the Day
Create the Money Flowers
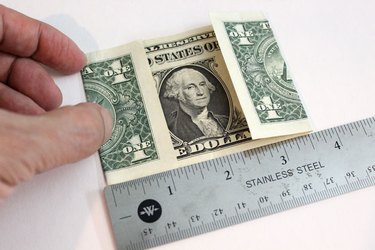
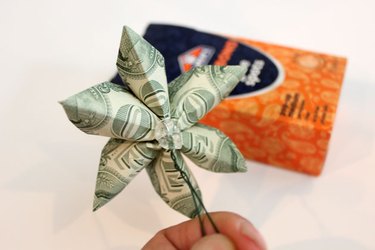
The first step in creating the money flowers is to lay the dollar bill flat with the president's image facing you. Fold the left and right edges in toward the president's image so that the folds are about 1 1/2-inches wide. Try to obtain newer dollar bills from the bank, as they allow crisper folds.
Step 1

At the four corners, make diagonal folds so they meet in the middle of the dollar bill. These corner folds will resemble the tip of a paper airplane. You should now have a six-sided bill.
Step 2

Fold the dollar bill in half lengthwise. You will now have a four-sided trapezoid that looks like a triangle with the top cut off. Repeat with two more dollar bills so you have three all together.
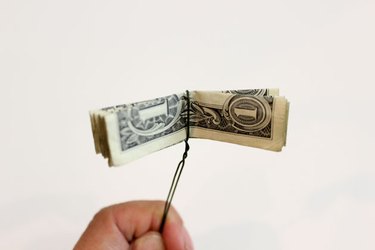
Step 3

Stack the three folded dollar bills with the narrow sides on top. Wrap a piece of wire—approximately 8 inches long—around the middle of the three bills one time, and twist the remaining wire to secure them together.
Step 4
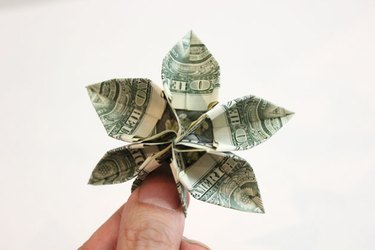
Open up the folds on either side of the middle piece of wire to create the petals of the flower. Don't be afraid to spread the petals wide. Because the wire is holding the bills in place, the petals will not come undone.
An Alternate Flower Shape

Here is a much simpler flower shape that only requires one bill. The first step is to accordion fold a dollar bill with approximately 1/2-inch pleats. There should be five pleats, with the two end folds facing down.
Step 1
Wrap a wire—approximately 8 inches long—around the middle of the folded dollar bill one time. Twist the remaining wire together to secure the bill.
Step 2

Spread the folds to create a pinwheel shape. On the bottom side, use two paper clips to secure the edges. This is why the end folds were facing down. The paper clips are hidden in the back, so when you turn the flower over, you don't see them.
Prepare the Branch
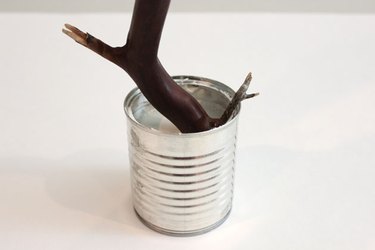
The first step is to mix the Plaster of Paris and water in a tin can according to package instructions, which is usually two parts Plaster of Paris to one part water. When the mixture is smooth, insert the branch into the Plaster of Paris. Hold the branch steady and upright until the mixture solidifies.
Note: Look for a branch in your yard (or purchase one in a craft store) that is no taller than 18 inches and has many offshoots for hanging the money.
Step 1

When the Plaster of Paris is set, place the tin can with the branch in a larger, decorative planter or vase. Cover the can with crumpled paper, squeezing the paper along the sides to keep the can firmly in place.
Step 2

Cover the crumpled paper with shiny chocolate coins. This is a fun way to finish off the planter while keeping with the money theme.
Attach the Bills to the Tree: Step 1
To attach the dollar bill flowers to the branches, use both the wire already on the bills plus glue dots. First, place a glue dot on the back of the dollar bill flower, in the center.
Step 1

Position the flower on a branch and press down, allowing the glue dot to adhere to the branch. Then wrap the wire stem around the branch to provide extra reinforcement. Now, even if the glue dot comes undone, the wire still holds the flower in place.
Step 2
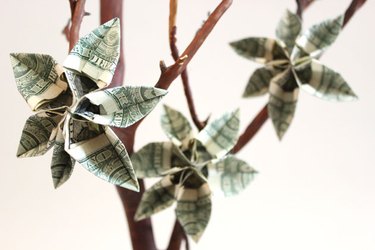
Continue adding bills to the tree. Try to have all the flowers face the same direction for a cleaner look. Depending on the size of your branch, as well as how much money you wish to give, you will need between 10 to 20 money blossoms for your tree.