
P. Allen Smith Talks About the Garden Home Challenge

Table of Contents
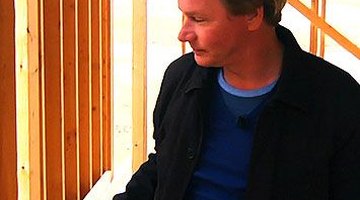
From his design and garden empire just outside Little Rock, Arkansas, P. Allen Smith advises his audience on thousands of ways to improve their lives and make their homes more beautiful.
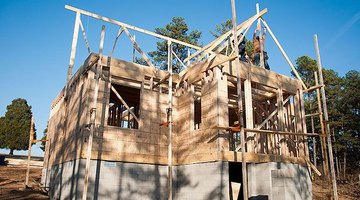
In his latest project, the Garden Home Challenge, the television host and author is hosting a web series on the eHow Home YouTube channel that documents his pledge to build a home for his brother, sister-in-law and their two children with only $150,000 for materials and labor ... and in only 150 days.
And if that's not challenging enough, Smith is also building green, to ensure that the 1,650-square-foot home saves energy and is environmentally friendly.
"There are so many poorly designed and built houses, and I just thought: Can't we do something that's green, energy efficient, stylish and uncomplicated at a price that people can afford?"
P. Allen Smith
Where did you get the idea for the Garden Home Challenge?
P. Allen Smith: I love to build things, and I love to show people how to build and transform things. Building a house that many people could afford was very appealing to me. I was also really intrigued with the idea of a challenge. There are so many poorly designed and built houses, and I just thought: Can't we do something that's green, energy efficient, stylish and uncomplicated, at a price that people can afford? The national average for home prices is in the $200,000 range, and so many people have these speculative houses that just seem hollow and soul-less. I thought, "What if we came up with a plan for $150,000 that had plenty of space, a good floor plan and some real soul to it?" I wanted to use this as almost a canvas to do something very creative by using existing materials in a different kind of way that cuts costs and raises that charm factor. People think that building a home takes a long time, like a year. But it doesn't have to take that long if you have everything organized.
Can you describe the Garden Home's look and layout?
PAS: It's got a "Southern Farmhouse Chic" look. It's 1,650 square feet, and has three bedrooms and two-and-a-half baths. There's a large common area for dining and gathering -- a sort of living room-dining room combination. There's a mud room for laundry, a kitchen, a home office, and the master bedroom has a bathroom and a large master closet, and each of the bedrooms has its own closet. There's also a front and a back porch.
What were the planning process and initial phases like?
PAS: I've always been a doodler. I'm doodling right now, actually. For about a month off and on, I created a set of drawings for the home. First it was 2,000 square feet, and then I cut it down to 1,650 square feet. I thought about things like in the bedroom, is there enough room to get into the closet that's right near the double bed? Some things I design as we go along. Then I sat down with my builder and asked him: Don't you think we can get this thing done in five months? (Even though we started building in November and had no idea what the winter would be like.) Luckily, it was a mild winter so that didn't delay the roofing. When we finally got the floor down and I saw the footprint of the house, I thought, "Wow, this will be huge," and then the walls went up and I thought, "Oh it's small." So I tried to make the house feel larger, using 10-foot-tall ceilings and really light colors on the walls and dark colors for the ceilings -- that's a decorator trick to make a room feel larger. When you are building green, you often have to wait for materials because they aren't always stocked. We tried to use as many stock materials as we could so that everyone watching could say: "I could go to my local lumber yard or home improvement sore and I could do that!" I will say that it does take a lot of personal time to shop and to save money. People need to realize that. I've taken weeks to find good deals on lumber and light fixtures and do craft projects. I'm not advocating putting up finished walls and floors yourselves, but a homeowner should be hands-on and engaged on a daily basis in the building, and that takes time. If you do it all yourself, make sure you allow that time.
What did you learn from others on the project?
PAS: I talked a lot to my construction crew. They're local guys who have done a lot of building. I asked them: "You've been building homes your entire lives, show me where people often make mistakes and how I can save money." They taught me that if you can get a good brick mason who can lay the foundation just right and be really precise, it will look so good you don't have to veneer it with brick. A member of the crew suggested going to the Habitat for Humanity ReStore that sells new and reused materials. We got our kitchen cabinets there that were brand new, but the wrong size for another house, and we got them for $500. I then showed the cabinets to my carpenter who matched it to wood we found at the salvage yard, using the same trim board. We painted them both white, so it all matched.
What other ways did you use re-purposed materials?
PAS: One of the things we thought would be less expensive and more sustainable was that instead of using drywall for the walls, we would create our own using second-grade lumber. We used pine that is locally produced that wasn't the top grade lumber, and that cut costs. Second-grade lumber is perfectly safe to build with, it has just little flaws, maybe the board is bowed or there are a lot of knots. To us, more knots mean more character. The price of using second-grade lumber and running the boards horizontally proved to be less expensive than doing drywall. We also created another form of drywall using particle board that we bought for $9 a sheet and covered in burlap for 6 cents a yard, using Elmer's glue. We painted it over, and that was my drywall. For the ceilings in the master bedroom and kitchen, we used galvanized corrugated barn tin, which is typically used for roofing. We also used scraps to create wainscoting in the entry way and wood blocks that are cut to look like stone for the entry hall. The blocks are beveled so that they look like cut stone, and that was less expensive and stylish. I got the idea from George Washington's home at Mt. Vernon, the exterior looks like stone, but was actually wood. We spent a lot of time at salvage yards. That's where I found some the cabinet doors that we used for wall paneling to go around the living/dining room. We used 16 doors that were $5 each.
What are the energy saving aspects of the Garden Home?
PAS: There are ways to isolate the heating and air conditioning in a room that can cut your energy use by 75 percent if you only heat or cool the rooms that you are in. The first step in saving money is to make sure that the house has no energy leaks. We used soybean foam insulation, and the house is very tight. We also used energy-efficient windows and doors that have the highest Energy Star rating. Someone from the energy office out here has come by to make sure we're getting it right, and at the end of the project we'll have a final test where they'll actually put a blower in the house and build up pressure in the house to see if there are any leaks. We decided not to do solar panels in the house because it wasn't in our budget, but I would love to put solar panels on the garage as maybe the next phase of this project.
What's been your favorite part of the project so far?
PAS: I'm a junk hound. I loved finding things and figuring out fun ways to use them. It was fun to be constrained by the budget because we had to figure out how to do things stylishly without breaking the bank. There are a lot of flea markets and antique malls in Arkansas, and I found an antebellum plantation desk from 1830 with a mahogany exterior that was in really rough shape. I bought it for $300 and painted it a sassy blue. I also love the fact that we used wood on the walls instead of drywall, and that we built the floors with second grade pine instead of drywall floors. I loved decorating the home, some of the art that we have is coming from programs where people who have disabilities sell their paintings, and I'm glad we're supporting causes like that.
What are some unanticipated challenges that you've faced building the Garden Home?
PAS: They were all little challenges. One was getting the plug sockets in the right place with the cabinet doors that we used as paneled walls. I should have done the math and told the electrician to put the plugs between the panels, so some of them had to go into the panels. Another big surprise was the cost of the interior doors. We went to a junk stores and found a recycled front door for $100 that was 100 years old. We thought, "Piece of cake! Easy to install." But that was just the price of the door. To complete the door, it needs to be mounted in a door frame and when you added it all up, it turned out to be $450 a door. We decided on a simpler door and had the carpenter apply our own moulding to the door and give it a simple trim. So in the end, it cost us $130 a door for eight doors using our own moulding and trimmings. Rather than spend nearly $4,000, we spent $1,000 for eight doors.
The home is for your brother, Chris, and sister-in-law, Joyce, and their children. Can you talk about what he means to you and how your background has shaped your design aesthetic?
PAS: My brother and his wife manage my farm and live on the property in another house. This will be a nice new home for them. Our father died when we were very young -- I was 12 and he was 8, and we've remained close our whole lives. I'm very much design oriented and he's very mechanical; he's a big equipment kind of guy. In addition to managing the farm, he works with the livestock and barn and paddocks, cutting hay and overseeing the garden. We both grew up on a farm and love rural pursuits, and we grew up with not a lot of money and always had to figure out how to do things in an affordable way. My mother was a great decorator and did everything on a budget. They say that the only thing worse than having lived through the Depression was being raised by someone who went through the Depression, and that was us. She had a great eye for shopping, and I learned a lot from her. Rather than reupholster, she slip-covered everything. I used that in the Garden Home Challenge. We slip-covered a couple of old chairs from the 1930s that we found. My mother was also notorious for painting sub-grade furniture, and we painted a lot of furniture in the Garden Home.
What are some easy ways that homeowners can create a green home? Any clever tricks?
PAS: The first thing people can do is make sure they are using fluorescent light bulbs in their homes. Also, try to plug all the energy leaks in your home. There are lots of things you can do, such as adding weather stripping.
Do you think you'll meet your goal?
PAS: I think so. We are very nervous though. I'm chewing my nails and getting very creative on some things. I might have gotten a little carried away with the landscaping, but I think we'll meet our goal, and they'll be moving in by the middle to end of June 2012.
Resources
Writer Bio
Lisa Chiu has been a journalist since 1998, covering everything from congressional lobbying to bee exterminators. She has worked for "The Orange County Register," "The Arizona Republic" and "The Seattle Times." Chiu holds a master's degree in China studies from the University of Washington.
Photo Credits
- Hortus, Ltd
- Hortus, Ltd
- Hortus, Ltd
More Articles