
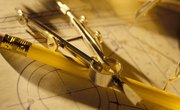
A math compass is used to draw perfect circles. The compass works with a sharpened pencil inserted into the cam lock. A sharp, pointed tip rests on the paper that the circle will be drawn on, and you rotate the top of the compass to create a circle of a certain diameter. Read this article to learn how to use a math compass.
- Ruler
- Sharp pencil
- Compass
- Paper
Use a miniature or shortened pencil whenever possible. A smaller pencil will balance out the weight of the compass more easily than a full-sized pencil. Sharpen your pencil before using the compass to create a smooth and flawless circle.
Always store the compass in a closed container when not in use. The sharp point can cause scratches and scars.
Prepare the compass. Insert the pencil into the cam lock and tighten the screw on the side of the cam lock to secure it. The tip of the pencil must be at the same height as the sharp point of the compass.
Decide on the size of the circle. The compass is extended based on the circle's radius. Use the ruler to measure exactly what the radius of the circle needs to be, then set the sharp point of the compass at that point on the ruler. Extend the pencil out to the '0' measurement of the ruler to set the size.
Draw the circle. Holding the compass firmly from the top metal safety point, place the pointed end of the compass on the paper where you wish to draw the circle. Slowly rotate the compass around so that the pencil begins drawing the circle. Do not apply any pressure to the pencil or the width of your circle will change.
Remove the compass. When the drawing is complete, lift the compass from the paper. Set the compass aside in a safe place, taking care not to touch the sharp point.
Things You'll Need
Tips
Warnings
Tips
- Use a miniature or shortened pencil whenever possible. A smaller pencil will balance out the weight of the compass more easily than a full-sized pencil. Sharpen your pencil before using the compass to create a smooth and flawless circle.
Warnings
- Always store the compass in a closed container when not in use. The sharp point can cause scratches and scars.
About the Author
Sabah Karimi is a professional Web and print copywriter. She specializes in several niches including travel, fashion, beauty, health, fitness, lifestyle and small business. Karimi has an educational background in business administration and marketing from the University of Wisconsin-Platteville.
Photo Credits
Jupiterimages/BananaStock/Getty Images