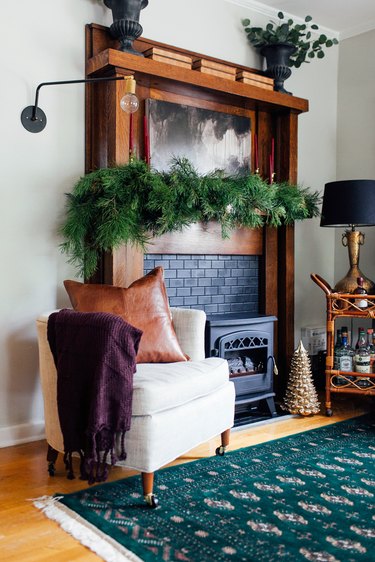
Everyone dreams of gathering around a warm fireplace with friends and family during the cooler months. A fireplace is great to have not only as a gathering place, but also as the perfect focal point in any space. Everyone deserves to have a beautiful fireplace if they wish (yes, even renters!). Follow this tutorial on how to transform an old mantel into a renter-friendly fireplace.
Video of the Day
Things You'll Need
Fireplace mantel
Free-standing electric fireplace
Tile of choice (this project uses subway tile)
Slate dome trim of choice (this project uses slate trim)
Brackets
Screws
Tip
A tile cutter can be rented by the hour at most home improvement stores.
Step 1: Locate a Fireplace Mantel
If you don't have a fireplace mantel, search Craigslist and local sales for a mantel that matches your style
Video of the Day
Step 2: Measure Fireplace Opening
Measure the height and width of the fireplace opening. Decide if you want a landing in front of the opening. If so, decide how deep you'd like it to be. For this project, the fireplace mantel opening measured 3 feet by 3 feet, so the landing was made to measure 3 feet by 2 feet.
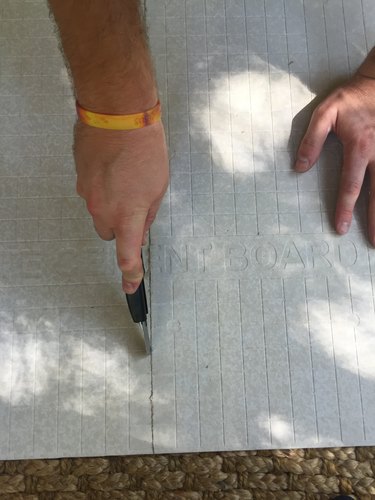
Step 3: Measure and Cut Backerboard
The backerboard should be cut to extend 3 inches past the fireplace opening (1 1/2 inches on each side). For this project, the fireplace opening measured 3 feet by 3 feet, so the backerboard was cut to measure 3 feet and 3 inches by 3 feet and 3 inches. The backerboard for the landing was cut to measure 3 feet by 2 feet and 3 inches (the extra 3 inches of backerboard is used to adhere to the back of the mantel).
To cut the backerboard, use a damp cloth to wet the line that should be cut. Backerboard has gridlines that can guide the cut. After the line is damp, use a box cutter to score the backerboard and then gently press until it breaks down the seam. If creating a landing, there should be two separate pieces of cut backerboard.
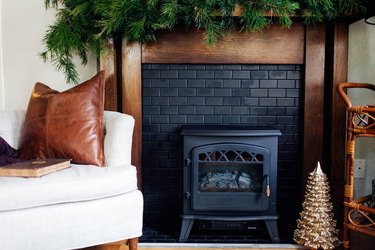
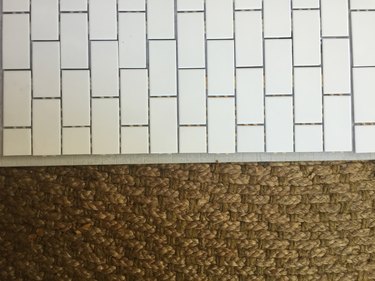
Step 4: Cut Tile Edges
After the backerboard is cut, set it to the side. The next step is to trim the tile edges to make a perfect square. Each set of tiles will have a couple of pieces that extend past the square. Use a tile cutter to cut each piece. You can rent one from your local hardware store for around $10 to $15 per hour.
Tip
Lay out all tile sets in a square to see which tiles need to be cut.
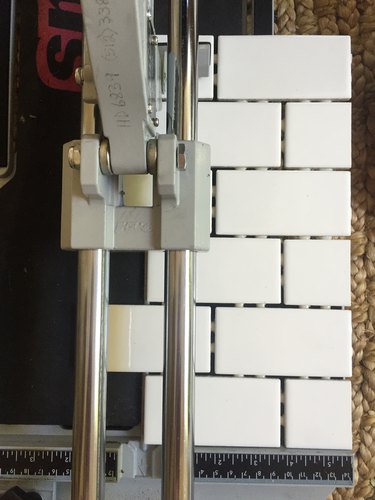
After the tiles are cut, all edges should be straight.
Step 5: Adhere Tile to Backerboard
After the tiles are cut, the next step is to adhere the tile sets to the backerboard using thin-set mortar. Use a trowel to apply thick rows of mortar to the backerboard, then lay the tile sets spacing properly with tile spacers. The tile sets will be able to be repositioned slightly after laying them. After tile sets are laid, wait 24 hours before the next step. It is very important to make sure the tile has the proper amount of time to set, otherwise it could shift or even fall off due to the weight.
Step 6: Grout the Tile
After the mortar has dried for at least 24 hours, it is safe to grout. Remove tile spacers before grouting. Use a grout float to generously apply grout to the tile. Use a wet grout sponge to clean off grout from the tile as necessary. Allow to dry for 24 hours.
Step 7: Attach the Tiled Backerboard to the Mantel
Position the landing tiled piece on the floor. The width of the landing piece should be cut to snugly fit on the floor of the fireplace opening (see measurements in Step 1). After the landing piece is in place, attach the larger tiled piece in the opening of the fireplace. Use the extra allotted backerboard to screw into the back frame of the fireplace.
Tip
Lay a larger tiled backerboard piece on top of the floor piece or use glue to adhere the two pieces together. Consider how long the piece will be in the current location when making this decision. If it will be moved any time soon, consider leaving the two pieces separate as it will be easier to transport.
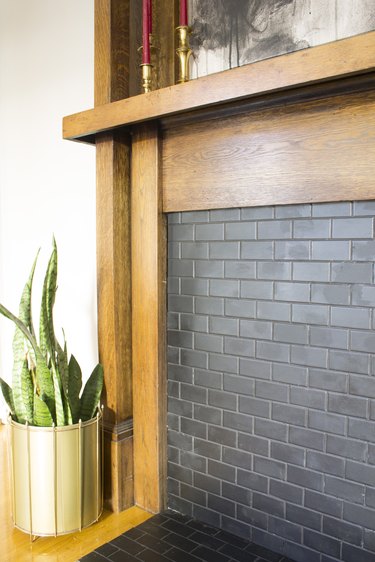
Step 8: Add Dome Trim
Once both of the backerboard pieces are in place, add dome trim around the edges of the backerboard. You can connect these using the same thin-set as used with the tile. Place grouter between each trim piece to adhere.
Step 9: Add Free-Standing Fireplace
Add the free-standing electric fireplace of your choice to the landing.
Step 10: Attach the Mantel to the Wall
Use appropriate size brackets to attach the top of the mantel to the wall. Insert screws in both the top of the mantel and the wall to ensure the mantel is properly attached.