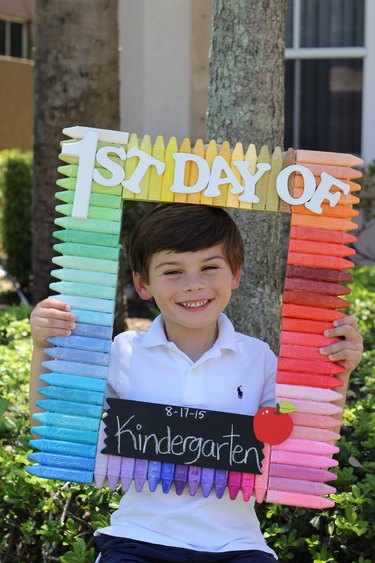
The first day of school is as exciting for parents as it is for kids, and if you're a mom who takes pictures each year of your child's first day of school, you're probably looking for a way to make it extra special. This easy back to school photo prop can be done in only 5 steps, and is a perfect summer craft to do with your kids.
Video of the Day
Things You'll Need
Laser-cut wooden frame (recommended 11-by-14 inches)
Multicolor sidewalk chalk with flat sides
Spray adhesive
Mod Podge
3-inch-wide foam brush
Small wooden letters (recommended 2 inches tall)
Large wooden number 1 (recommended 5 inches tall)
Hot glue gun
Hot glue sticks
10-by-4-inch wooden plank
Black chalkboard paint
Acrylic paints
Chalk
Apple embellishment (optional)
Big wooden letter (recommended 5 inches tall) (optional)
Tip
The small wooden letters and large wooden number will spell out "1ST DAY OF"
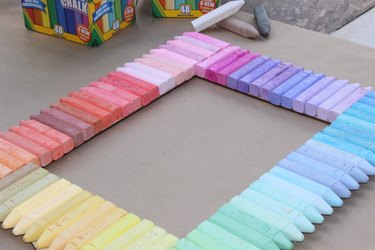
Step 1: Prepare the Layout of the Chalk
Before gluing the sidewalk chalk to the frame, decide how the chalk will be arranged. On a flat working surface, lay the laser-cut frame down and arrange the chalk pieces in the design of your choice.
Video of the Day
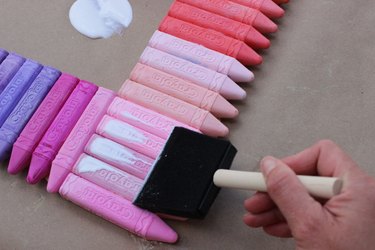
Step 2: Glue the Chalk on the Frame
Once you have your design, take 3 to 4 pieces of chalk and spray adhesive directly onto the chalk and frame. Push the chalk into the frame and hold down until secure. Repeat until all of the chalk is adhered to the frame.
Tip
Work on small sections. Glue 3 to 4 pieces of chalk at a time.

Repeat until all of the chalk pieces are glued to the frame. Allow 1 to 2 hours to dry.
Warning
Use spray adhesive in a well ventilated area.
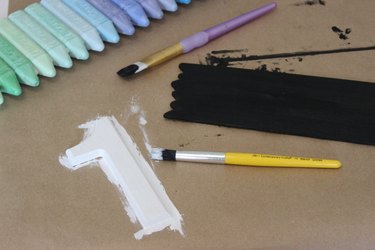
Step 3: Prepare the Embellishments
Apply 2 to 3 coats of black chalkboard paint to the small wood plank to create a mini chalkboard. Paint the wooden letters and number the color of your choice. Allow to dry completely. Using a hot glue gun, attach the apple embellishment to the top corner of the mini-chalkboard. Allow the glue to dry.
Step 4: Seal The Chalk
Once the chalk is dry and has completely adhered to the frame, use a 3-inch-wide foam brush to apply a coat of Mod Podge over the entire surface and in between each chalk stick. The Mod Podge will seal the chalk and create a glossy, protective layer that prevents chalk dust from falling off while reinforcing the previously applied adhesive.
Tip
If you don't have Mod Podge, use urethane or a clear spray paint in gloss or semi-gloss finish.
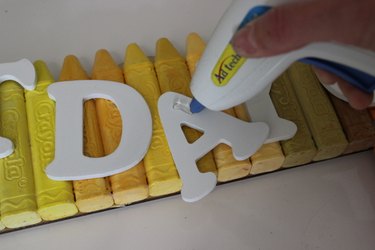
Step 5: Attach Letters and Accessories to Frame
Once the Mod Podge is dry and the chalk is soft to the touch, attach the letters and embellishments directly over the chalk sticks.
Tip
- Decide on a layout and design and lay the letters and embellishments onto the frame before gluing.
- Lift and glue down one piece at a time.
Alternative Design
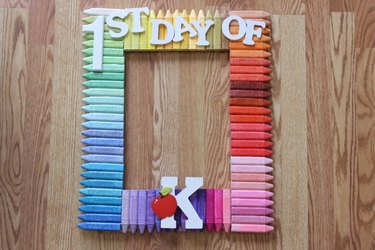
As an alternative finish, skip the chalkboard and spell the grade in wooden letters or numbers instead.
Warning
- Always keep hazardous materials and dangerous tools away from small children's reach.
- Once finished, frame will be heavy (depending on the size and amount of chalk sticks) and fragile. Handle with care.