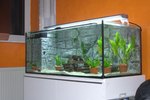
Turtles make excellent pets, though their requirements often force owners to make compromises, the end result of which is often an unhappy and unentertaining turtle. One of these requirements is housing. Turtles require a lot of ground space to be happy and are best kept outdoors. For year-round outdoor turtle keeping, there is a solution. The turtle table is a large but not unreasonable table-top vivarium, which can be simply constructed and maintained.
Necessary Materials
Gather the necessary materials for the construction of your turtle table. One turtle can be kept in an enclosure as small as 4 feet square, but a 4-by-8-foot enclosure is ideal to keep one to three turtles happy. Whichever size you choose, you will need one sheet of 3/4-inch thick plywood in those dimensions. This will be the base of the enclosure. You will need one sheet of plexiglass, cut to match the sides of your plywood base, between 16 and 20 inches high and at least 3/16-inch thick. Also obtain four 2-by-4s, 8 feet long for support. Next, obtain about five trays of various depths, not exceeding 4 inches, with lips or edges. Medium-sized cat litter trays work well for deeper trays. These will be your water, dirt and plant trays. You also need a half-gallon of polyurethane sealer, one tube of aquarium sealant, nails, flat-topped wood screws, a plexiglass cutter, a power drill with bits, a hammer, a jig saw, sandpaper, plants, full-spectrum UV lights and substrate.
Base Planning and Construction
The large piece of plywood is your base. The five trays will be the various attractions for the turtle. Place a deep tray for dirt and a shallow tray for water at one end and cut holes in the plywood using the jigsaw to fit them. If you use trays with lips and do not cut too much away, the trays will stay suspended without further construction. Place the other three trays on the other side, two at the far end and one nearer the middle. Cut these away as well. Sand all the edges, apply the polyurethane sealer, let dry and sand again lightly.
Frame Construction
Create a frame for your turtle table by placing the long boards along the edge of the base and screwing them into place from the top. Place a drop of sealer over each screw to prevent moisture loss during use. Two of the boards will be cut in half. Of these four pieces, two will serve as the shorter sides of the frame and two will be interior framing. Place these out of the way of the tray holes and screw into place. Your frame should be sturdy and flush along the sides with the plywood. Eventually you will need to place this framed base on a table or other sturdy surface.
Plexiglass Siding
Attach the plexiglass siding that will enclose your turtle table. Place the plexiglass siding along the frame and base of the enclosure. Mark holes for screws 1 1/2 and 3 inches from the bottom of the frame, so that you have two supporting screws, and make these marks every 2 feet, along all sides. Slowly and carefully screw these plexiglass sheets into the base, being careful not to go too fast, as your plexiglass will crack or your bit will melt it, both of which will require you to start over. Once secure, use the aquarium sealant to seal all plexiglass-plexiglass and plexiglass-plywood joints. Allow the manufacturer recommended time for the sealant to dry and toxic fumes to ventilate.
Final Assembly
Place the entire apparatus on a set of low bookshelves or a low table that can support the weight and allow you to reach in and over the turtle table. Place the trays in their holes, seal and let dry. Fill the deep trays with dirt and substrate mixture appropriate for your turtle. Plant some leafy, nontoxic plants in the plant trays that the turtles can use for cover or for eating. Spread a thin layer of substrate over the rest of the base. Place hollowed-out half logs inside as hiding places as you would in an outdoor enclosure. Fill the water tray, place and turn on lights to create a temperature gradient, and introduce your turtles.
Classing it Up
Use your imagination to make the finished project more attractive. By staining the frame and the edges of the base with colors that complement the decor of the room, you can make the piece look like it was meant to be there. Another alternative is the use of wooden or artificial siding material, which when attached in strips, can hide the separation between the base and the frame, as well as hiding the part of plexiglass that is screwed into the frame. Use siding of the same material of the table on which your enclosure will sit to maximize its effectiveness.
References
- University of North Carolina at Chapel Hill: Kirkpatrick, David T., Ph.D.: How to Build an Indoor Land Turtle Table
- University of North Carolina at Chapel Hill: Kirkpatrick, David T., Ph.D.: Turtle Table Materials
- University of North Carolina at Chapel Hill: Kirkpatrick, David T., Ph.D.: Figure 1
- University of North Carolina at Chapel Hill: Kirkpatrick, David T., Ph.D.: Figure 2
- Marietta College: Eastern Box Turtle Care
- Michigan State University: Care: Box Turtles
Photo Credits
-
yotrak/iStock/Getty Images

