There can be many reasons why an owner of a Canon photo printer (BJC, Pixma, "i", or "S" series printers) might want to remove the outside case of their printer - perhaps a paper clip has dropped inside and jammed things up; maybe there's a paper jam deep inside there; or perhaps they need to get at the ink tank, because they are getting an error message which says "Waste Ink Tank Filled". The latter reason is why I'm including this article as a part of the series on dealing with a filled ink tank and the fact that it has shut down your printer (see related articles below for the rest of the series). Whatever the reason, getting the case off your printer is often a mystery that ends this noble quest even before it has begun, but it doesn't have to be that way - are you ready? - let's just do it.
Step 1
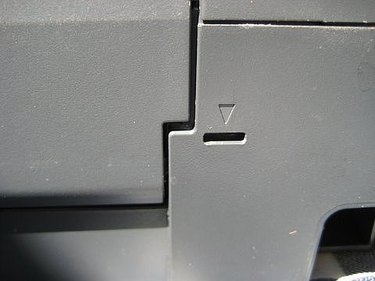
OK, first thing you need to know is that all Canon photo printers use simple clip mechanisms to secure the outside case to the printer body and tray-like base (which holds the ink tank, which isn't really a tank, but several blotters used to soak up the surplus ink not used in your text or photo - and there's a LOT of surplus ink!). And what you need to look for are small "arrow" imprints at various points of the outside of the case. Those arrows are usually sitting right next to a small, rectangular opening in the case (see the pic here). These clips can be sprung by inserting a flat bladed screwdriver into the small, rectangular slot and pushing it in (or sometimes, up or down).
Video of the Day
Step 2

Where to start? Good question. And the answer depends on which model printer you're working on. Please bear with me, but because we're talking about a lot of different printers here, there are going to be a few exceptions to these generic directions. I'll try to cover as many exceptions as I can, but I'll miss a few because I haven't worked on every Canon photo printer! Usually, you'll be starting on the back of the case to remove it. But on the Pixma models, you'll need to start by removing the side-trim first - it too is marked by an arrow imprint (lift the top door, look on the top corner of the trim, and slip the screwdriver into the opening under the trim - as the trim lifts off, it will release from the remaining clips). If you have trouble with a Pixma case, see my link to Marcus's excellent directions below under Additional Resources. Once you've sprung the first clip on the back, you may need to slip a screwdriver blade into the opening of the case there, in order to keep it from snapping closed again as you try the next clip.
Step 3
Once you've got the back clips sprung, look for the arrows on the sides. They should open just like the back clips did. On most models, besides there being two clips on the back, and two clips on the sides, there are also two clips on the front, but unfortunately, for whatever reason, Canon has often failed to mark these front clips as clearly as elsewhere on the case.
Step 4
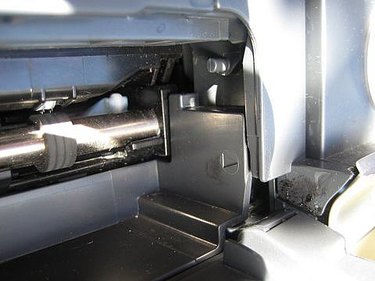
Where are the front clips found? Again, it depends on your model. If you're lucky, there will be arrows indicating where the clips are located - but don't depend on it! If you don't see any arrows, look for openings in the paper exit area, and for metal or plastic strips behind those openings - use your screwdriver to push those strips to spring the clips. There is also another kind of clip sometimes used in the front, and that one requires that you simply use your fingertips to move a flexible area of the case to release the clip - Marcus describes this kind of clip in his case removal instructions noted below in Additional Resources.
Step 5
Once all clips are loose, the case should lift straight up and off the tray-like bottom on which the body of the printer is secured. This will give you access to any foreign objects which need to be removed, or to any paper jams deep inside the printer innards. If your intent is to clean the waste ink blotters, you are almost there - see the companion article, How To Clean the Waste Ink Tank of Your Canon Photo Printer, listed under Additional Resources.
Step 6
When the time comes to put the case back on, it will simply snap back into place. Make sure that all wiring is routed back into place before trying to replace the case. Piece of cake.
Video of the Day