Things You'll Need
Ruler or tape measure
Drill and drill press
Screw driver
Carpenter square
2 6-foot 1-by-4 inch boards
2 3-foot 1-by-4 inch boards
1 3-foot 1-by-4 inch board
Hammer
Finishing nails, 2 1/2 inch
8 wood screws, 1 1/2 inch
Sandpaper
Clamps
10 screw eyes, 1 5/8 inch
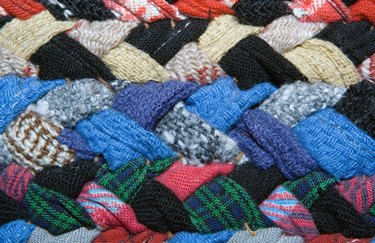
Twining is an old weaving technique that has been adapted over the last century to make rag rugs. Twining is probably the most "homemade" kind of weaving. Strips of fabric are interwoven on a simple loom to make attractive and very durable rugs. Twining uses two weft strips, woven across the warp, and completely hides the warp so that any string, yarn or fabric can be used. Often weavers use homemade looms made out of inexpensive, simple materials and built to the size the weaver wants.
Step 1
Find the center of one of the 3-foot 1-by-4 boards using a tape measure. Drill a starter hole at that point for a finishing nail. Mark a level line from one end of the board to the other, through the center hole. Drill a hole every 1/4 inch out from the center hole to the ends, so that you wind up with an even row of nail holes, parallel to the long edges of the board. Hammer a finished nail halfway into the board at every pre-drilled hole. Repeat with another board, so that you have two 3-foot boards with a row of nails sticking out of them.
Video of the Day
Step 2
Make a frame that looks like a wooden screen-door frame. Lay the two 6-foot long boards on a work bench or the floor, parallel to each other. Put one of the nailed boards at the top, across the long boards to form the top of the frame. Square up the corners, clamp the boards together, and then drill holes and drive two screws on each corner about an inch or so in from the edges to hold the boards together.
Step 3
Lay the plain 3-foot 1-by-4 board across the bottom of the long boards, square up the corners and drill pilot holes for two screws at each corner. Drive in the screws.
Step 4
Drill pilot holes for the screw eyes on the side pieces, starting a foot down from the cross bar at the top, and 1 1/2 inches in from the side. Place the holes for the screw eyes 12 inches apart down the sides of the frame, all of them 1 1/2 inches in from the outside edge. Make sure the holes on each side are exactly even with the holes on the other side. Screw in all the eye screws, except for the bottom hole on each side.
Step 5
Drill a hole 1 1/2 inches in from each end of the remaining 3-foot board with nails for the remaining screw eyes. Place the nailed cross piece on the frame and screw it in place with the screw eyes in the bottom holes. You should have a frame that looks like an old screen door frame, without the screen.
Tip
The bottom nailed board is adjustable. Use the screw eyes to put it at the right height for the length of the rug you want to make. Warp the loom by tying your warp fabric to a nail on the top crosspiece. Wind the warp fabric strip down to the bottom nail, up to the next nail on the top, down to the next nail on the bottom, and so on until the warp is as wide as you want it to be. Tie it off and begin twining.
Warning
All holes must be perpendicular, boards must be cut straight across and each board must be sanded, according to Bobbie Irwin, author of "Twined Rag Rugs."
Video of the Day