Ground bars, or ground bus bars, are metal bars generally inside of a breaker box, which is sometimes also referred to as a sub-panel or main panel. These bars are made of a series of holes with screws in them and holes that intersect each screw hole to feed a wire through. A ground bar attaches to the main ground wire, which is attached to the grounding rod outside. It is where you attach the ground wires from breakers and other devices. Installing a ground bar requires the use of some basic tools and some basic electrical knowledge.
Step 1
Turn off power to your circuit breaker box. This might require shutting off your main outside or potentially calling an electrician to shut it off at the street. Contact your local electrician for more information on how to turn off the power to your breaker box.
Video of the Day
Step 2
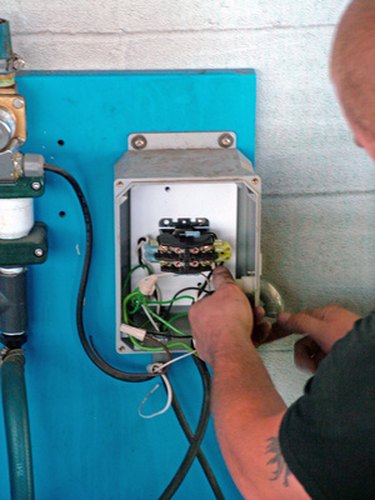
Open your breaker box or sub-panel once you have shut off power to it. Locate a suitable spot to install your ground bar. You want an area on the back wall of the breaker box without a lot of wire clutter in the immediate area.
Step 3
Hold your ground bar in place inside the breaker box where you are going to install it and mark its location with a pencil. Make sure to mark the holes where the screws will go as well. Generally, most ground bars have empty holes for mounting screws. There will be two or more holes depending on the size of your ground bar.
Step 4
Drive a self-tapping screw into the casing of the breaker box, using a drill, enough to puncture the metal. Back the screw out once it is through the metal. Do this for each mounting screw mark; it will make installing your ground bar much easier.
Step 5
Slide one self-tapping screw through a mounting screw hole in the ground bar and line up the screw with the appropriate hole you drilled in the back of the breaker box. Drive the screw until it is fully seated with a drill. Drive screws through the remaining mounting holes. Make sure they line up with the holes before driving them in.
Step 6
Loosen a ground wire screw on either end of your ground bar. Slide your main ground wire, the one from your grounding rod, through the hole on the side of ground bar at the screw you loosened. Strip the end if necessary with wire strippers. Tighten the screw back into place firmly.
Step 7
Attach any remaining ground wires from breakers or other devices as necessary. Turn the power back on to your breaker box.
Video of the Day