Things You'll Need
1/2 inch plywood sheet
Wood screws (galvanized)
Wood glue
Razor knife
Insulation knife or serrated steak knife.
Metal sheeting, stainless steel, tin or aluminum.
Metal file.
Round headed 3/4" galvanized nails
"Blue Board" 1/2" insulation board.
"Liquid Nails" adhesive for holding the blue board in place.
Silicon chalking.
Chalking gun.
Large cardboard pieces for templates, from a refrigerator box or other large box.
Three refrigerator wire shelves (can be recycled or new replacement racks
Ice drip pan for melting ice. Think cake pan or plastic tub.
8 galvanized or stainless steel L brackets to hold the ice drip pan and three wire racks in place.
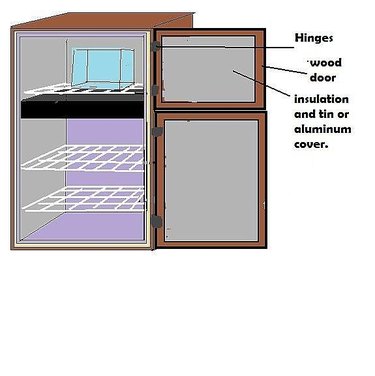
Four heavy hinges in brass or stainless steel
Two heavy duty latches
Optional: non-mercury thermometer for mounting in the ice box.
The basic ice box is an insulated wooden or metal box that holds a "block of ice" and keeps food cold. This works similar to a picnic cooler only more efficiently. The big difference is that the ice in an ice box is at the top and in a picnic cooler the ice on the bottom. Ice boxes are not generally portable. The instructions here are for a very basic working ice box.
While a cooler usually sits on the floor and the ice is placed in the bottom and the food put on top, the food is kept cold by contact with the ice.
Video of the Day
In an Ice Box the melting ice block cools the air inside the box which in turn cools the items placed on the racks. The items never touch the ice. This will keep things cooled but not frozen. You may be able to keep meat and dairy items for several days and fresh vegetables for a bit longer.
Step 1

Build a box out of 1/2" plywood. Ensure that is is wide and deep enough to fit your refrigerator wire racks. Take into account the thickness of your blue board insulation panels and the metal panels you plan to use to cover the insulation inside the box.
Build the box ensuring you glue the joints and fasten them together with galvanized wood screws (pre-drill screw holes to prevent splitting the plywood). Silicone the joints on the inside with silicon chalking material (use a thin bead) to create a tight seal inside the box.
Step 2
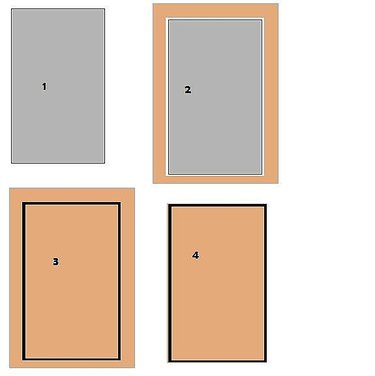
Using an insulation knife or serrated steak knife, cut your Blue Board insulation to fit the sides, bottom, top and back of your box. Test fit the panels to ensure they fit snugly (when fixed in place you want a tight insulation seal for the best insulation you can get, this will allow your food to stay cooler longer with one block of ice.
Once satisfied they fit tightly, remove your Blue Board panels. Trace the outline of each piece of insulation on the metal panel that you are using to line the Ice box.
Now starting with the back of your box, spread Liquid Nails in a zigzag pattern inside your box. Take the back Blue Board panel and do the same to it. Also put Liquid Nails around the edge of your Blue Board so that it seals when pressed in place on the plywood. Now put in place.
Do the same for the sides, top and bottom panels. Follow the instructions on the tube of Liquid Nails for application and drying times. Let dry completely before installing the metal panels.
Step 3

Now cut out your metal panels per the templates. These can be cut out with band saw or jig saw using a metal cutting blade.
Use a metal file to remove any sharp edges after cutting. Test the panels to ensure they fit tightly, trim if necessary. Once satisfied, pre-drill metal holes for round headed galvanized wood screws or nails. Install your metal back first, then add the top, bottom and sides. Seal the edges and corners with silicon chalking.
You basic cooler box is complete.
Step 4
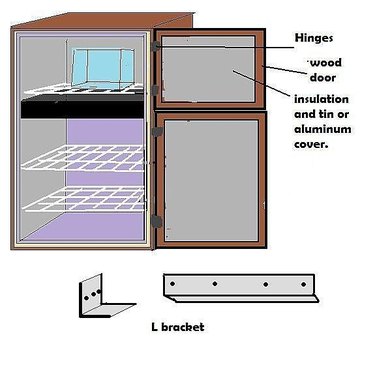
Now determine where you want to put L brackets to hold your four refrigerator wire racks. Keep in mind that you will need room for your block of ice to fit on the top rack. Under this is the rack that will hold your drip pan. Ensure that your drip pan will allow cold air to circulate around it to allow cooling in the lower part of the Ice Box.
Install your L brackets with galvanized screws.
Step 5
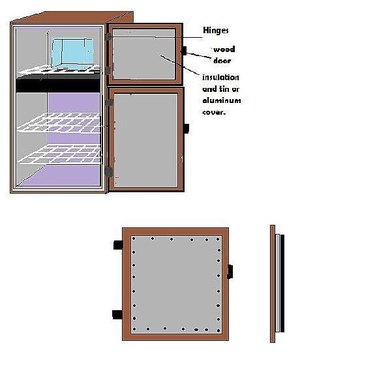
Adding the doors. Cut doors to fit out of plywood. Install the hinges and door latches so that the doors fit snug when closed. Then cut a piece of insulation to fit in the space between the insulation on the walls, top and bottom of the ice box. As above, once satisfied of the fit, use the insulation as a template for cutting out the metal insulation covers. As above install the metal panels on the doors and check for fit. Your Ice Box is now complete.
Do not cover the edging so that the door will shut tightly.
Step 6
The instructions here are for a basic working ice box. Better boxes and more efficient boxes can be built with thicker wood and insulation. Feet can be added by adding wooden corner blocks to the bottom corners. Rollers can be added for ease in moving.
A spring non mercury thermometer can be used to monitor inside temperatures.
Tip
A large single block of ice will last longer than cubed ice Milk and dairy will last only several days in a Ice Box so buy what you will use in that time. A spring non mercury thermometer can be used to monitor inside temperatures. Packed sawdust can be used for insulation instead of insulation board, its what your ancestors used.
Warning
Frozen food will defrost in an ice box. Ice boxes keep things cool not frozen check for freshness of perishables daily.
Video of the Day