Things You'll Need
1/2 yard light- or medium-weight fabric
Scissors
Tissue paper for pattern
Iron
One packet of 2-inch-wide bias tape
Elastic
1/4-inch-wide ribbon in color that matches fabric (optional)
Sewing machine
Needle
Thread
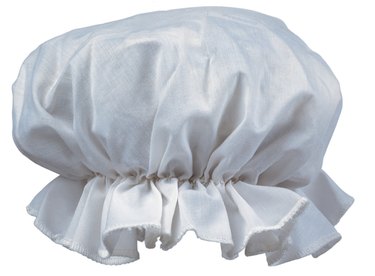
In the 18th and 19th centuries women in Britain and the United States wore soft fabric bonnets to cover their hair whenever they went out. Although most 21st-century women no longer wear bonnets outside the home, you can still buy sleeping bonnets at beauty supply stores to protect your hair at night. You can make your own bonnet from your fabric of choice to match a favorite nightgown or to add authenticity to a historical costume.
Step 1
Measure your head from the front center of your hair line to the nape of your neck, and from ear to ear across the crown of your head. Cut a tissue-paper rectangle that's about four inches longer and wider than your measurements. For example if your head measurements are 12 by 13 inches, your pattern piece should be should be 16 by 17 inches.
Video of the Day
Step 2
Trim the square edges of the pattern piece to make them round. To trim your pattern evenly, fold your pattern into quarters. Use a plate to trace a rounded line just below the open corner of the folded pattern and cut along the line. Your pattern piece should be a semicircle, so use the pattern piece folded in half. Pin the pattern to your fabric and cut two pieces. The two pieces are the front and back of your bonnet.
Step 3
Stitch the two rounded pieces together on a sewing machine with a 5/8 inch seam. Make a narrow fold about 1/4 inch wide around the entire perimeter of the bonnet and press it down with an iron. Fold and press the edge a second time and stitch the hem in place.
Step 4
Place and pin the bias tape around the hat about 2 inches from the hemmed edge. Stitch both sides of the bias to make a casing for your elastic. Leave a small opening at the end of the bias to feed in the elastic. Measure a length of elastic around the perimeter of your head, then cut it. Attach a small safety pin to the elastic and feed it through the casing. Use a needle and thread to stitch both ends of the elastic together and to close off the casing.
Tip
If desired you can use a piece of ribbon instead of elastic to gather the bonnet. Use the ribbon to tie the bonnet under your chin, or behind your neck to hold it in place.
Video of the Day